versaSRS Training
Welcome to the versaSRS Training area!
Whether you are an Administrator or a User get up to speed quickly by following one of our learning paths.
Get started now by watching the versaSRS Crash Course for an overview of the application and core functionality.
In each learning path we will drill down deeper into usage and configuration of versaSRS.
versaSRS
User Learning Path
versaSRS
Administrator Learning Path
versaSRS Administrator Training
The aim of this learning path is to educate versaSRS Administrators on how to perform common administrative tasks in versaSRS.
Prerequisites
- versaSRS Application
- User account with Administrator access
Exercises
Exercise 1 - Adding a New User
The aim of this exercise is to educate versaSRS Administrators on how to create Users and add them to Teams.
Scope
New Users
User Creation
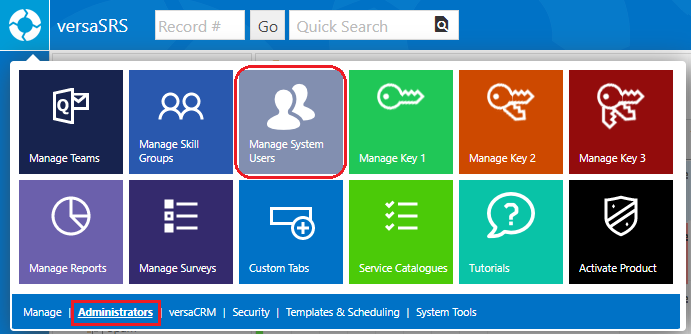
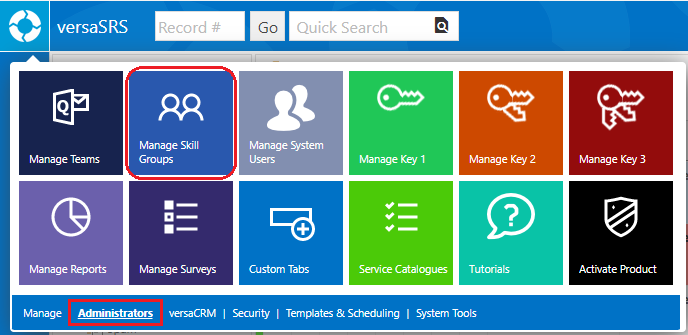
Step 1 Select Manage System Users from the versaSpinner - Administrators tab.
Select the New button on the System Users screen to create a new User.
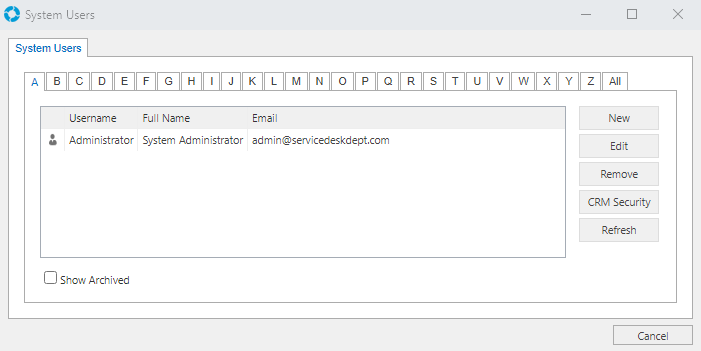
This will populate the User Details window.
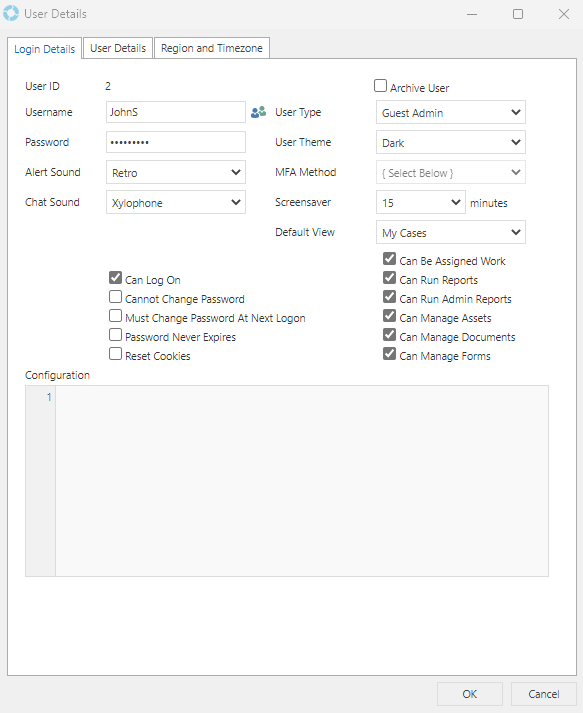
Step 2 On the Login Details tab enter the User's Username and Password.
Step 3 Select a User Type from the drop-down list then check the Can Log On, Can Be Assigned Work, and Can Run Reports checkboxes.
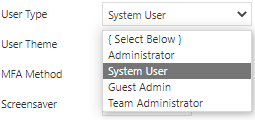
Administrator: This enables the Administrator menu options which grants access to the configuration of versaSRS.
System User: This is a general User that can be assigned to a Team and work on Cases in the system. The Administrator menu options will not be available to this type of user.
Guest Admin: This User Type will have access to the Settings cog menu options 'Activate versaSRS' and 'Check for Updates'.
Team Administrator: This User Type has Administrator privileges only for the Teams which they are assigned to.
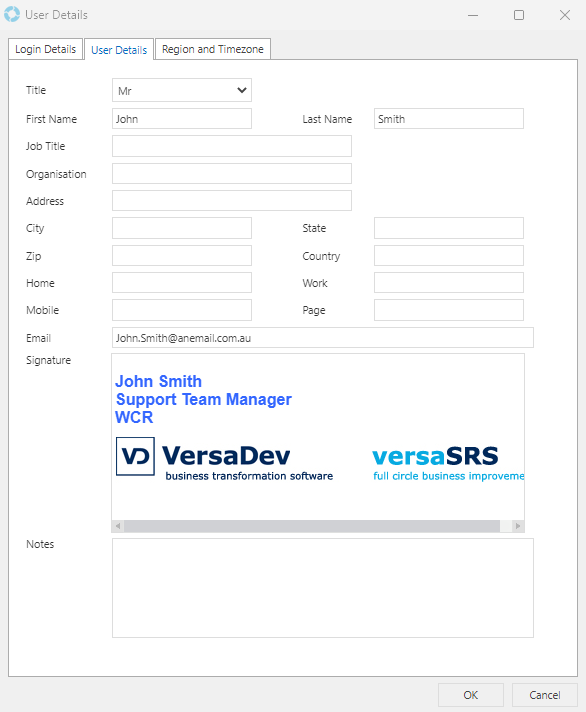
Step 4 Click the User Details tab and fill in the fields. This should at minimum include a First Name, Last Name, and Email Address.
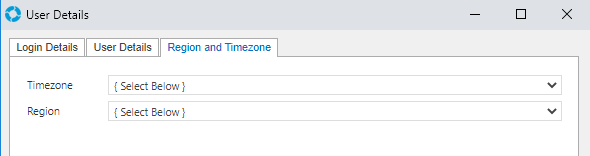
Step 5 Click the Region and Timezone tab and select the appropriate Timezone and Region that applies to the User being created.
Step 6 Click the OK button to save the User to the System.
Assigning Users to Teams
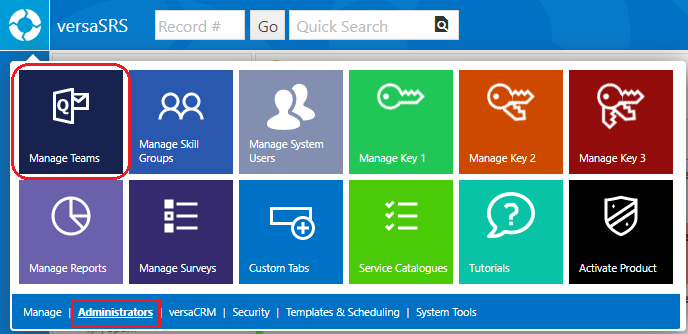
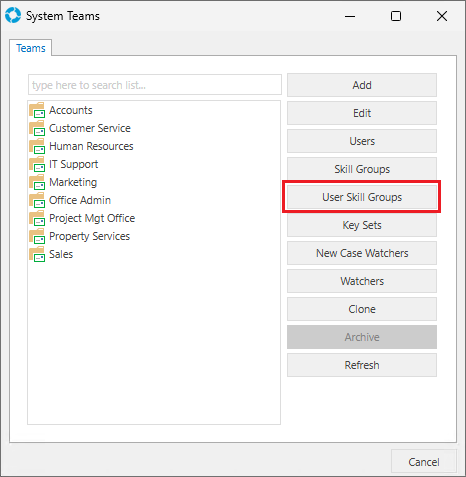
Step 1 Select the Manage Teams icon from the Administration Panel, under the Administrators tab.
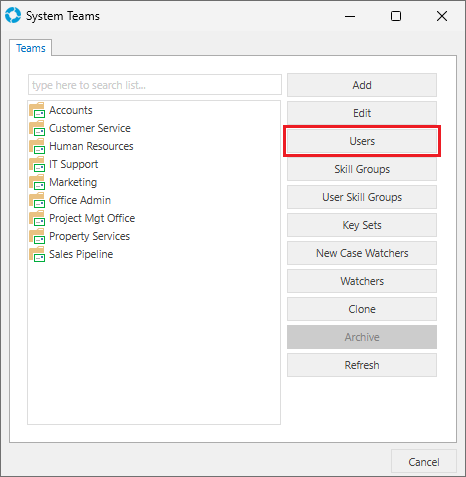
Step 2 On the Manage Teams screen select the Team that the newly created User will be added to and then select the Users button.
Step 3 On the Manage Team Users screen select the User you wish to assign to the Team and click the > button to move them to the Current Users list.
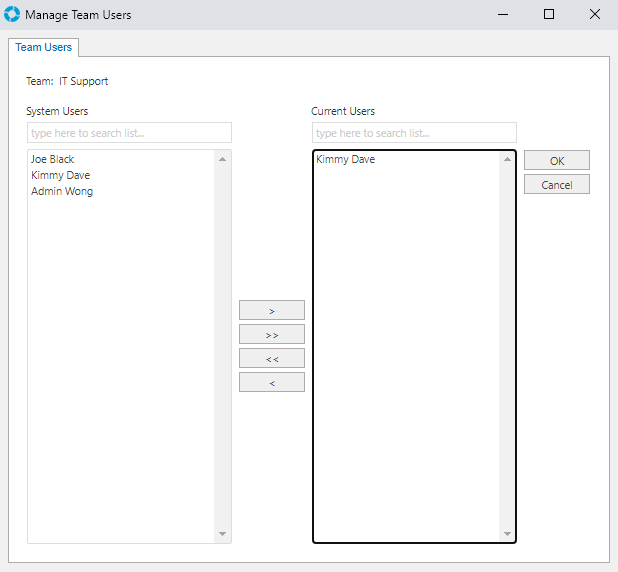
The < button can be used to remove users from the Current Users list, and the >> & << can be used to bulk add or remove all Team Users.
Step 4 On the Manage Teams screen, select the User Skill Groups button.
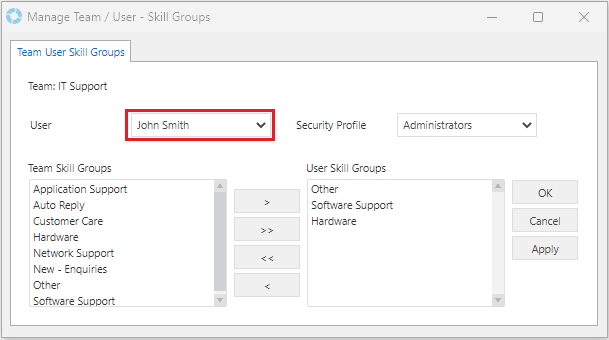
Step 5 On the Manage Team / User - Skill Groups screen, select the User via the drop-down list and the Skill Groups can be assigned by adding them from the Team Skill Groups list to the User Skill Groups list.
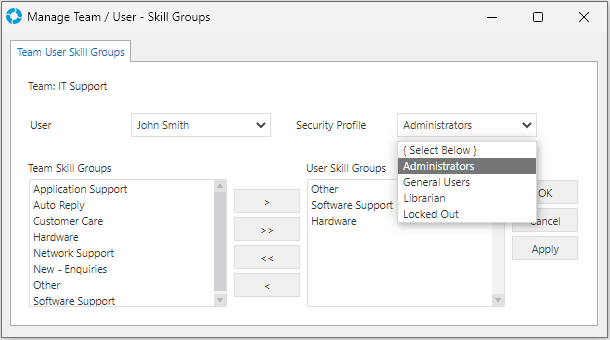
Step 6 From the Security Profiles drop-down list select one of the available profiles. If no Security Profile is assigned to the User then all the Cases in the Team will be Read-Only.
Exercise 2 - Managing Skill Groups
The aim of this exercise is to educate versaSRS Administrators on how to create Skill Groups and assign them to Teams and Users in versaSRS.
Scope
Skill Groups
Skill Group Creation
Step 1 Select the Manage Skill Groups icon from the versaSpinner - Administrators tab.
Step 2 On the System Skill Groups screen click the Add button.
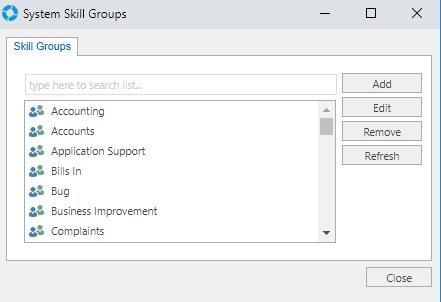
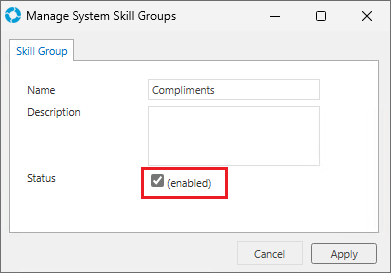
Step 3 Enter a name and description, and ensure that the enabled checkbox is checked then click OK to save.
Assigning Skill Groups
Step 1 Access the Team Settings via the Manage Teams icon through the versaSpinner - Administrators tab.
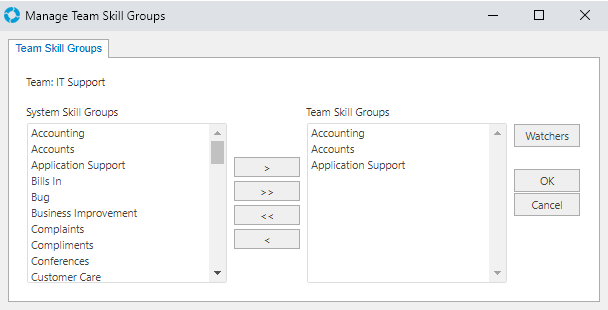
Select a Team and click the Skill Groups button.

Step 2 Locate the newly created Skill Group in the System Skill Groups list and move it to the Team Skill Groups list, click OK to Save.
Step 3 On the System Teams screen, select the User Skill Groups button.
Step 4 On the Manage Team / User - Skill Groups screen, select the desired User in the drop-down list and the appropriate Security Profile. The Skill Groups can then be assigned by moving them from the left side to the right side as needed.
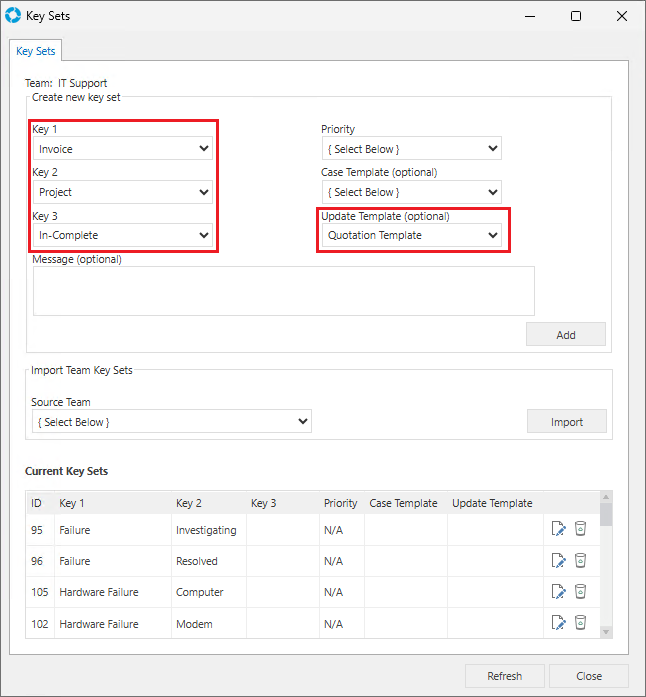
Exercise 3 - Managing Key Sets
The aim of this exercise is to educate versaSRS Administrators on how to create Key Sets and assign them to Teams in versaSRS.
Scope
Key Sets
Key Set Creation
Pre-defined Case Templates and Update Templates can be applied based on Key Set selections - making logging a Case fast and efficient.
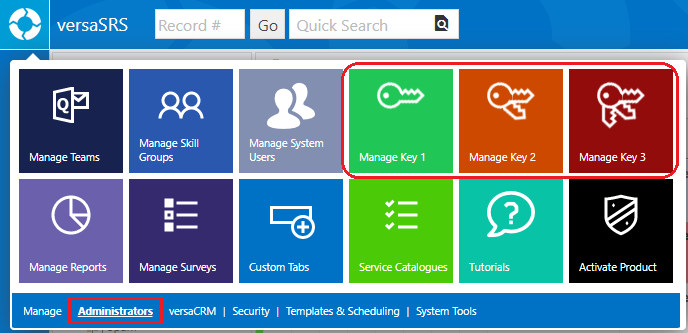
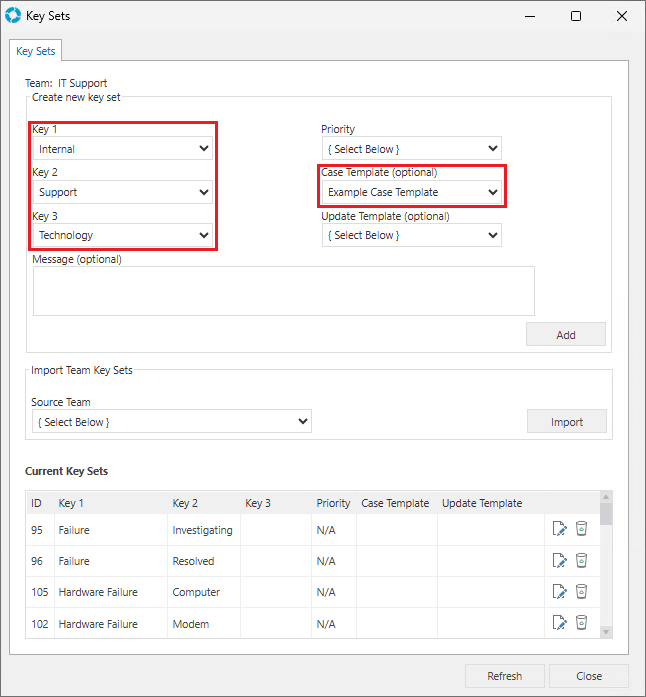
Step 1 Select the Manage Key icons within the Administration Panel and select Manage Key 1.
Step 2 On the Key Manager screen, select Add.
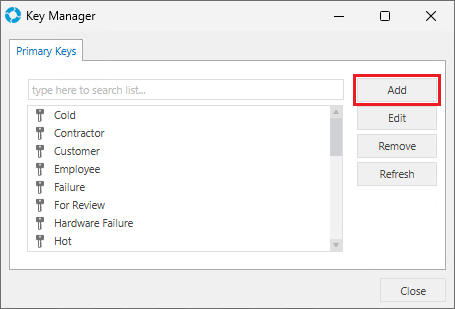
Enter the name of the Primary Key you wish to create. Ensure that a Key with the same name does not already exist, it is not recommended to repeat Key names.

Step 3 Repeat this process to add a Secondary and Tertiary key. In the next lesson these will be linked together to create a Key Set within a Team.
Assigning Key Sets
Step 1 Access the Team Settings by clicking the Manage Teams icon from the versaSpinner - Administrators tab.
Select a Team and click the Key Sets button.
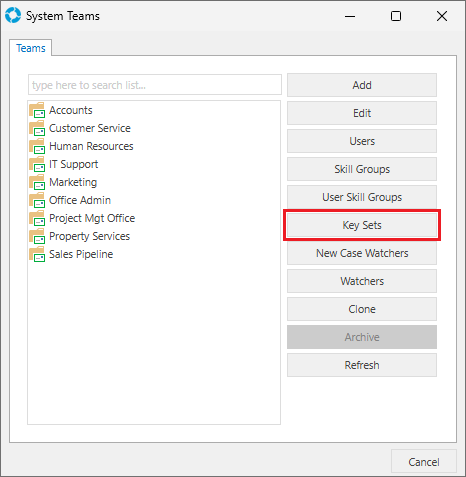
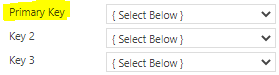
Step 2 Set the Key 1, Key 2, and Key 3 selections to the newly created Keys from the previous lesson.

Step 3 Click Add to add the Key Set to the Team.
Exercise 4 - Team Creation
The aim of this exercise is to educate versaSRS Administrators on how to create Teams in versaSRS.
Scope
Creating a New Team Part 1
Creating a New Team Part 2
General Team Setup
Step 1 Select the Manage Teams icon from the versaSpinner - Administrators tab.
Step 2 Select the Add button on the System Teams screen.
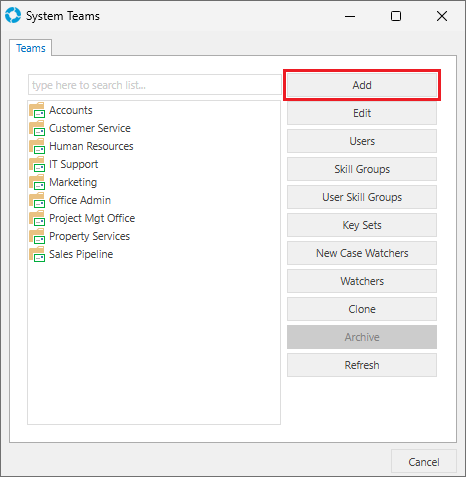
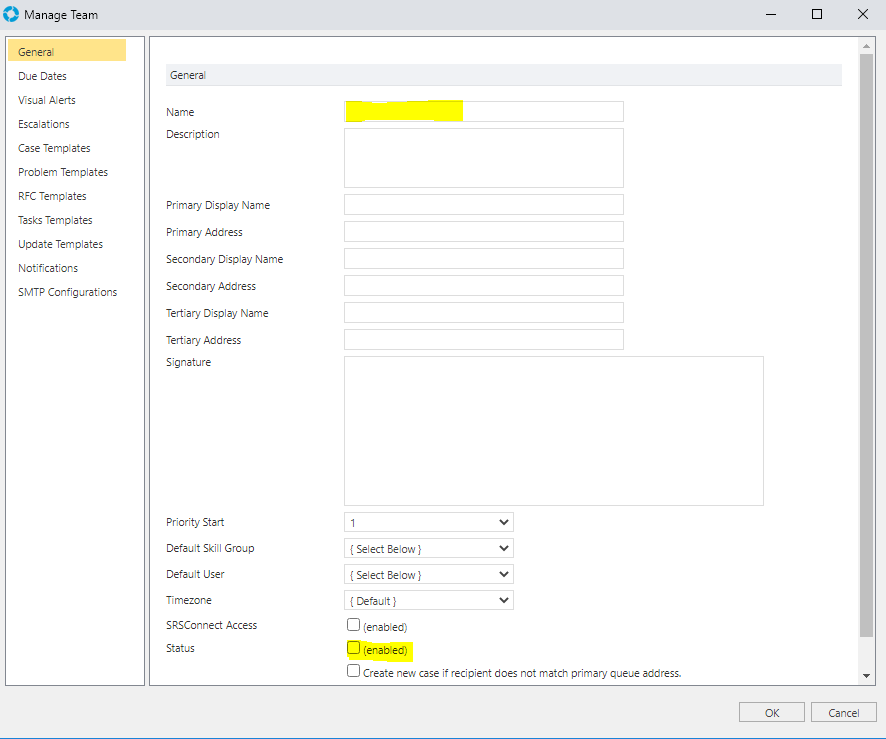
Step 3 This will launch the Manage Team screen where the Team can be setup. On the General tab, enter a Team Name, Primary Display Name, Primary Address (email address of the Team), set the Priority Start (default Priority), Timezone, and set the Status checkbox to enabled.
Due Dates
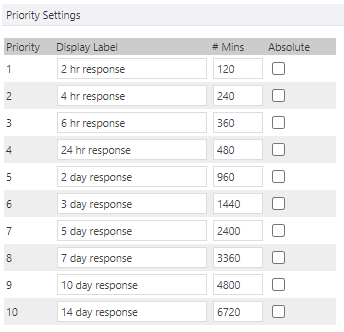
The Priority times are used to calculate the Due Date assigned to a Case. Time is only calculated within the set Working Hours, unless the Absolute checkbox is checked for a Priority.
Step 1 Click the Due Dates tab.

Start Time: This sets the start time for the Working Hours.
End Time: This sets the end time for the Working Hours.
Priority Settings 1-10 #Mins: This sets the number of minutes that the Due Date is calculated from.
Step 2 Set the Working Hours to be 8am to 5pm and enable the 'Include only weekdays' checkbox.
Step 3 Fill out the Team Priority Settings to match the image below.
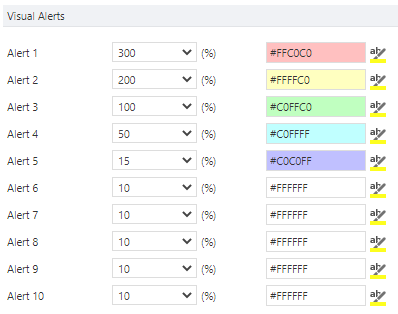
Visual Alerts
Colour can be selected by pressing the highlighted icon in the below picture or entering the colour code manually, e.g. entering #bbb displays a light grey colour.
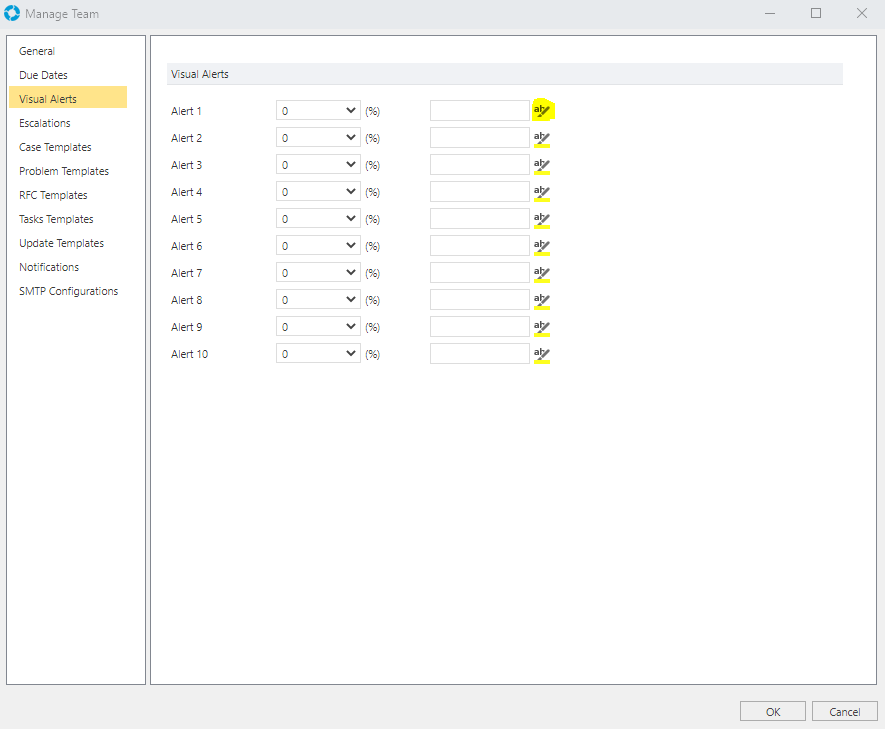
Step 1 Fill in the Team Visual Alerts the same as the below image.
Escalations
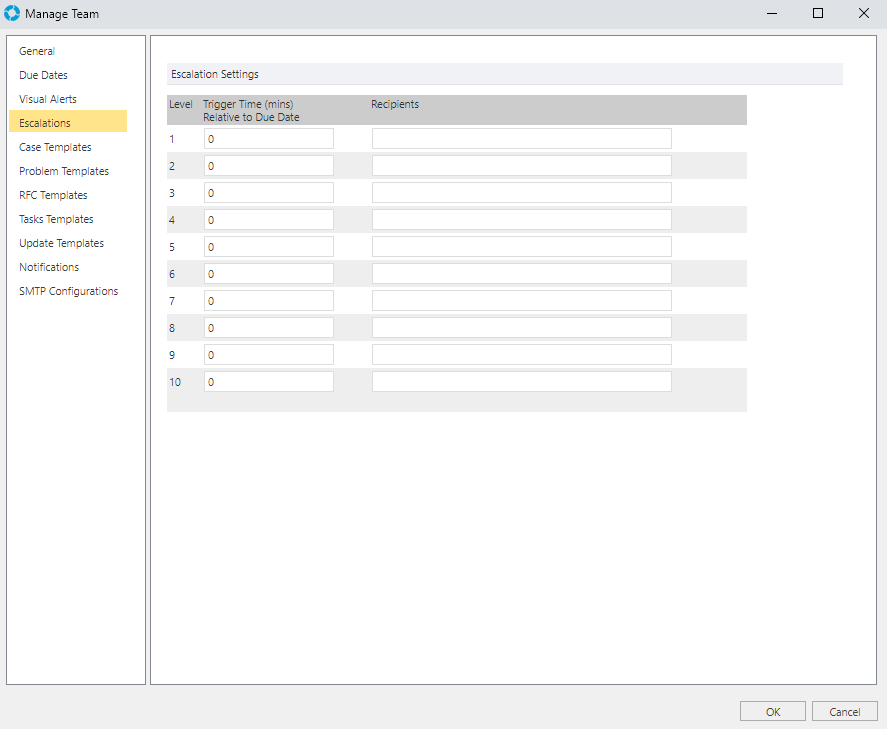
Step 1 In the first escalation level add -120 for the trigger time and add your email address to the Recipients list.
Templates
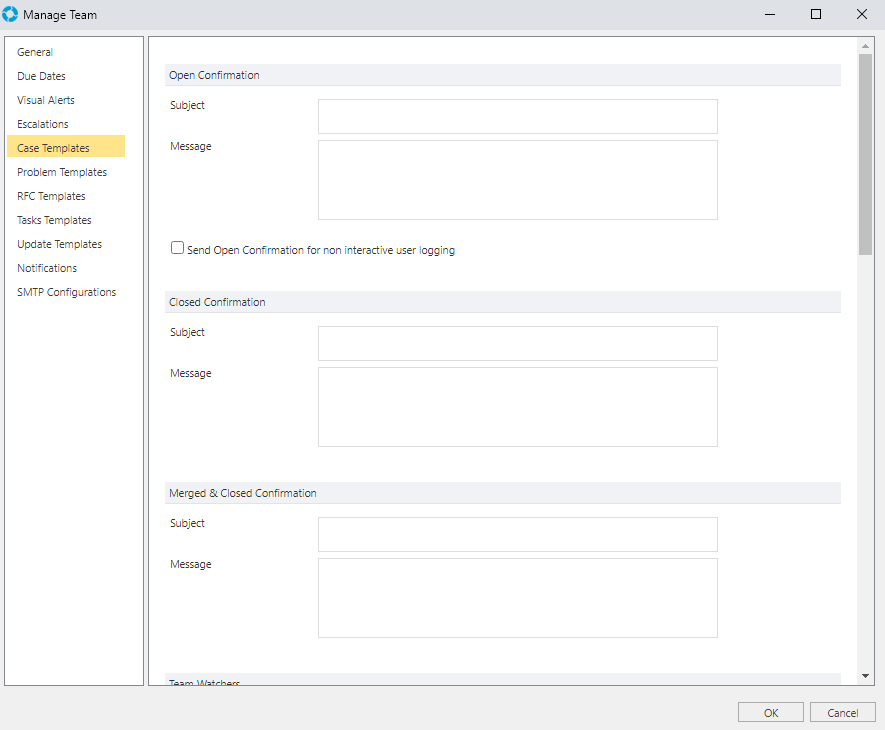
Step 1 Add your choice of content for the Subject line of the Open Confirmation template. For example: Open Case Acknowledgement: [CALLID]
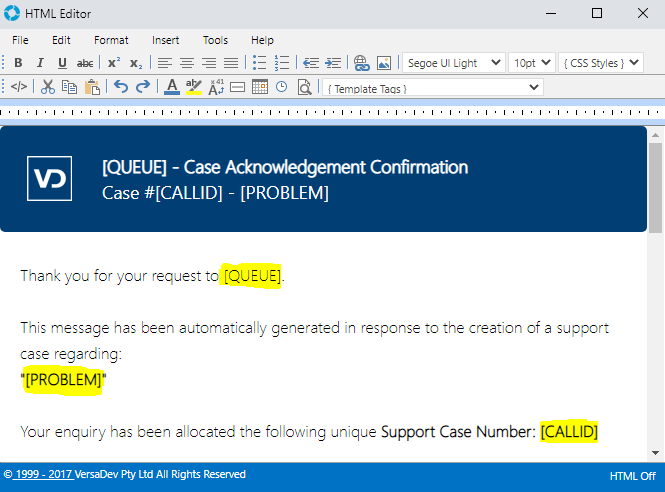
Step 2 Double click the Message box to display the HTML editor. Add some text here which will be the email body of the Open Confirmation email. Select File >> Save & Exit to Save the template.
For example, double click the Message field and add the below pictured text into the HTML editor.
Step 3 In the Open Confirmation section, check the "Send Open Confirmation for non interactive User logging" checkbox to enable the notification.
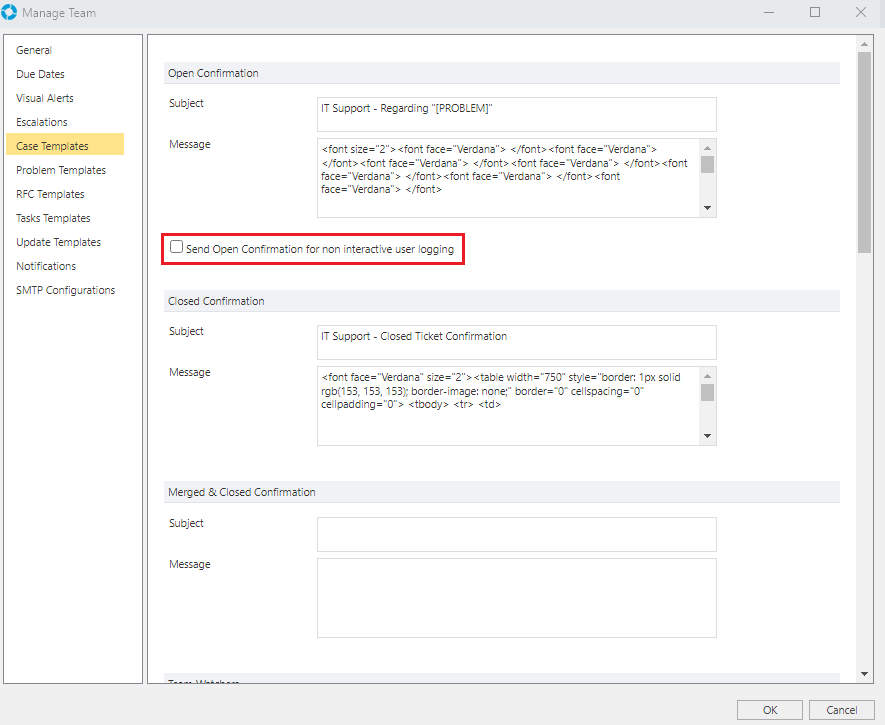
Step 4 Add a Subject and Message for the Closed Confirmation template to create the automated response to be sent when a Case is Closed.
Step 5 Click the Update Templates tab.
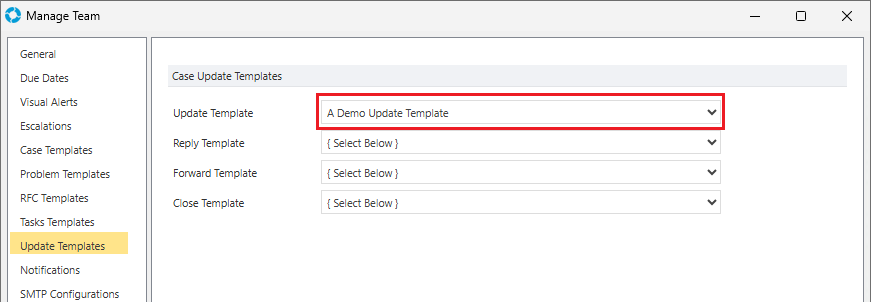
In this example, the selected Case Template will be used when performing a Case Update via the Right-Click Menu 'Update' option.
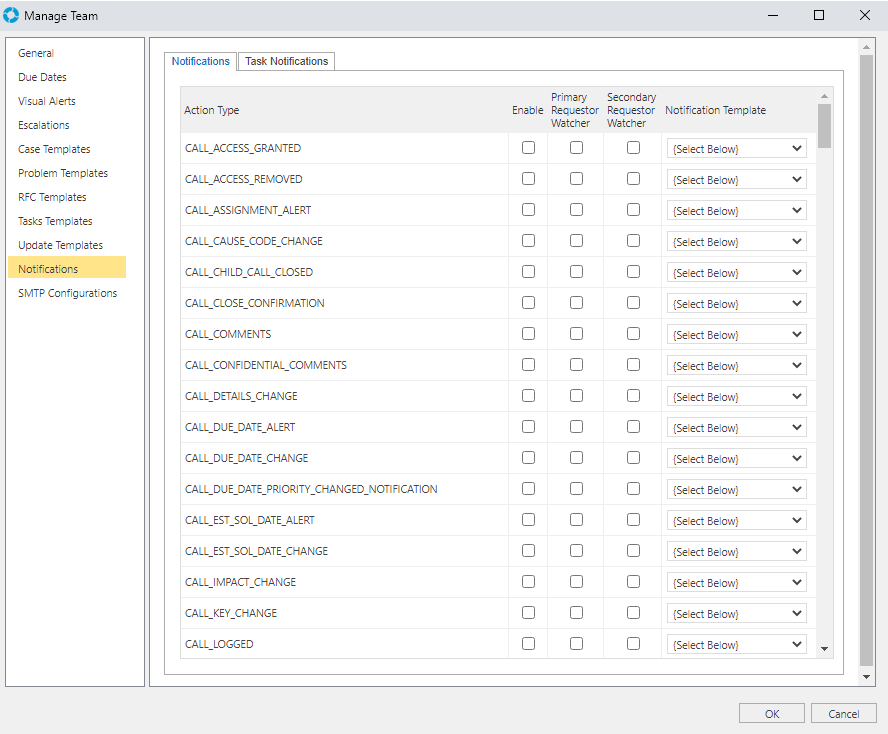
Step 6 Click the Notifications tab.
Team Email
Step 1 Enter the settings for an email account by filling in the fields on this tab. The example given below is based on an Office365 account.
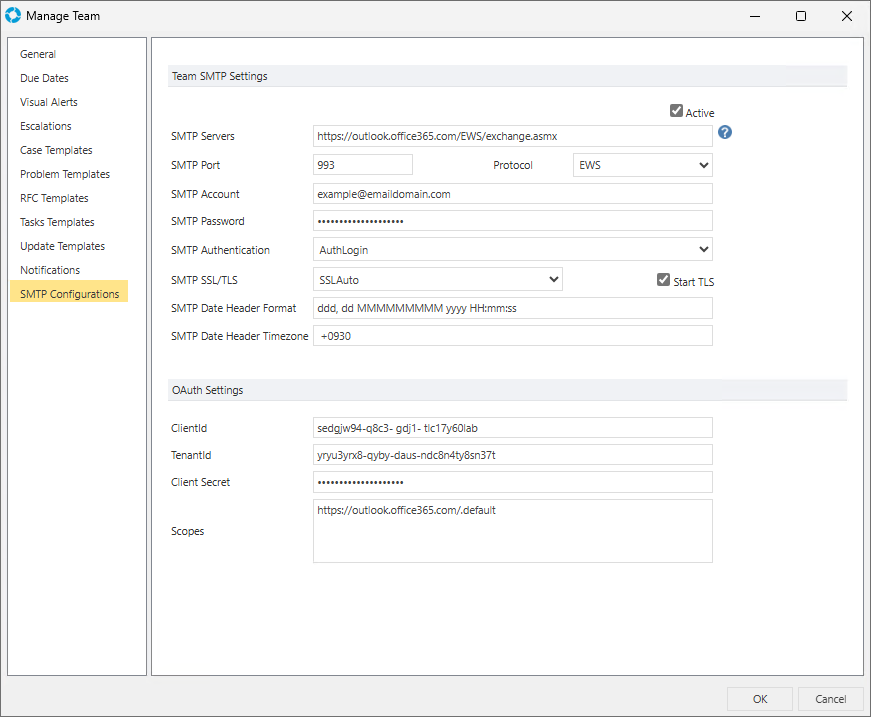
SMTP Server: Name or IP address of SMTP server. Example 1: localhost Example 2: 127.0.0.1 Example 3: ACMEEX
SMTP Port: Port number of SMTP Server
Protocol: Defines the mailing protocol to use for sending emails from this Team
SMTP Account: Defines the Account/Username to be used when SMTP is enabled for an individual Team
SMTP Password: Defines the Password for the SMTP Account/Username
SMTP Authentication: Governs whether SMTP is enabled or disabled and the type of authentication
SMTP SSL/TLS: Defines the security encryption protocol to use when sending emails
Start TLS: Enable SMTP SSL / TLS (Only Applies if SMTPSSLTLS Is Not "None")
SMTP Date Header Format: SMTP Date Header Format ("ddd, dd MMMMMMMMM yyyy HH:mm:ss")
SMTP Date Header TimeZone: SMTP Date Header Time Zone (" +0930" (Note: the white space prefix)).
ClientId: Defines the ClientID used by the SMTP Account, sometimes referred to as the ApplicationID
TenantId: The Azure Active Directory to connect to when using Office 365
Client Secret: The secret password generated for the corresponding ClientID
Scopes: Available scope(s) used to limit versaSRS's access to the email accounts
Exercise 5 - Templates
The aim of this exercise is to educate versaSRS Administrators on how to create and use Case Templates and Update Templates in versaSRS.
Scope
Case Templates
Case Templates have been integrated into versaSRS configuration to provide automation where possible.
Case Templates - Create and Edit
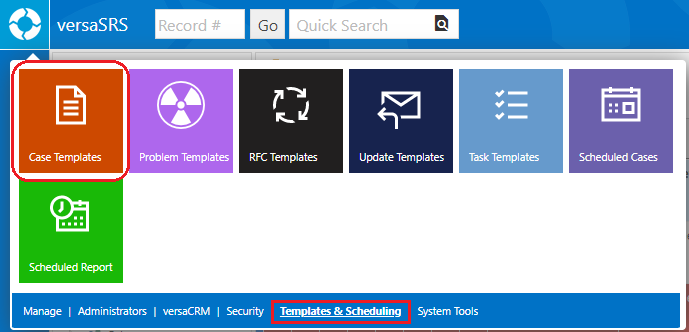
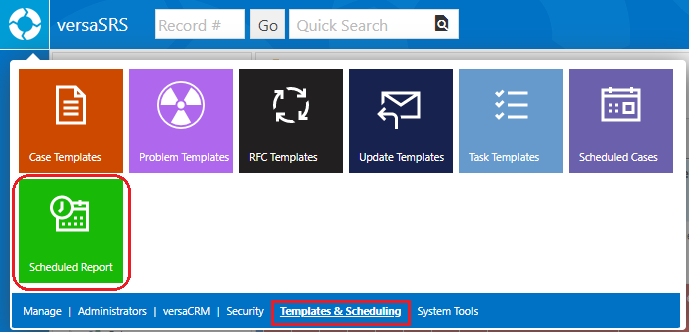
Step 1 Select the Case Template icon from the versaSpinner - Templates & Scheduling tab.
Step 2 Click New to launch the Case Template Properties screen, here you can enter a Subject and the Details of your choice in the corresponding fields.
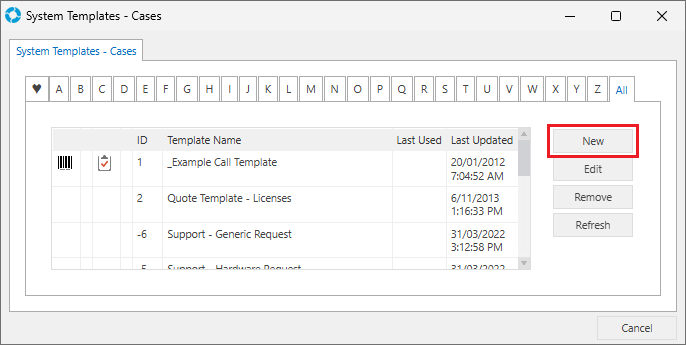
In the Template field ensure you enter an appropriate display name to identify the Case Template and differentiate it from existing ones.
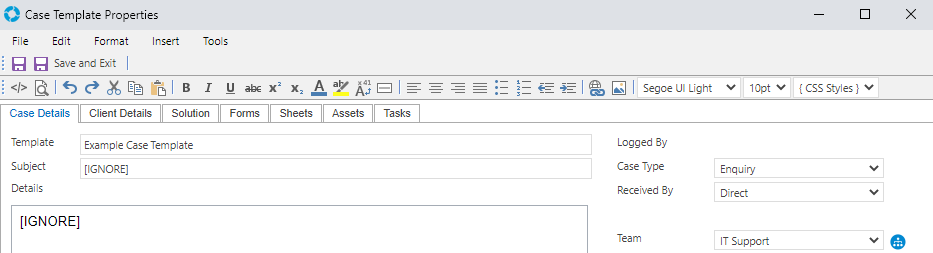
Step 3 On the right side select the Team that the Template will assign the Case to and any other categorisations you need to set. Select Save and Exit to Save.
Case Templates - Cases
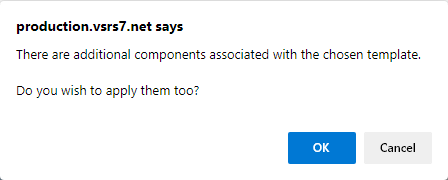
Case Templates - Key Sets
You will be prompted with a message about applying the associated Case Template for the selected Key Set. Select OK to apply the Template.
Case Templates - Scheduled Cases
Case Templates - Routing Rules
Note: You will learn more about Routing Rules in Exercise 7.
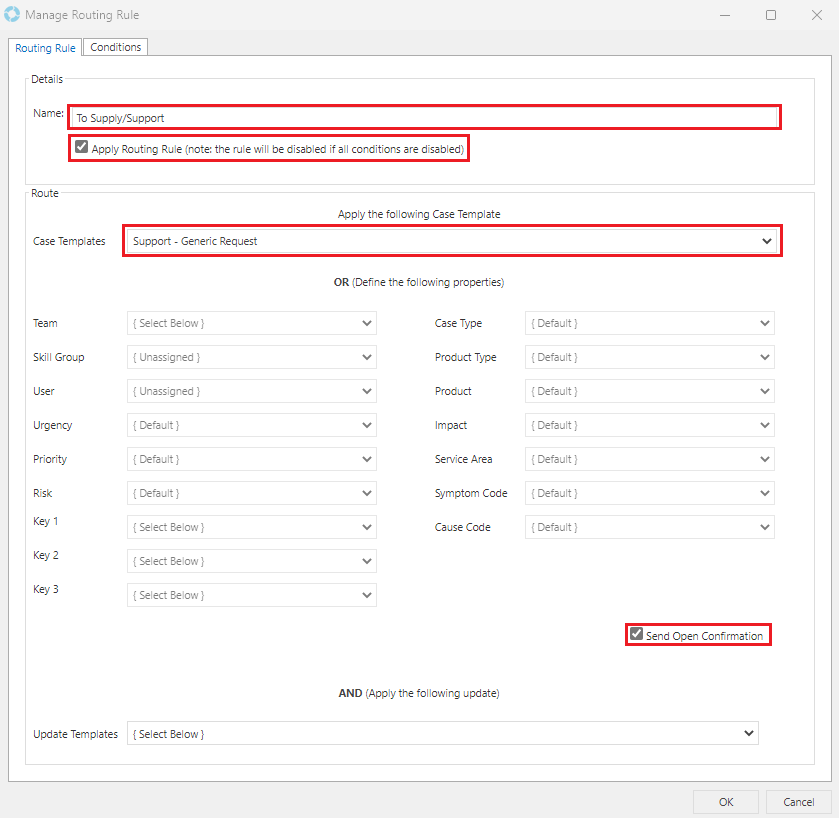
The below example searches for the keywords support and supply, this Routing Rule will be triggered by any incoming email containing one of these keywords in the subject line.

Case Templates - versaForms*
*versaForms is included with an Enterprise license and is available to be purchased additionally for all other license types. Please Contact Us for further details.
If you do not have the versaForms module, click here to jump to the next exercise.
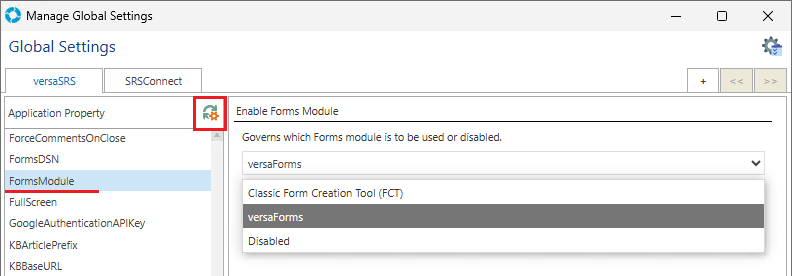
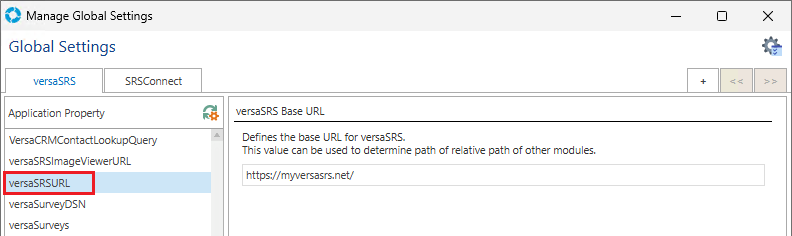
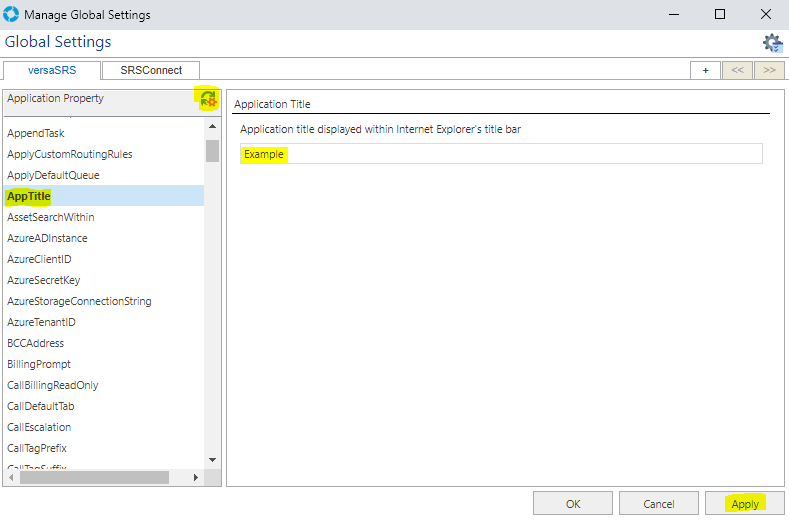
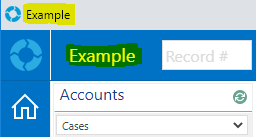
 , located on the top left of the Global Settings as shown in the above picture. It is crucial to reload the Global Settings after any changes are made to them, this ensures the changes are reflected in versaSRS.
Note: Reloading the Global Settings breaks all current, logged in User session(s) we recommend performing reloads outside of regular business hours.


 on the top left of the versaForm Library to create a Form.

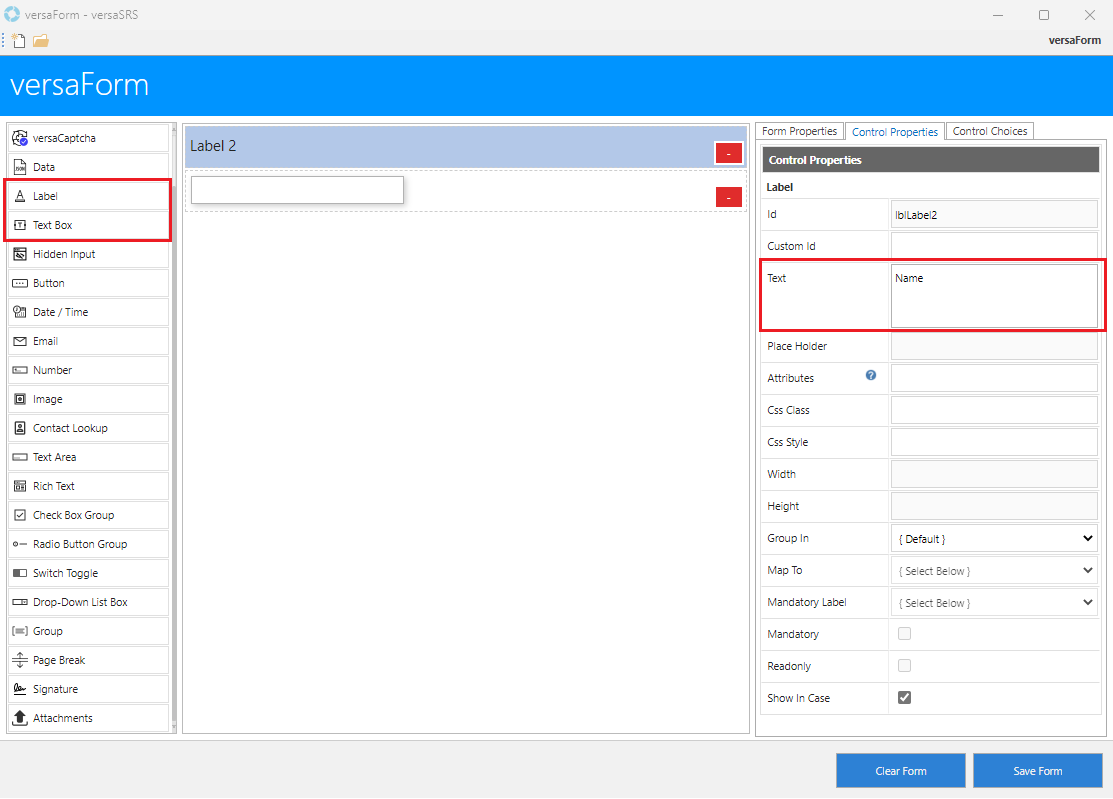
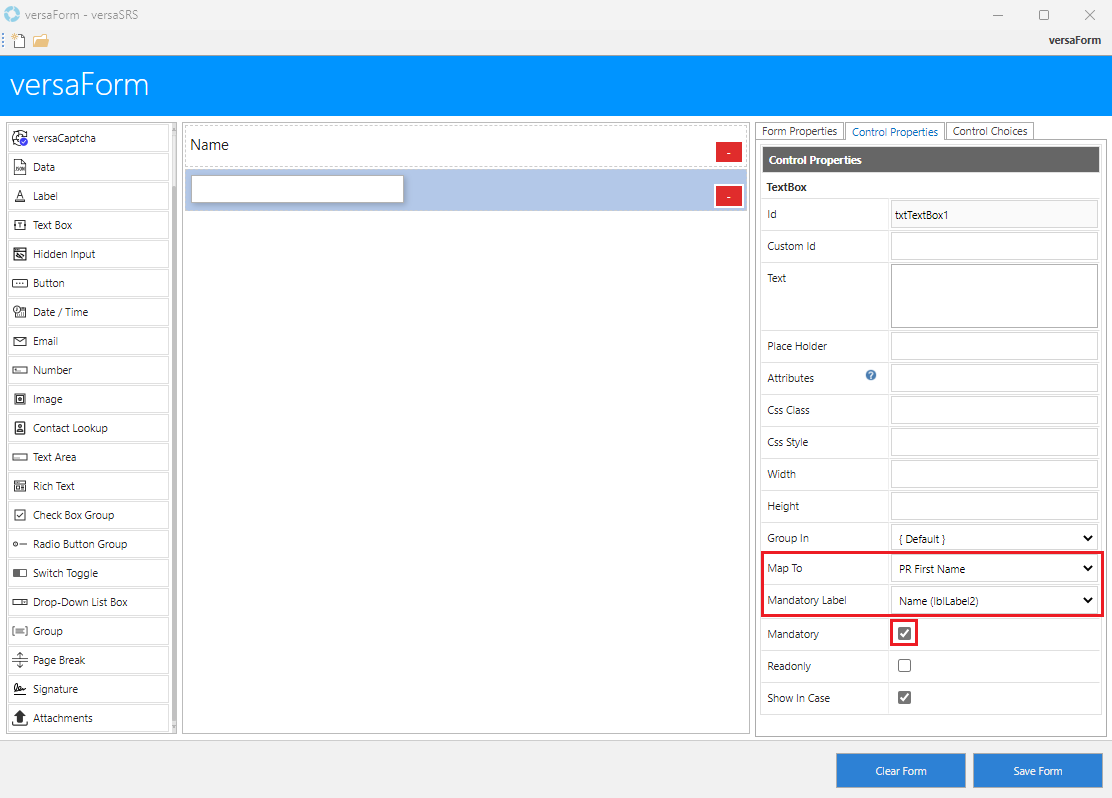
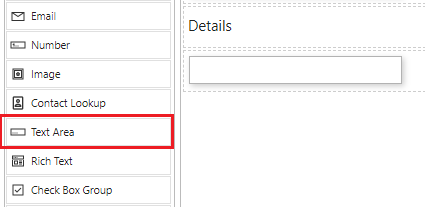
Selecting a Mandatory Label from the drop-down results in that label displaying a * denoting it is mandatory.
Mandatory Labels and Map To settings:
- Name - PR First Name
- Email - PR Email
- Subject - Subject
- Details - Details
 on the top left of the versaForm window to return to the versaForm Library. The created versaForm will now show in the list, select Review & Complete to view the versaForm.


Update Templates
Update Templates - Create and Edit
Step 1 Select the Update Template icon from the versaSpinner - Templates & Scheduling tab.
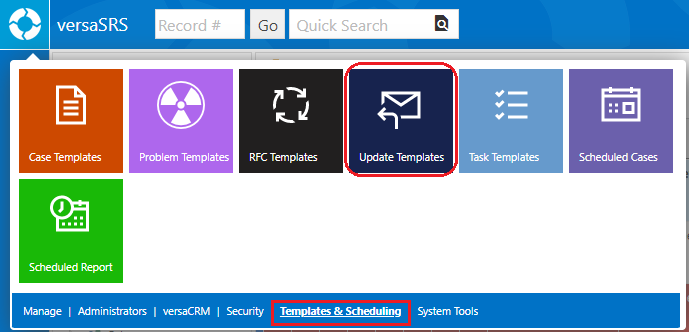
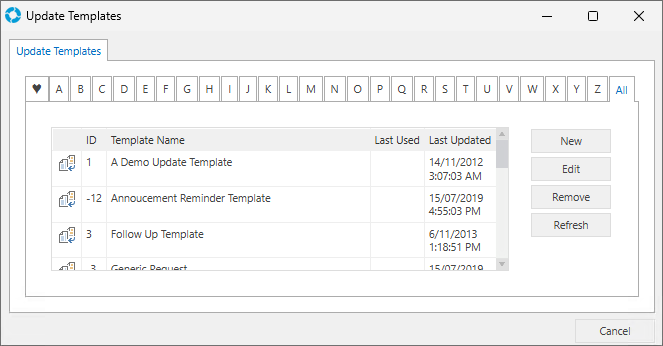
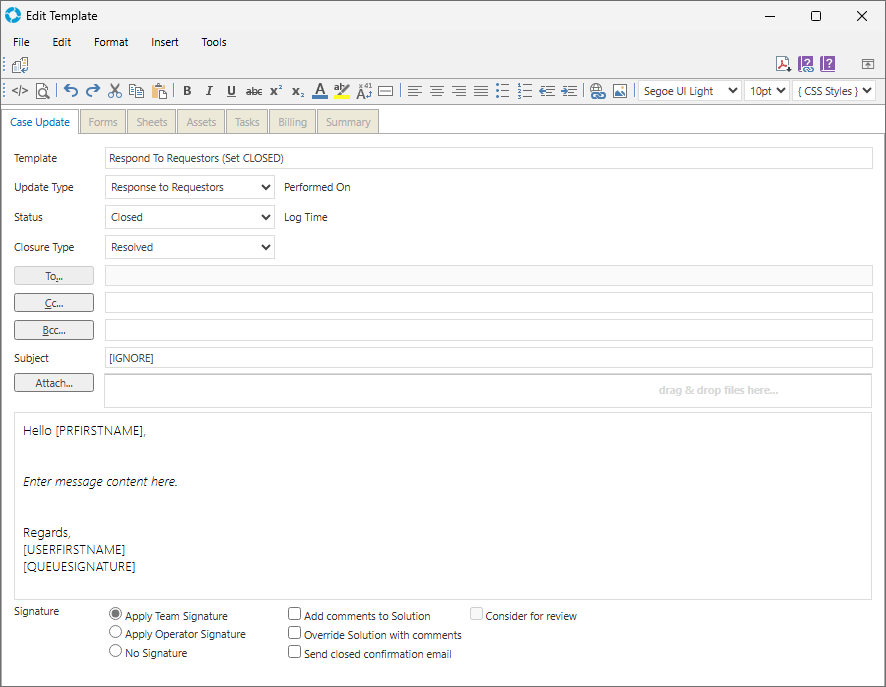
Step 2 Click the New button to launch the Update Template screen and create a brand New Template. Alternatively, double click a Template or select a Template then click Edit, to edit an existing one.
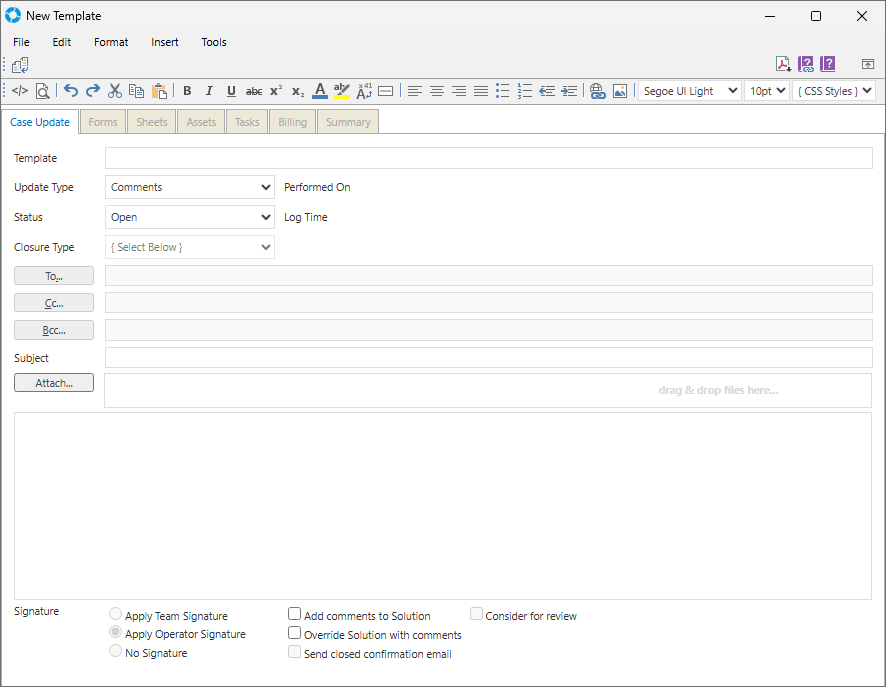
Step 3 Input or select a value for each field then click File >> Save & Close to create the Update Template.
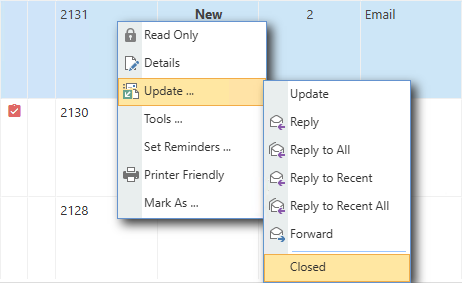
Update Templates - Case Update
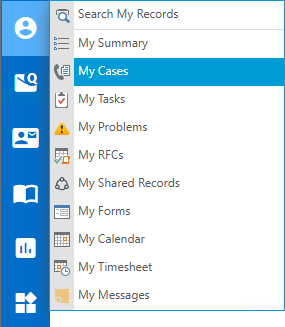
Step 1 Select the My Cases option from My Views in the left navigation menu.
Step 2 The My Cases view will be shown in the main pane, double click one of the existing Cases.
Step 3 Select Update on the top left of the Case screen.
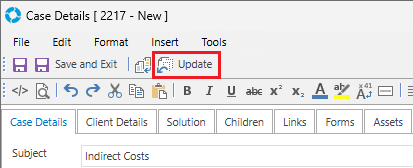
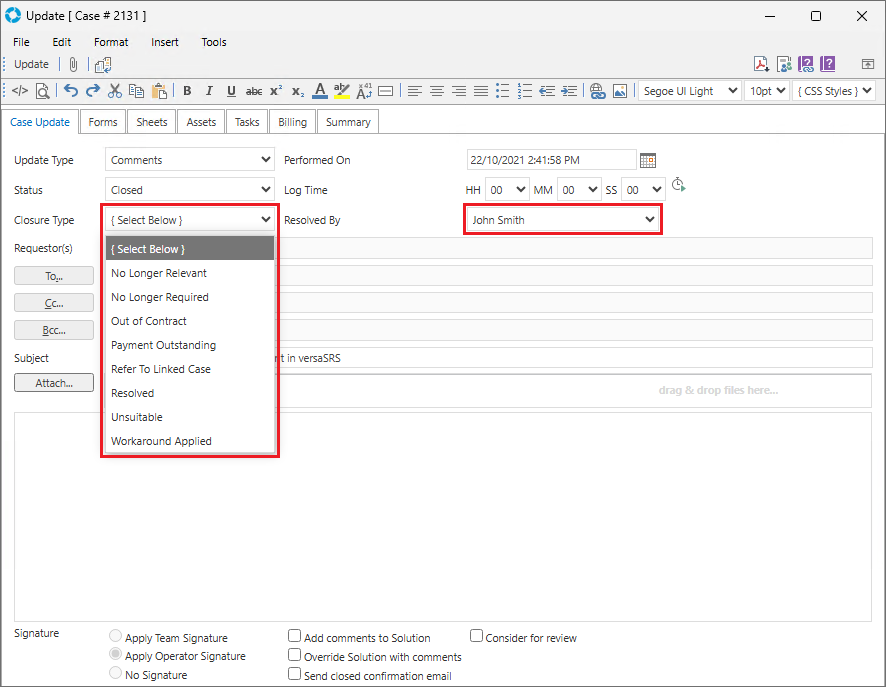
Step 4 Once on the Case Update screen select the Template icon, shown outlined in the below image.
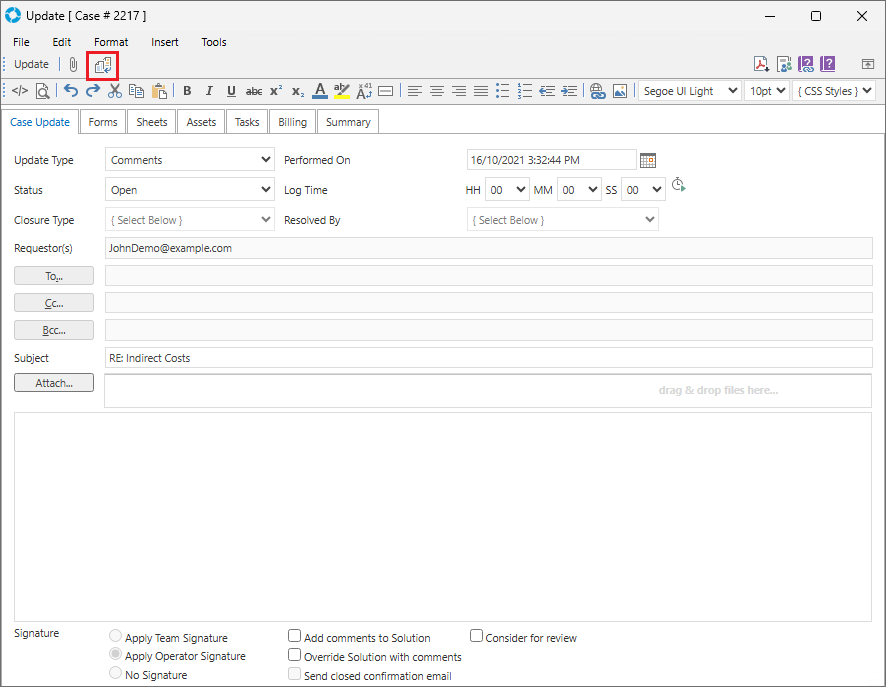
Step 5 Locate the Update Template you created in the previous exercise and click Apply to see how the Template applies to the Case Update.

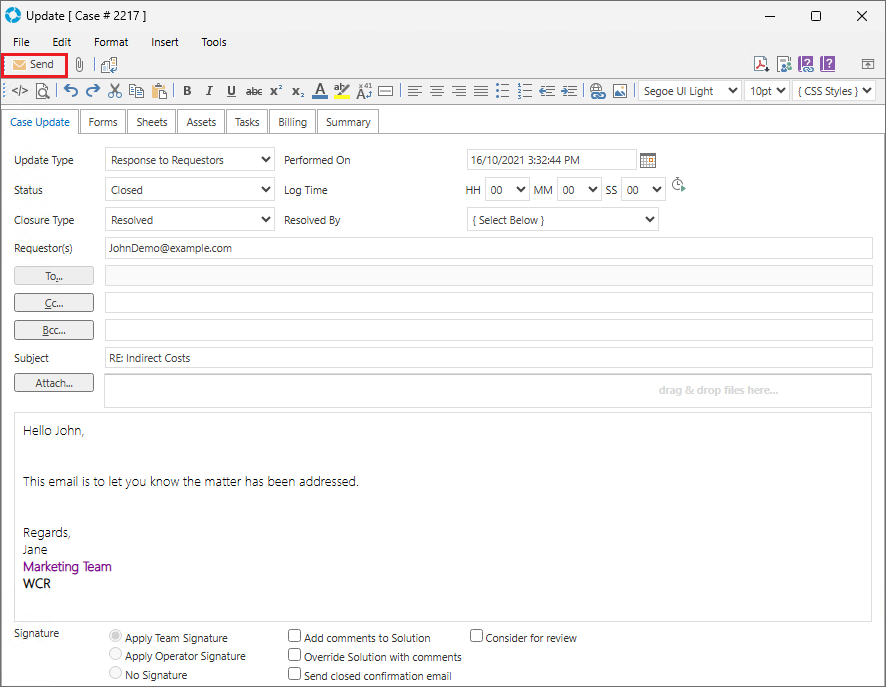
Step 6 If the Template's Update Type is set to 'Send Email' or 'Response to Requestors' the Update button will change to Send in the Update screen. Click the Send/Update button to Update the Case.
Update Templates - Team Default Replies
Step 1 Select the Manage Teams icon from the versaSpinner - Administrators tab.
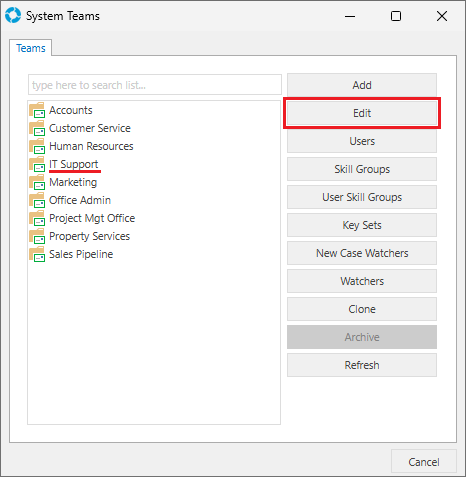
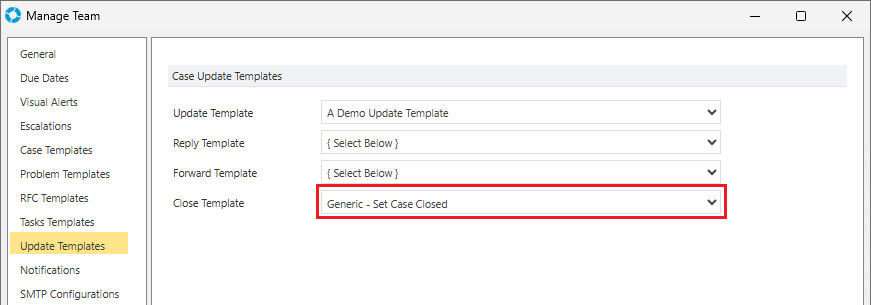
Close Templates will not be applied automatically if the Case is updated from the Case Update screen. In this example, Close Template will need to be applied manually (refer to Update Templates - Case Update).
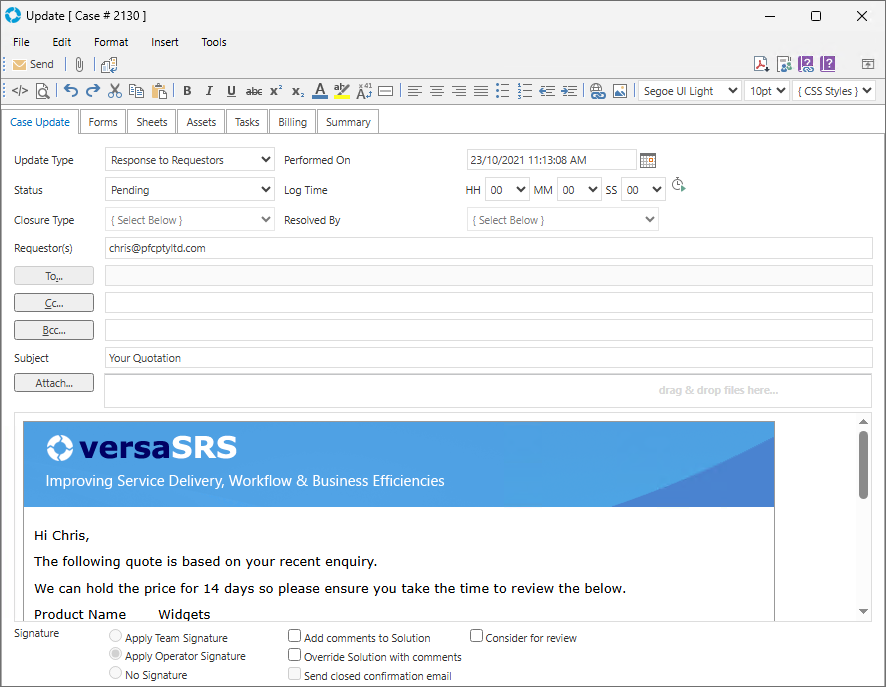
Update Templates - Key Sets
In the below example, whenever a Case is logged with the IT Support Team that gets categorised with the Key 1, Key 2, and Key 3 values Invoice, Project, and In-Complete respectively, the Quotation Template will be applied by default to the Update screen.
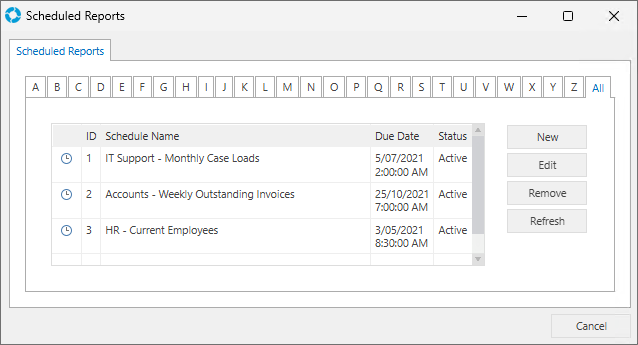
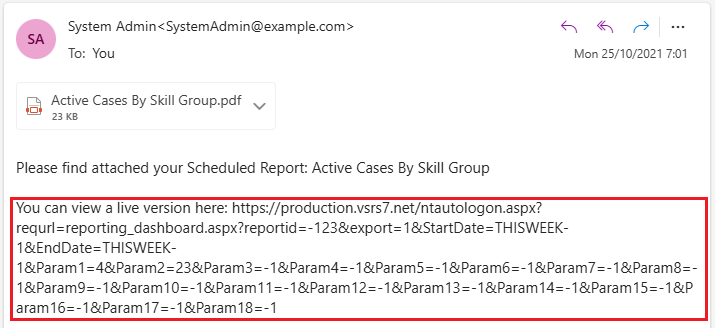
Update Templates - Scheduled Reports
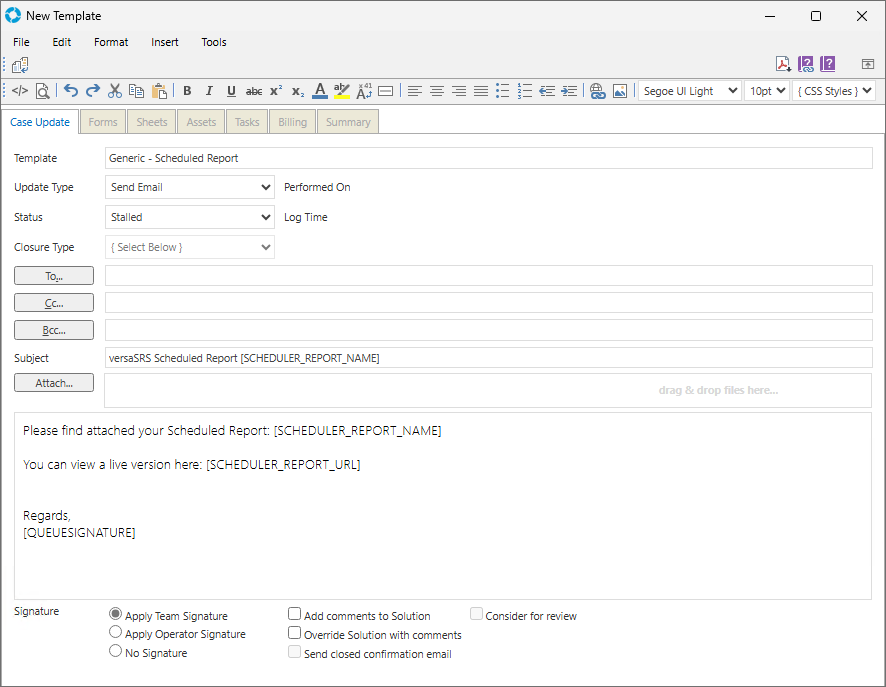
[SCHEDULER_REPORT_NAME] - Name of the Report.
[SCHEDULER_REPORT_RUN_DATE] - Execution date and time of the Report.
[SCHEDULER_REPORT_START_DATE] - Starting date and time of the Report.
[SCHEDULER_REPORT_END_DATE] - Ending date and time of the Report.
[SCHEDULER_REPORT_DATA] - Report output if not sent as attachment. *This tag only displays the content of the Report in the email if the Report is exported as In-line HTML.
[SCHEDULER_REPORT_URL] The URL of the Report (for live report access).
If it is incorrect change it to the correct URL and select Apply to Save.
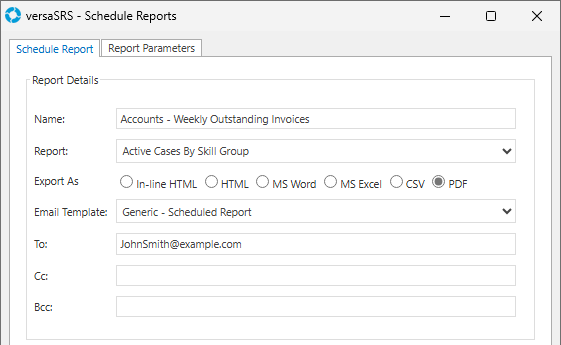
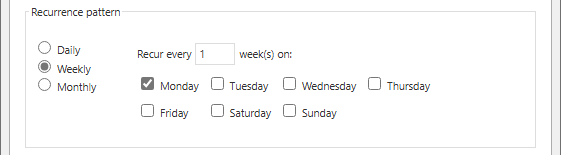
Set a recurrence pattern of your choosing or copy the below example.
For this exercise select the End after: # occurrences radio button and set the Start field to be the current data and time, this will ensure the Schedule is made Inactive after it runs and it will only run once. If this section is set incorrectly you can create an issue with the versaSRSScheduler Service, this is explained in more detail below.
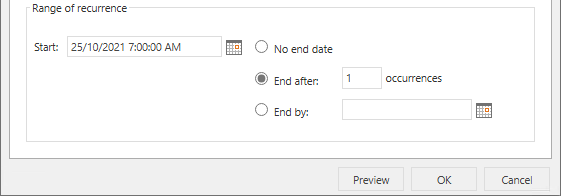
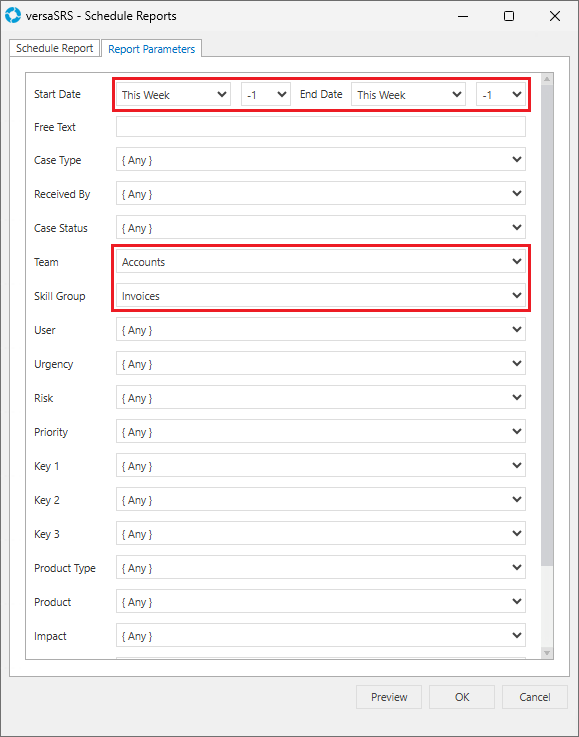
Select the required Parameters for the Report you selected or if you are copying the examples in this exercise set them to match the below image.
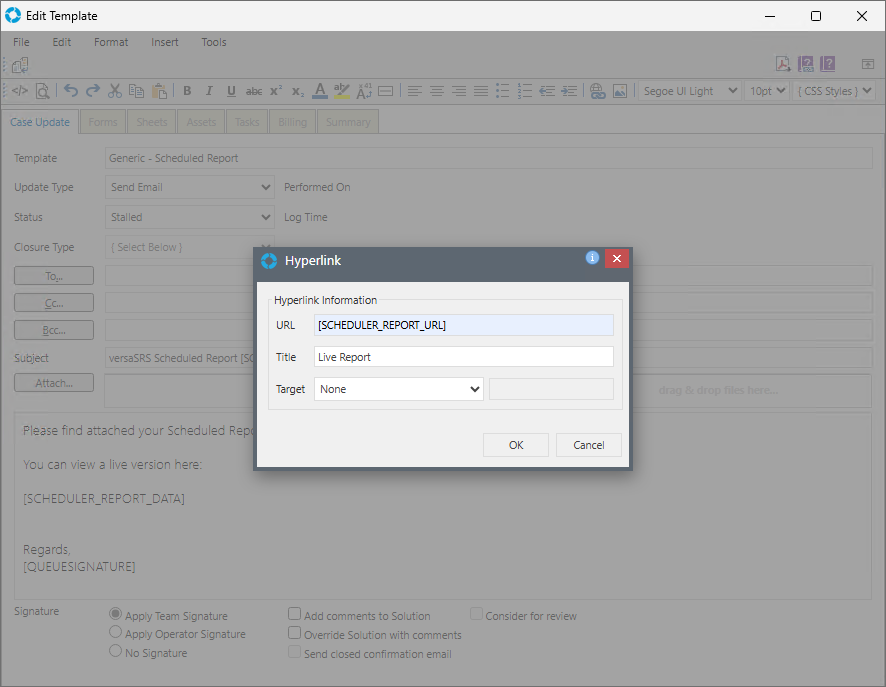
If you added the [SCHEDULER_REPORT_URL] tag to your Update Template you may notice that the URL in the email doesn't look like a typical link.
 icon from the toolbar. Paste the tag in the URL field and input an appropriate title in the Title field.
The URL of the Report [SCHEDULER_REPORT_URL] uses the User's versaSRS account to access the live Report. Non-versaSRS Users will not be able to view the live Report.
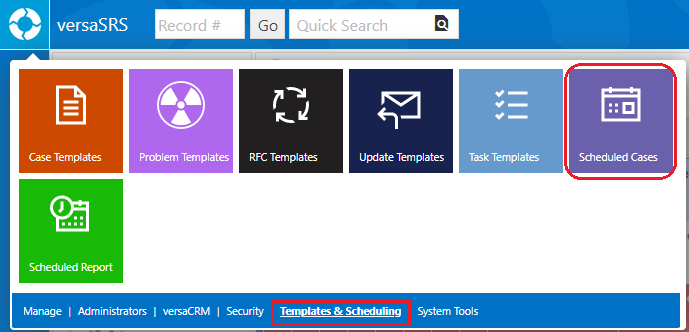
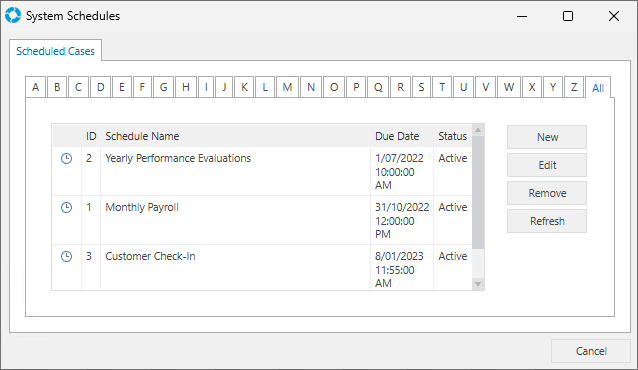
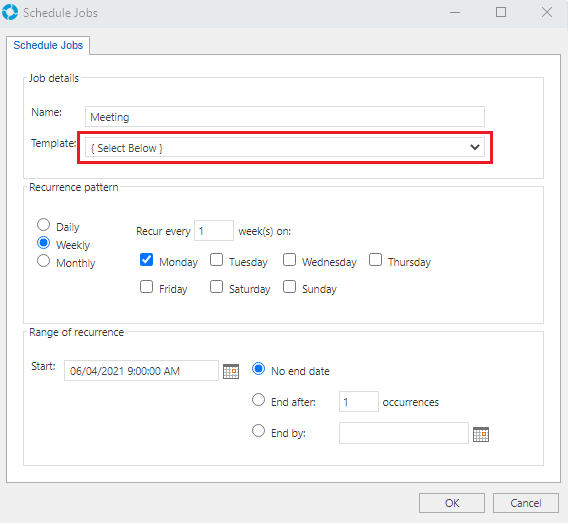
Exercise 6 - Scheduled Cases
The aim of this exercise is to educate versaSRS Administrators on how to create Scheduled Cases in versaSRS.
Scope
Creating Scheduled Cases
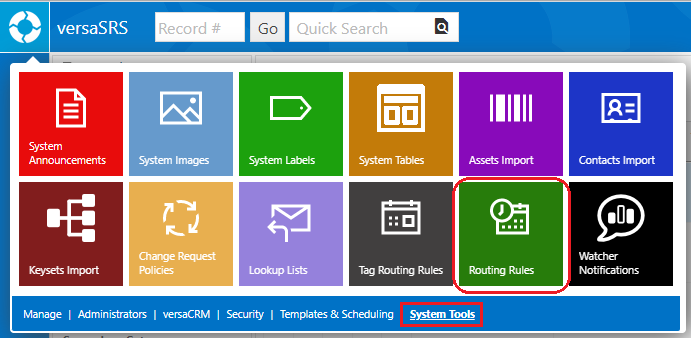
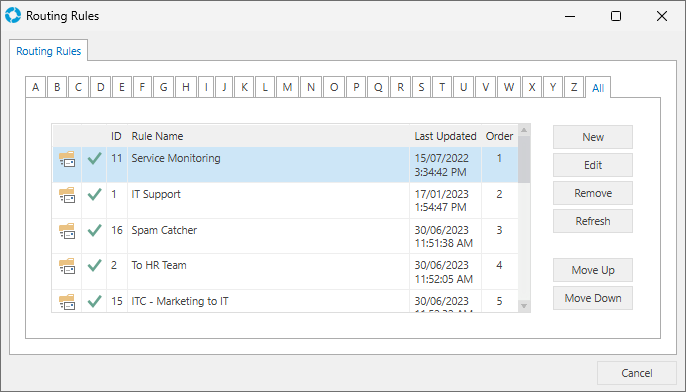
Exercise 7 - Routing Rules
The aim of this exercise is to educate versaSRS Administrators on how to create Routing Rules in versaSRS.
Scope
Creating Routing Rules
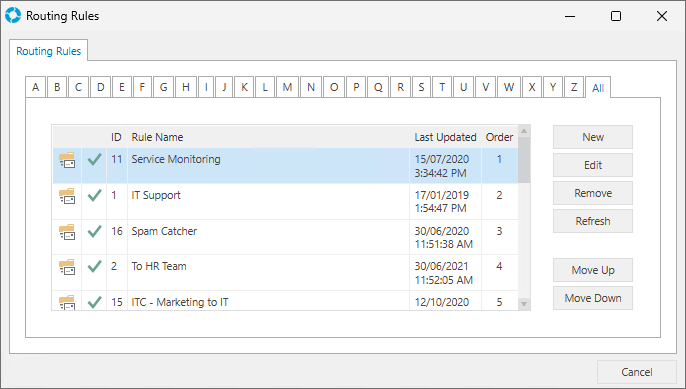
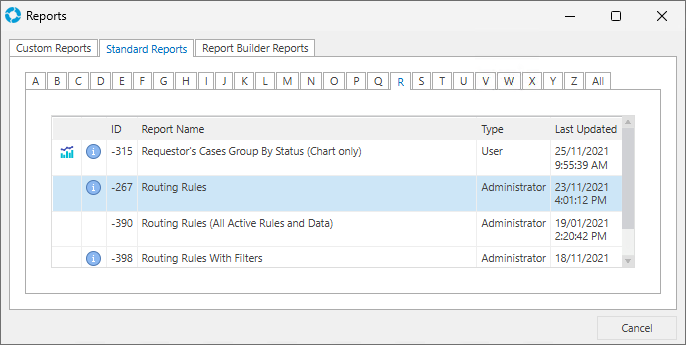
When doing this in a Production environment we highly recommend running Standard Report Routing Rules which has an ID of -267, before creating any new Rules. This Report returns all the existing Rules and their condition(s); you'll need to confirm that there is not an existing Rule with the same condition(s) you plan to set for the new Rule. If there is an existing Routing Rule your new one will likely never work as expected, read more about that here.
You can also set an Update Template, though typically this is used for SPAM or Monitoring Cases that require no User interaction, to automatically set the Case Status as Cancelled or Closed respectively.
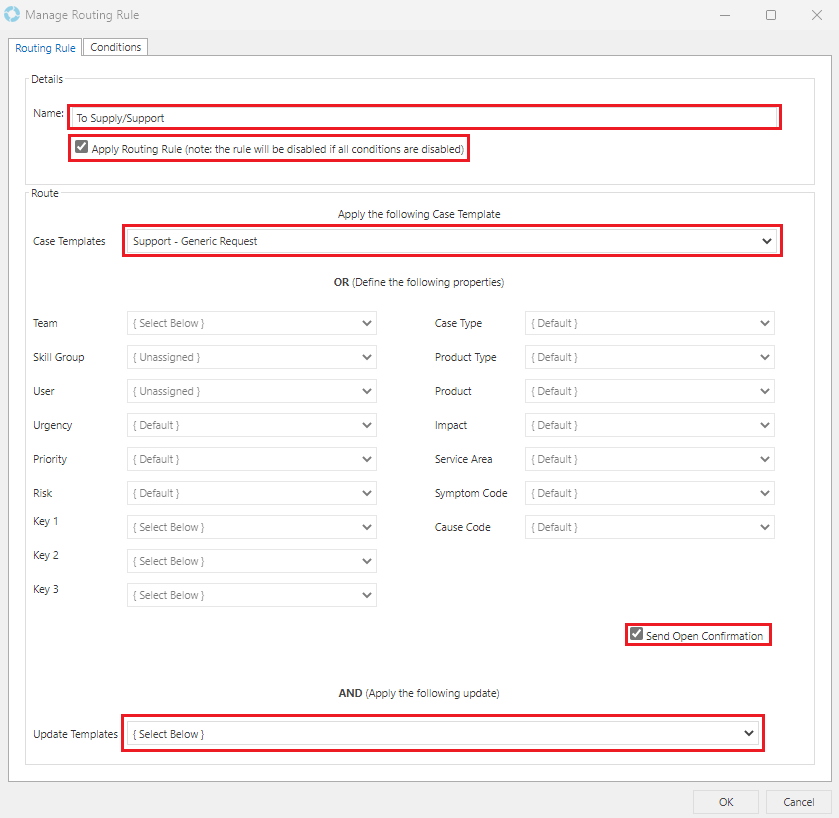
In this example, *support* and *supply* have been added as a keyword to be found within an email's Subject.
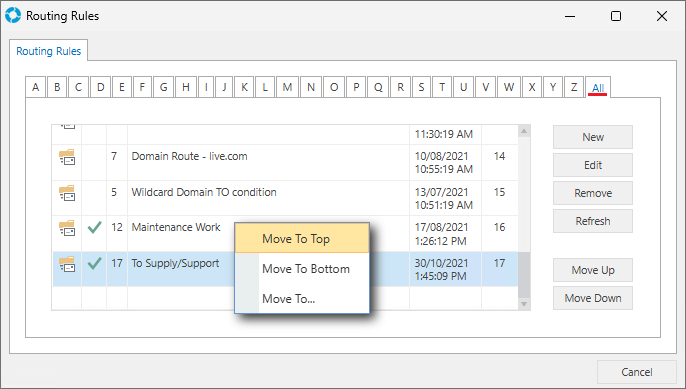
Domain Wild Cards - Domain Wild Cards are also supported for the TO and FROM conditions by entering just the domain part of the email address into the Email Address condition on the Rule. For example having *@versadev.com in the FROM address condition will result in all emails from the @versadev.com domain triggering the Routing Rule.
The email should trigger the Routing Rule when it is processed by versaSRS, and log a new Case to the system based on the settings of the Routing Rule. If it doesn't please consult our Knowledgebase article to determine why or contact our Support Team.
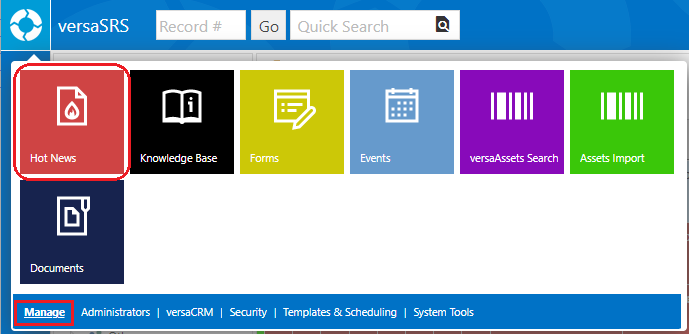
Exercise 8 - Hot News
The aim of this exercise is to educate versaSRS Administrators on how to create Hot News in versaSRS.
Scope
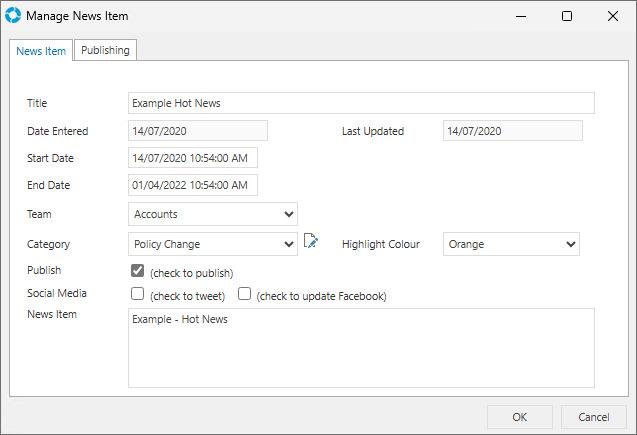
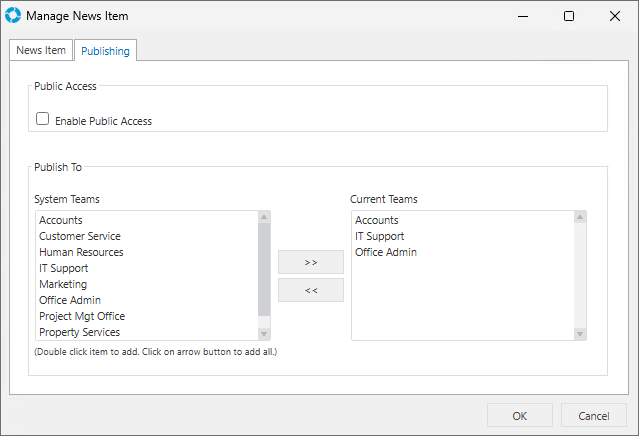
Creating Hot News

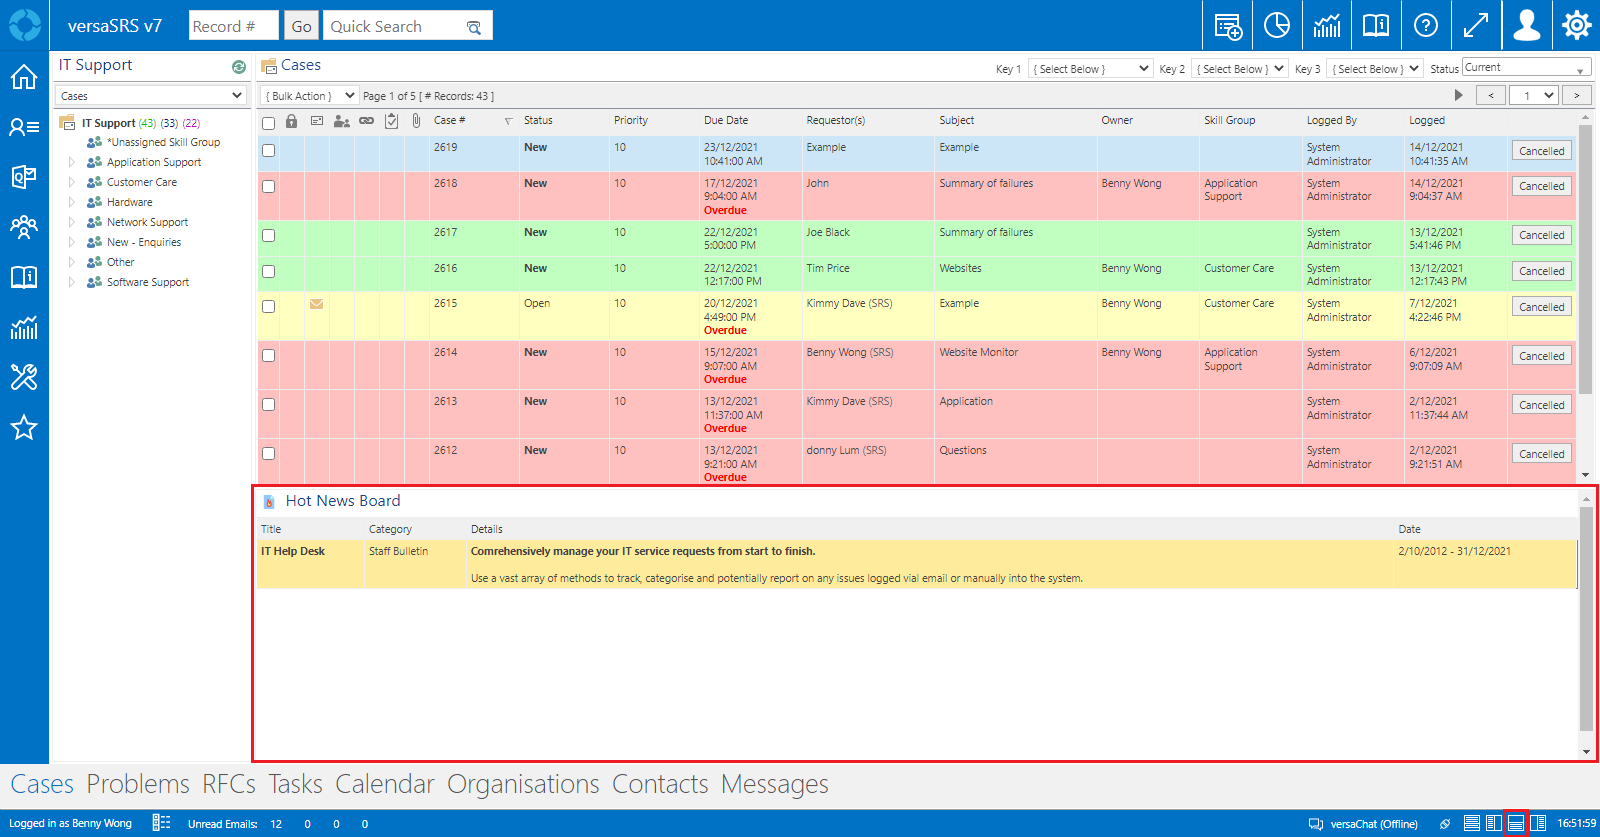
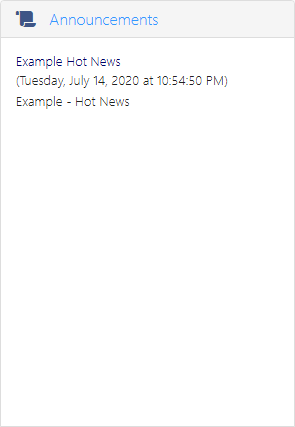
In order to see the Hot News item on the Hot News Board make sure the Start Date and End Date includes the current date within the range of values set.
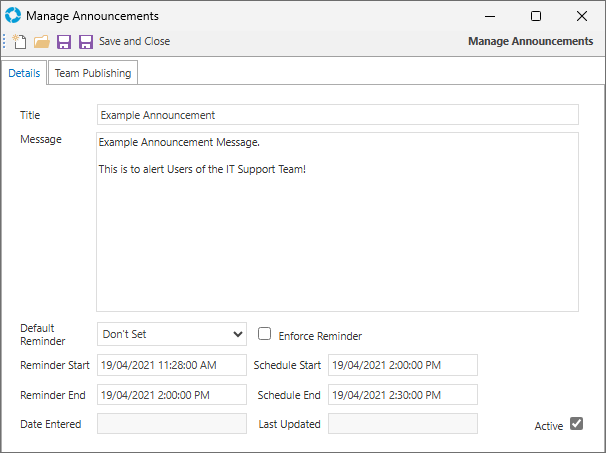
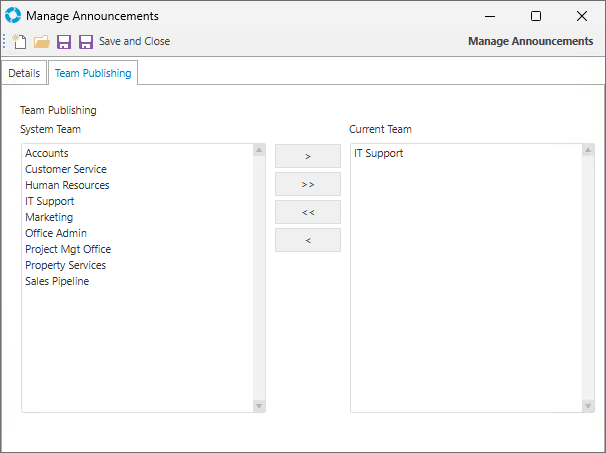
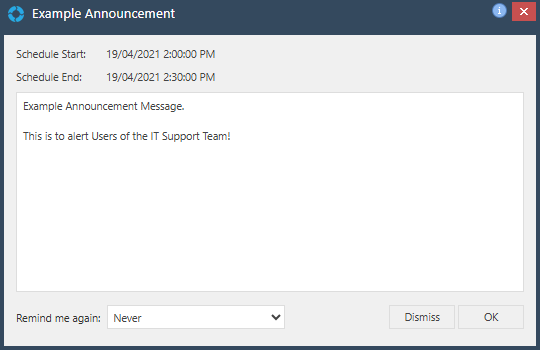
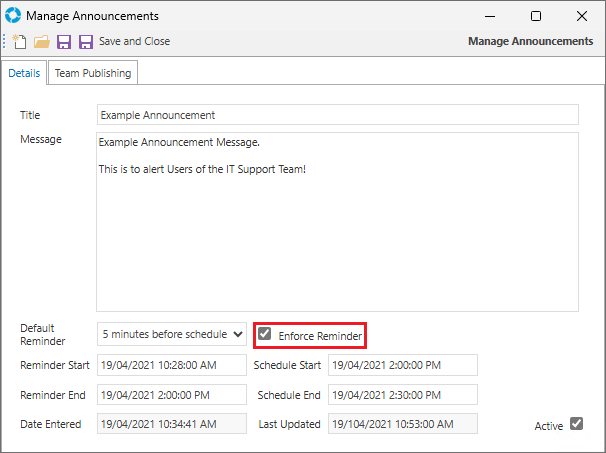
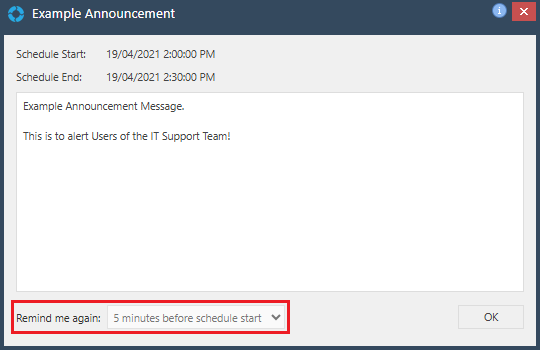
Exercise 9 - Announcements
The aim of this exercise is to educate versaSRS Administrators on how to create Announcements in versaSRS.
Scope
Creating Announcements

Ensure that the Active checkbox at the bottom right is checked to activate this Announcement.
Add at least one Team to the Current Team list, make sure you are a member of that Team.
Exercise 10 - Global Configurations
The aim of this exercise is to educate versaSRS Administrators on the versaSRS Global Configurations.
Scope
- Labels and Tables
- Global Settings
- Mail Services
- Changing DSN Values
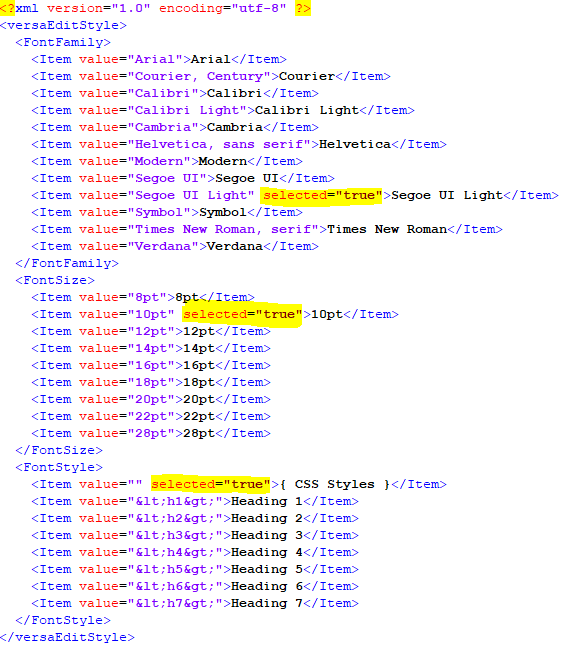
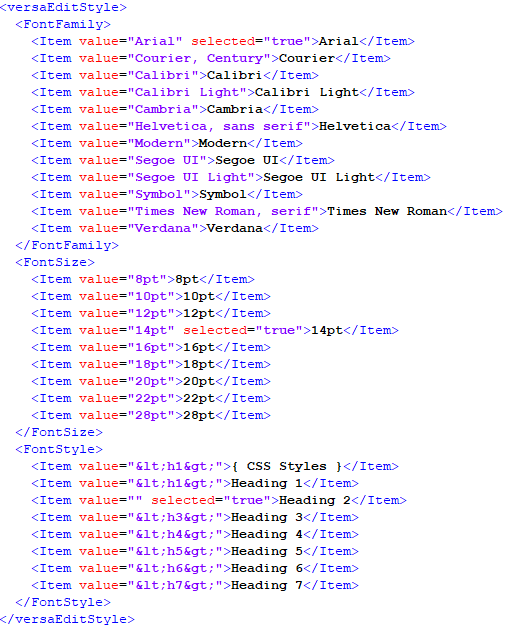
- Default Font Styles - versaEdit
Labels and Tables - System Labels

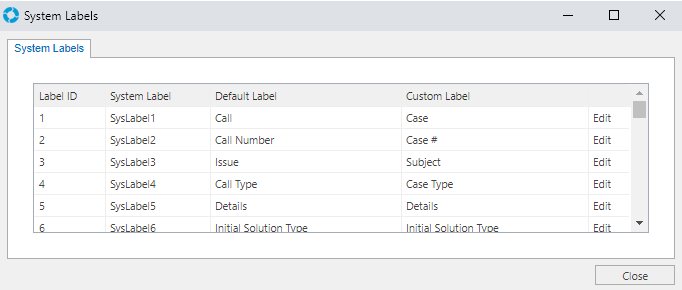
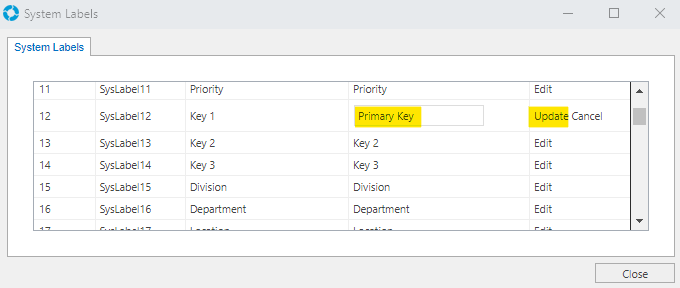
on the top left of the screen.
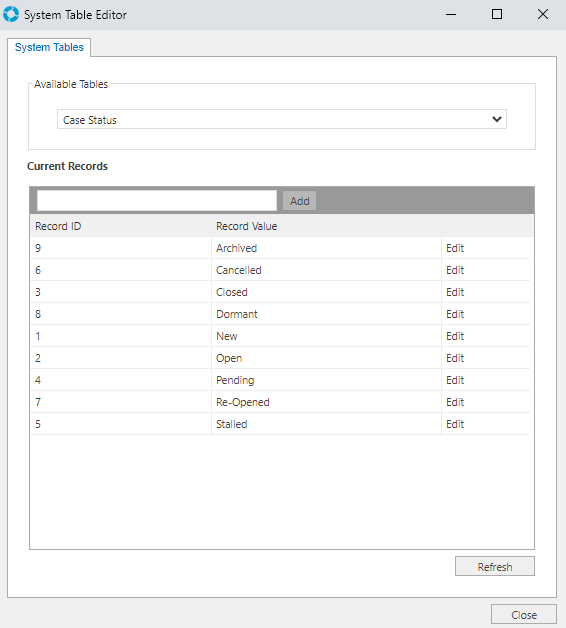
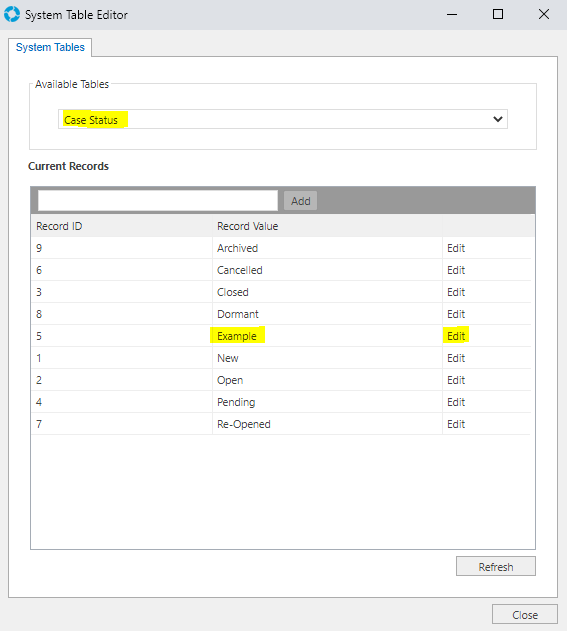
Labels and Tables - System Tables

Global Settings

on the top left of the screen.
Mail Services
Mail Services - Single Mailbox
MailboxPassword Password required for authentication to the mail server.
MailboxPort Set the port number EWS / POP3 / IMAP uses.
MailboxProfile Profile required for authentication to the EWS / POP3 / IMAP mail server.
MailboxProtocol Defines Mail Protocol (EWS, POP3 or IMAP)
MailboxSSL Enable or Disable EWS / POP3 / IMAP SSL setting.
MailServer Name or IP address of the mail server.
MailServerTimeout POP3 / iMAP Server Timeout in seconds.
on the top left of the screen.
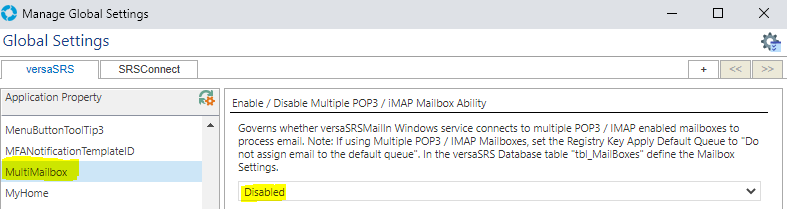
Mail Services - Multi Mailboxes
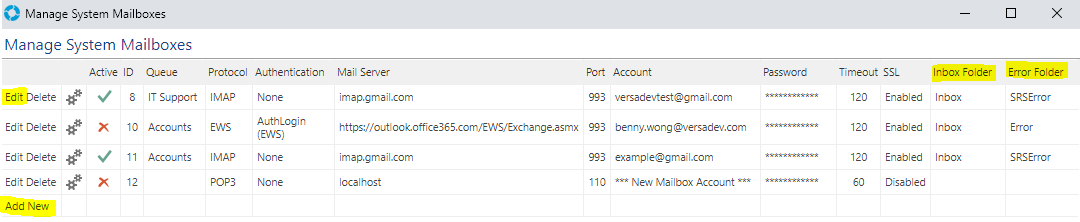
The Inbox Folder allows for a custom folder in the mailbox to be specified so that versaSRS will only process emails in that folder (e.g. versaSRS folder) instead of the default Inbox (e.g.Inbox folder).
The Error Folder can be used to specify a folder (e.g. Error folder) in the mailbox where problematic emails that can't be processed by versaSRSMailIn can be moved automatically to prevent a stoppage in email processing.
 on the top left of the Global Settings screen. This will take effect for the changes.
Mail Services - Other Mail Services
versaCRMMailIn
versaCRMMailOut
versaCRM Mail
Scheduled Reports
Scheduled Cases
versaSRS Service Monitor
Changing DSN Values
versaSRS - Web.config (Default location, C:\Program Files (x86)\VersaDev\versaSRS\versaSRS\Web.config)
SRSConnect - Web.config (Default location, C:\Program Files (x86)\VersaDev\versaSRS\SRSConnect\Web.config)
versaAssetWebService - Web.config (Default location, C:\Program Files (x86)\VersaDev\versaSRS\versaAssetsWebService\Web.config)
versaChatWebService - Web.config (Default location, C:\Program Files (x86)\VersaDev\versaSRS\versaChatWebAPI\Web.config)
versaSRSWebServices - Web.config (Default location, C:\Program Files (x86)\VersaDev\versaSRS\versaSRSWebServices\Web.config)
versaSurvey - Web.config (Default location, C:\Program Files (x86)\VersaDev\versaSRS\versaSurvey\Web.config)
<add name="SqlServerConnectionString" connectionString="Server=localhost; Database=versaSRSv7; uid=versasrs; pwd=Password; Timeout=90;" providerName="System.Data.SqlClient" />
Default Font Styles - versaEdit


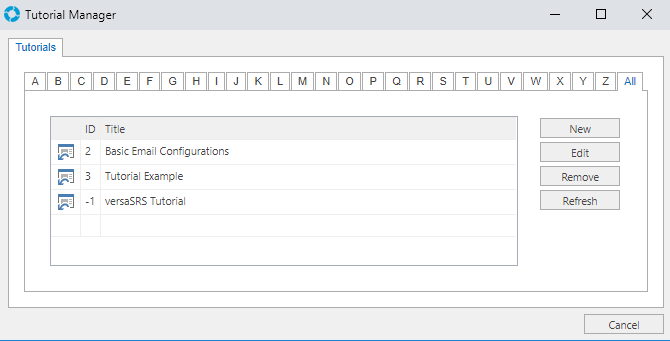
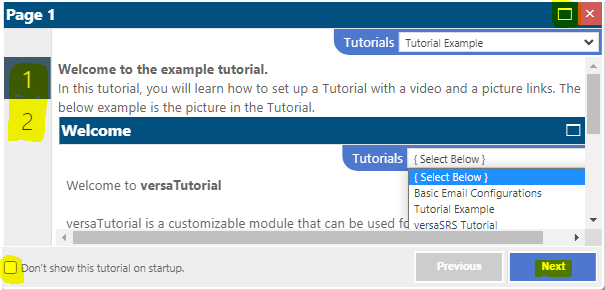
Exercise 11 - Tutorial
The aim of this exercise is to educate versaSRS Administrators on how to create Tutorials and the basics of Tutorial in versaSRS.
Scope
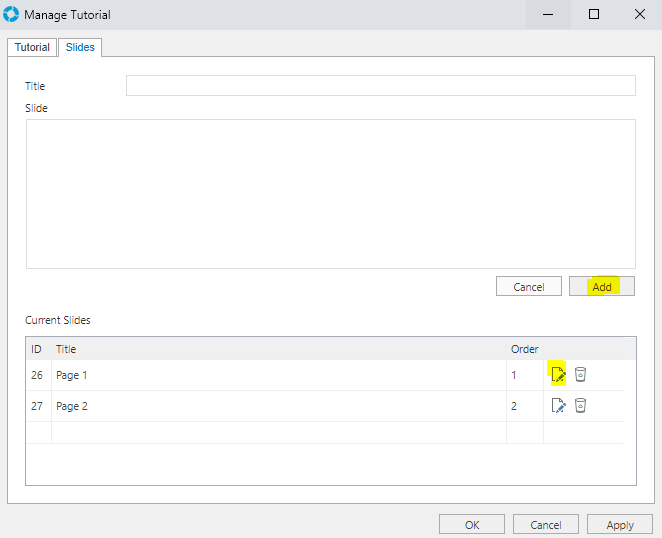
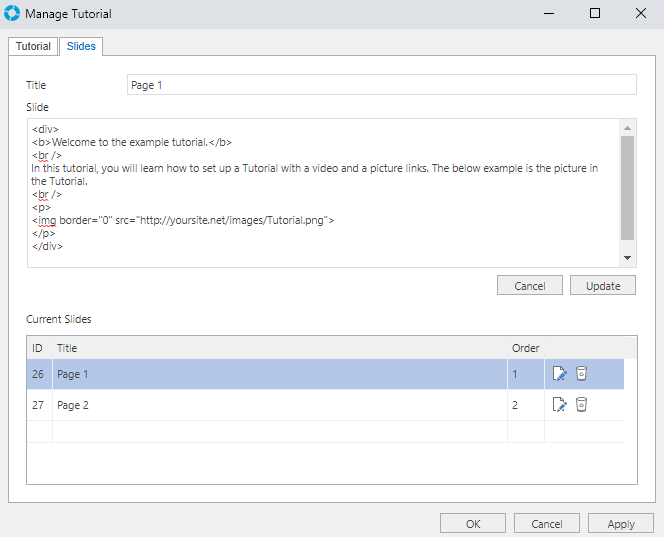
Creating Tutorial

The Publish checkbox allows the Tutorial to be visible within versaSRS.
 on the right side of the Current Slides allows the slide(s) to be edited.

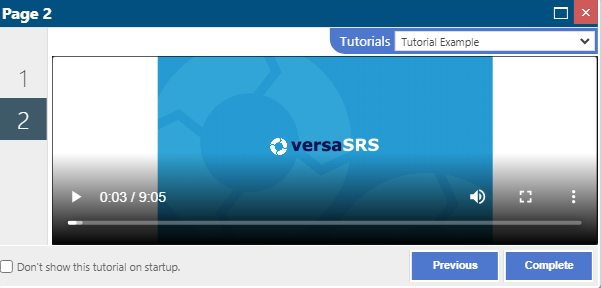
Usage of Tutorials
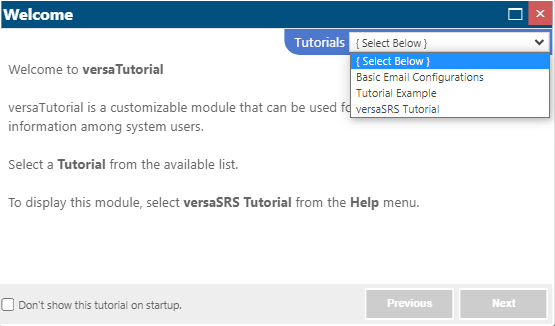
 on the top right of the Tutorial screen, it will show all content in the full screen mode.
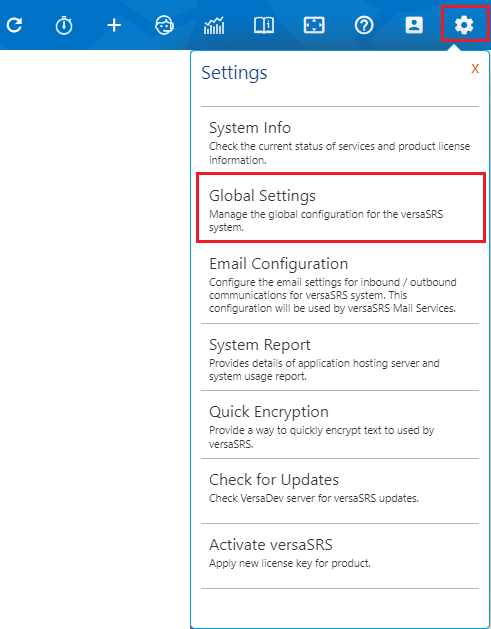
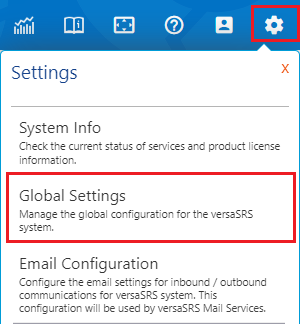
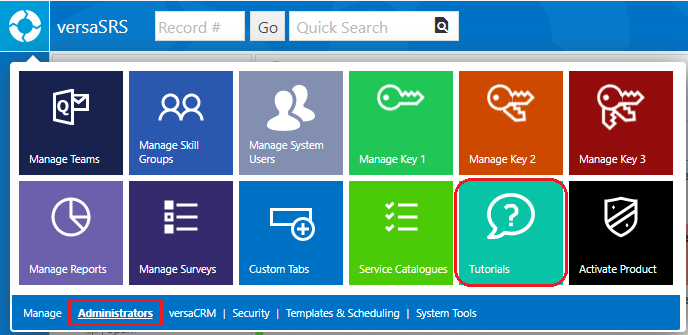
The default Tutorial can be configured in the DefaultTutorial Property in Global Settings (Cog icon on the top right >> Global Settings >> locate the DefaultTutorial Property).
 in versaSRS by selecting Cog icon on the top right of the Global Settings screen.
versaSRS User Training
The aim of this learning path is to educate versaSRS Users on the basic functionality of the application.
Prerequisites
- versaSRS Application
- User account
- Access to at least one versaSRS Team
- versaCRM view permissions
- versaSRS Reporting permissions
Exercises
Exercise 1 - Case Creation
The aim of this exercise is to educate Users on how to create Cases in versaSRS.
Scope
Case Creation
Manual Case Creation
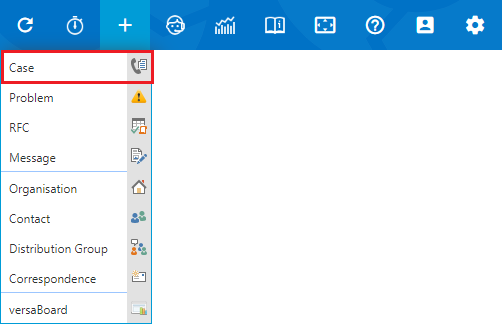
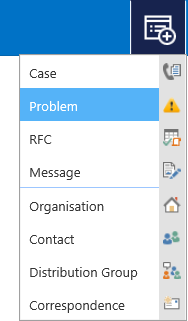
Step 1 Once logged in to versaSRS and on the main screen, select the Create New icon located on the navigation header at the top right of versaSRS, and select Case.
Step 2 Enter your First Name, Last Name, and Email Address into the fields provided.
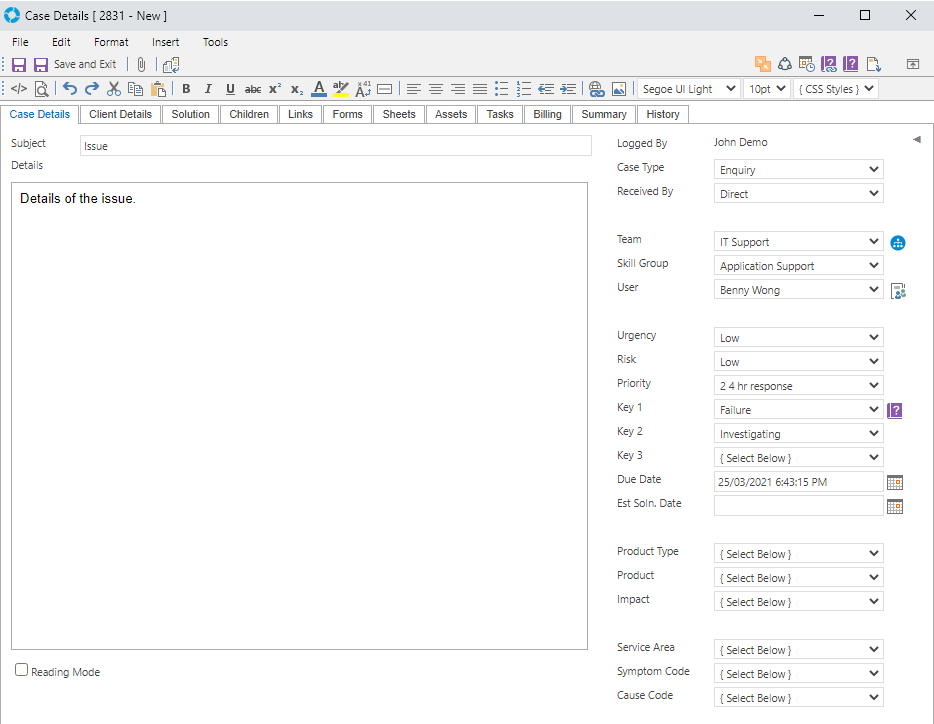
Step 3 Click the Case Details tab. This is where the main Case information is stored and categorised.
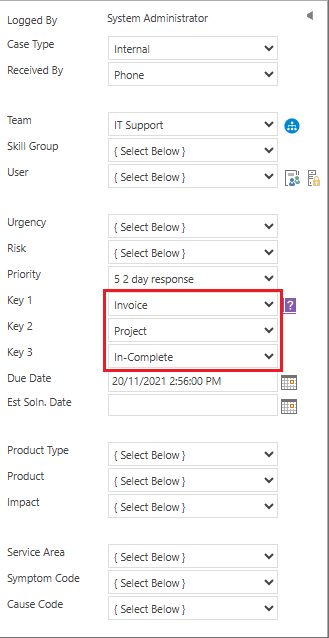
Step 4 Create and categorise a Case by entering or setting a value for each of the highlighted fields shown in the image below. Ensure you assign yourself in the User field.
Note: You will need to first select the Team so that the other drop-downs are populated accordingly.
Step 5 Click the Save icon to save this Case to the specified Team. Once saved the Case will appear in the Team view.

Email Case Creation
Step 1 From your personal email client (Outlook for example) create a new email with the following details.
To: Team@Email_Address.com
Subject: Test Case Creation via Email
Details: Test Case Details
Note: Ensure the email address entered into the To: section is the correct address for the desired Team in versaSRS.
Exercise 2 - Updating Cases
The aim of this exercise is to educate Users on how to update Cases in versaSRS.
Scope
Updating Cases
Adding a Comment to a Case
Step 1 Double click your existing Case to open it, the one created via email, then click the Update icon to launch the Update Screen.
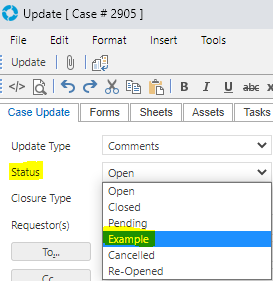
Step 2 On the Case Update screen set the Update Type to Comments and the Status to Open, then enter a Subject and the details of your choice, and click the Update Button.
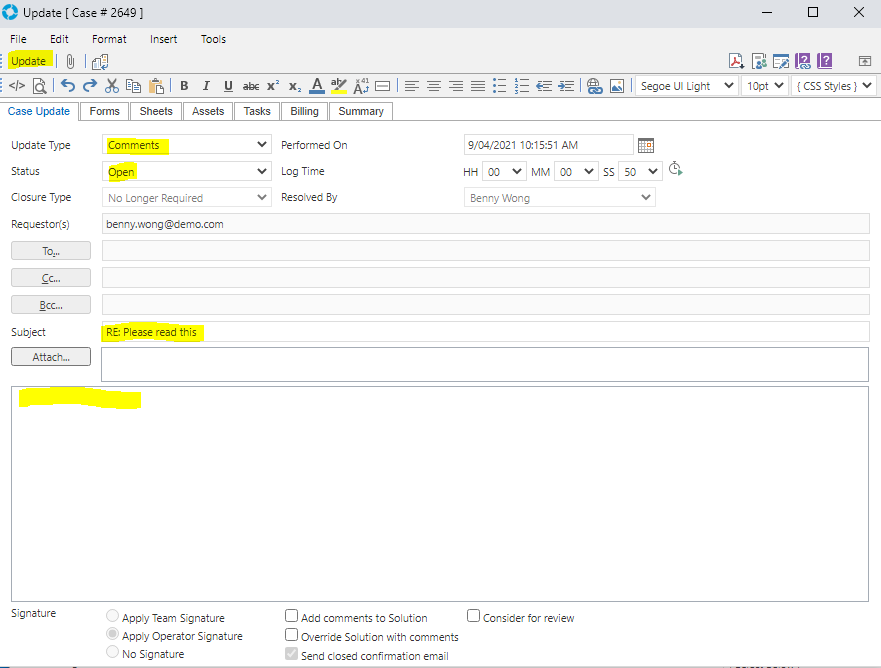
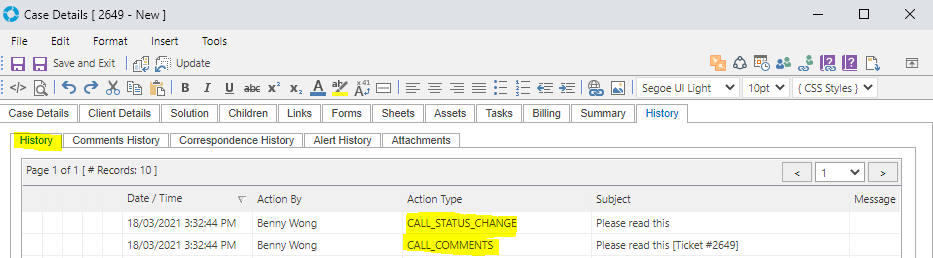
Step 3 Back on the Case window select the History tab and then the inner History tab as shown.
Sending an Email from a Case
Step 1 Open your existing Case created via email and on the Case screen click the Update icon to launch the Update screen.
Step 2 Set the Update Type to Send Email and the Status to Pending.
Step 3 In the To field enter your personal email address.
Step 4 Enter a Subject and the details of your choice.
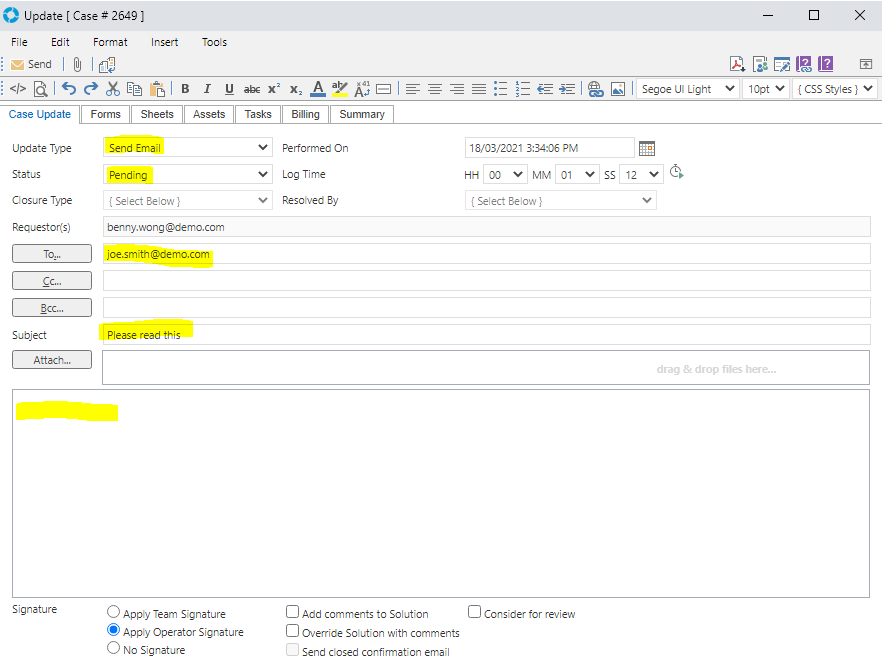
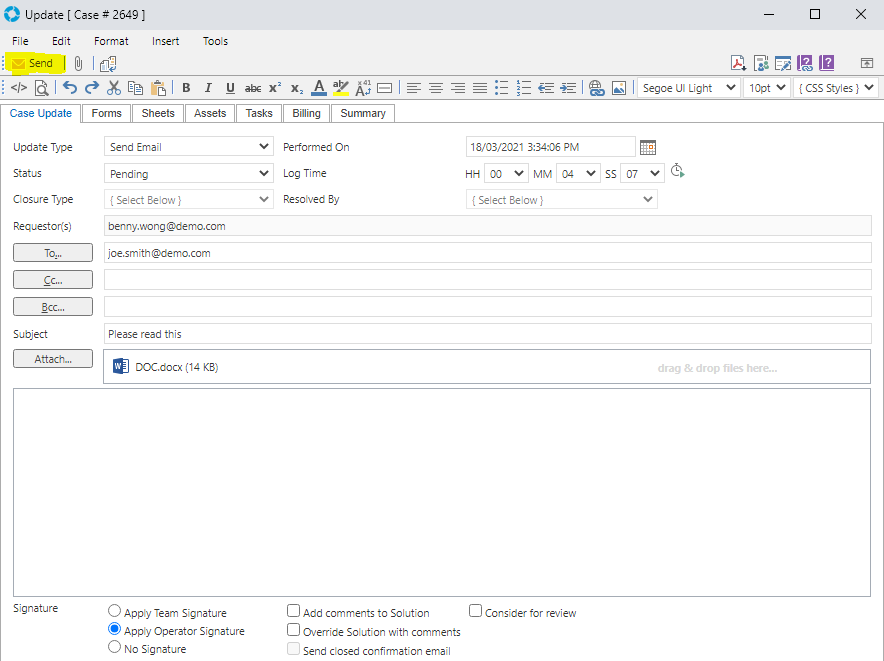
Step 5 Add an attachment to the email by clicking the Attachment button on the top left of the Update screen. A file can be selected and then added, or the drag and drop feature can be used.

Step 6 Click the Send button to send the email.
Responding to Requestor(s)
Step 1 Open the existing Case created via email and on the Case screen click the Update icon to launch the Update screen.
Step 2 Set the Update Type to Response to Requestors and the Status to Stalled, add a Subject and the details of your choice.
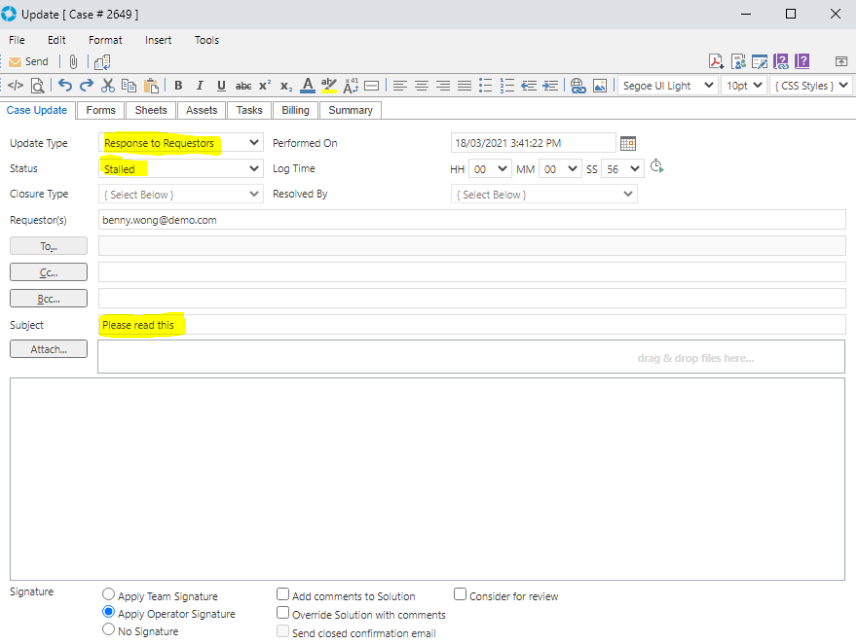
Step 3 Click the Send button to send the email to the Requestor(s) of the Case.


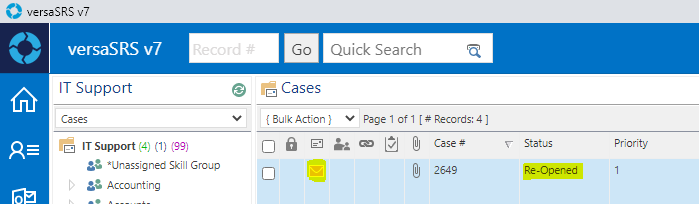
Step 4 Back on the main versaSRS screen click the refresh button in the Team view. You will notice that this Case is not displayed. This is because the Status was set to Stalled which moves it out of the Current Status view.
Step 5 Click the Status drop-down filter on the top right of the screen and select Stalled. Now the Case should be listed in the Stalled Status view.

Replying to the Case
Note: Ensure that the email Subject contains a ticket number.
Step 1 Locate the email sent to your personal mail client from the above 'Responding to Requestor(s)' section, compose a response and send the reply.
Step 2 In versaSRS ensure that the Status drop-down is set to Current and refresh the Team view.
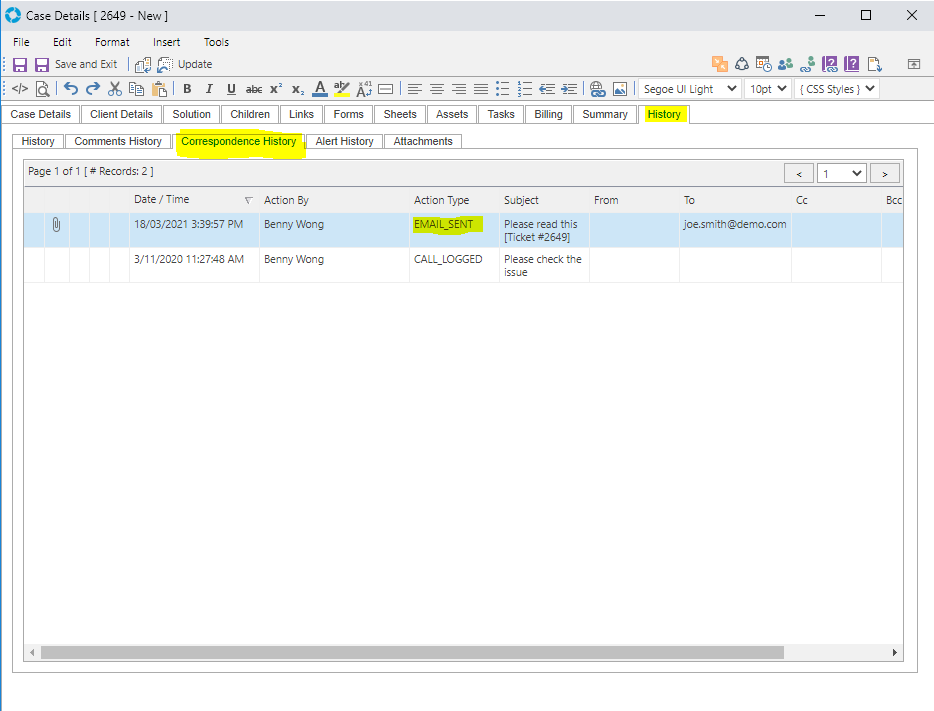
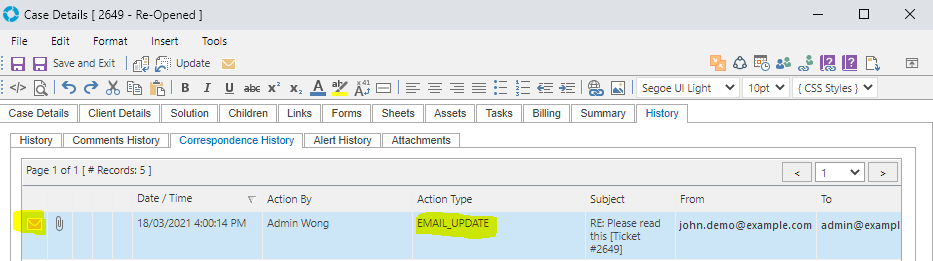
Step 3 Open the Case and click the History tab, and in the inner tab of Correspondence History it should show the entry with the EMAIL_UPDATE Action Type. You can double click this to view the email update.
Replying from a Case
Step 1 Right click the EMAIL_UPDATE entry and select Reply.
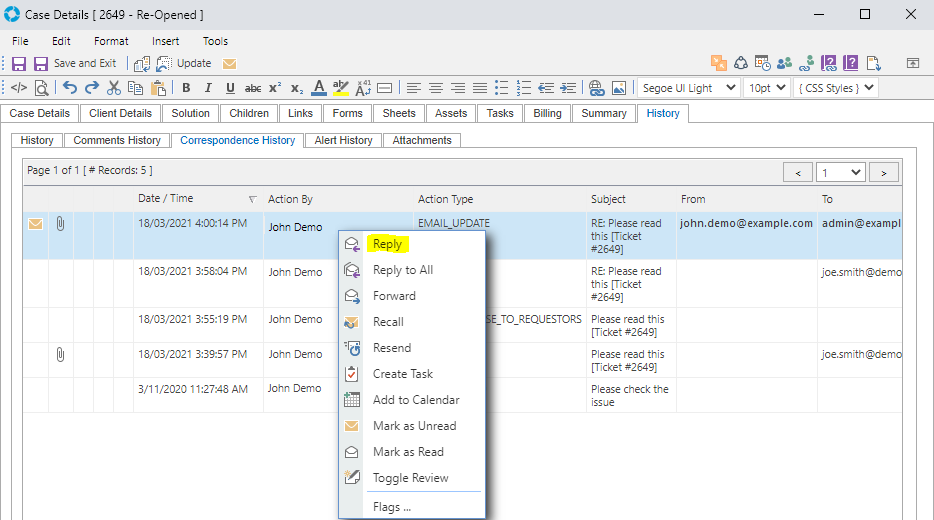

Step 2 Compose an email and click Send.
The Reply to All and Forward options from the Right-Click Menu will also include the email trail for the entry that is being replied to.
Replying to the initial email that created the Case can be done by right clicking the CALL_LOGGED audit entry.
Closing a Case
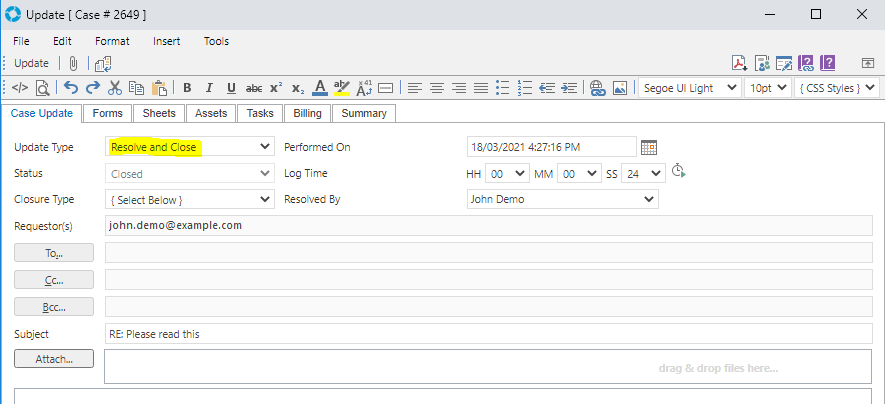
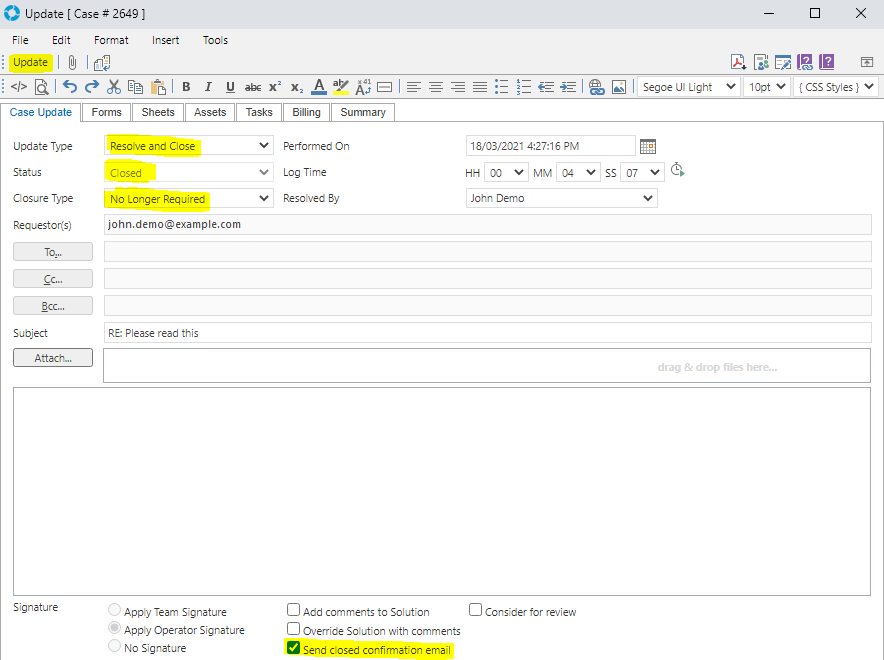
Step 1 Update your existing Case and set the Update Type to Resolve and Close.
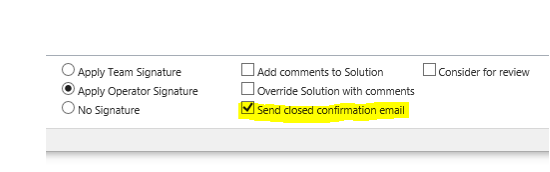
Step 2 Compose a closure response and ensure the 'Send closed confirmation email' checkbox is ticked. Select an appropriate Closure Type then click Update to send the email to the Requestor(s) and Close the Case.

Exercise 3 - Case Searching
The aim of this exercise is to educate Users on how to search for Cases in versaSRS.
Scope
Search Module
Go to Record
Step 1 In the Record # field, located toward the top left of versaSRS, enter the Case Number for one of the Cases that you created in the previous exercise.

Step 2 Click 'Go' to go directly to the Case.
Quick Search
Step 1 In the Quick Search field at the top left of versaSRS enter a keyword to search for and press enter.

Standard Search

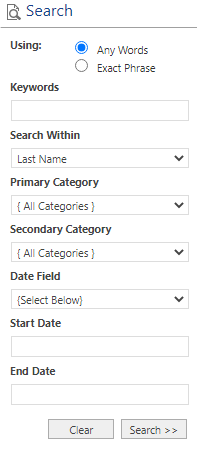
Step 1 To conduct more specific searches click the Search icon in the Quick Search field to display the Search window.

Ensure that the Standard Search tab is selected and perform a keyword search.
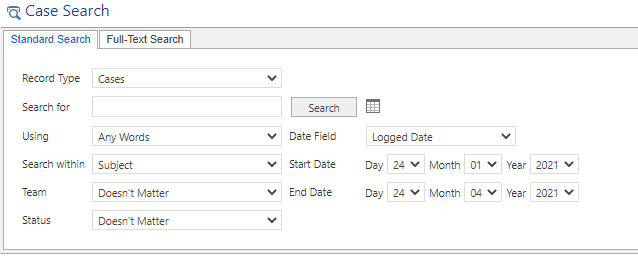
Step 2 The Standard Search returns the Case that the keyword is located within. Change several of the current Search Filter selections and take note of how this impacts the results returned.

Record Type: Denotes the type of record to be searched for. We will only be looking at Cases in this session.
Search for: The keywords to search for are entered here.
Using: This field specifies if any of the keywords in the phrase should be matched or if it should only return results for an exact phrase match.
Search within: This allows the search to be only within a specific field on a Case. For example only search the Case Subject for the keyword or phrase.
Team: Specifies the Team that the search will return results from.
Status: Specifies the Status that the search will return results for.
Date Field: Specifies which date the Date Filters will apply to.
Start Date: Specifies the start of the Date Range.
End Date: Specifies the end of the Date Range.
Conduct some test searches with a constrained date range to locate the Cases that you have created.
Note: When conducting a search it is best to limit the result set by constraining the date range and search criteria as much as possible. Performing general searches on very wide date ranges will take a lot of processing power and take a long time to complete; this can impact the performance of versaSRS while long searches are running.
Full-Text Search
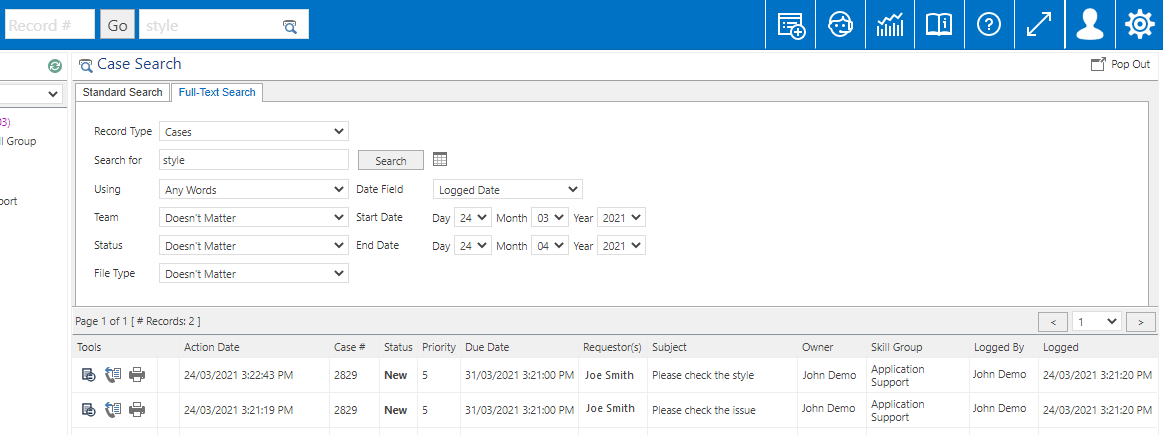
Step 1 Click the Search icon in the Quick Search field to display the Search window and select the Full-Text Search tab.
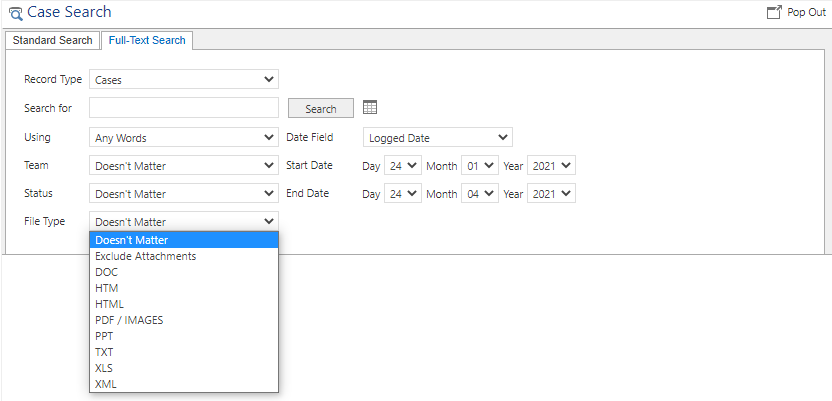
File types like PDF / Images require an OCR reader which is available for Enterprise versions.
Step 2 Conduct a Full-Text Search on some keywords and phrases used in the Cases you have created and confirm the expected results have been returned.
Exercise 4 - CRM Contacts
The aim of this exercise is to educate Users on how to use the built-in versaSRS CRM module.
Scope
versaCRM Overview
What is CRM?
In versaSRS the CRM module is integrated with entities like Cases, which allows tracking of Case history to individual Contacts or Organisations.
While there are many features within the CRM module this exercise will focus on the basic functionality of a Contact and integration with Cases.
Navigation & Search
Step 1 Access the CRM module by clicking the My CRM icon on the left navigation menu.

Step 2 Click the 'Contacts' menu option to go to the Contacts screen.
On the left side is the Contact Search area.

Step 3 Perform some searches using both the Search window on the left and the alphabet filtering on the right.

Step 4 Click a Contact from the list to select it, the Contact Summary for the selected Contact will be displayed in the bottom panel.
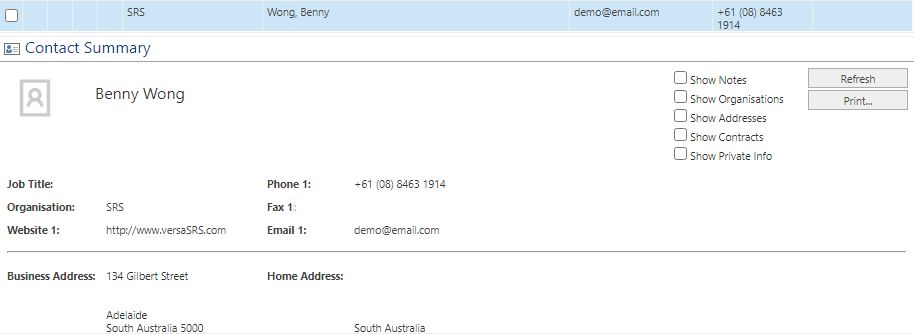
Step 5 Perform several more searches using both the Search window on the left and the alphabet filtering on the right.
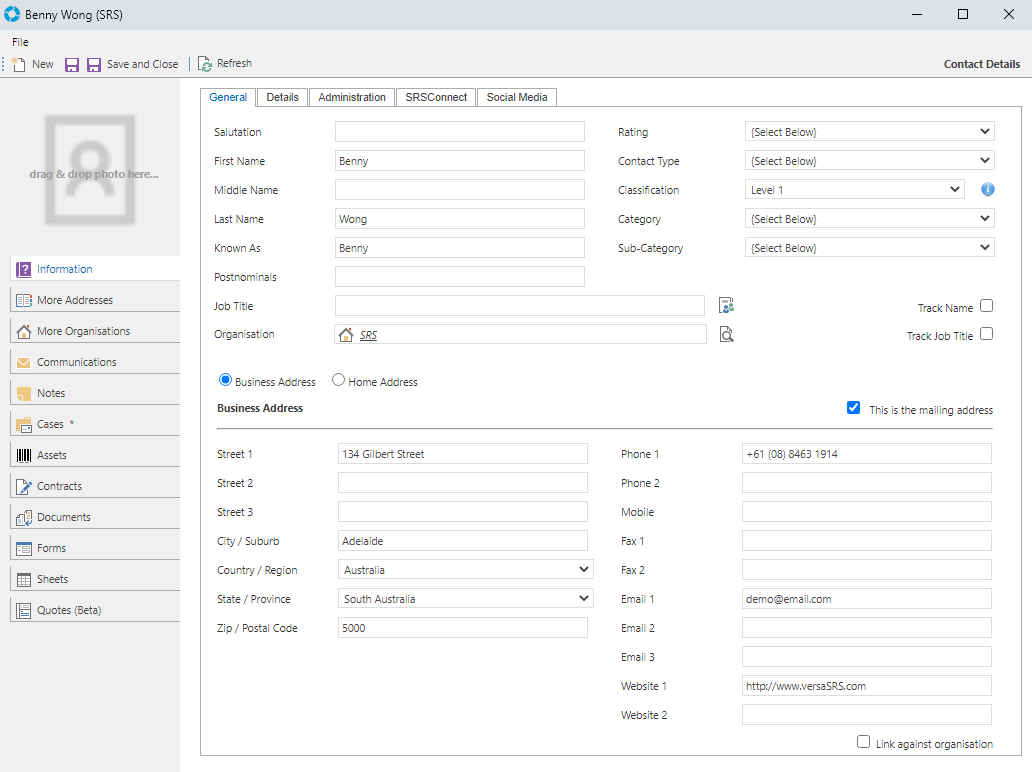
Creating a Contact
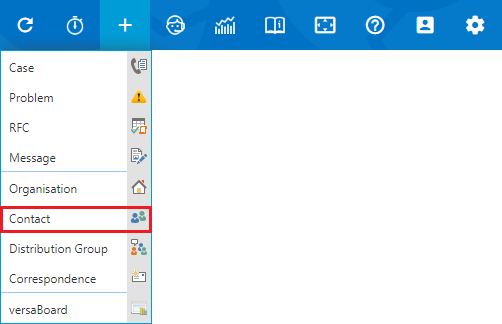
Step 1 Create a new Contact by selecting the Create New icon on the navigation header and clicking Contact as shown below.
Step 2 Enter your First Name, Last Name, and Email Address (Email 1) into the relevant fields and click the Save button.
Integrating with Cases
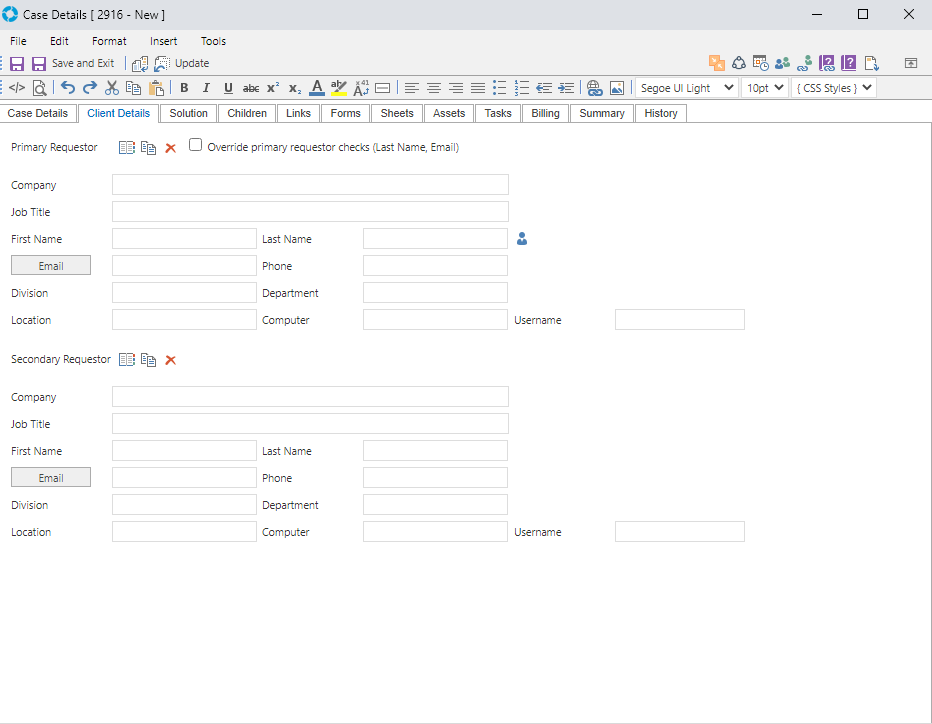
Step 1 Select the Team view or locate a Case you have created using the Case search options. Open the Case and go to the Client Details tab.
Step 2 Click the Browse Contacts button.
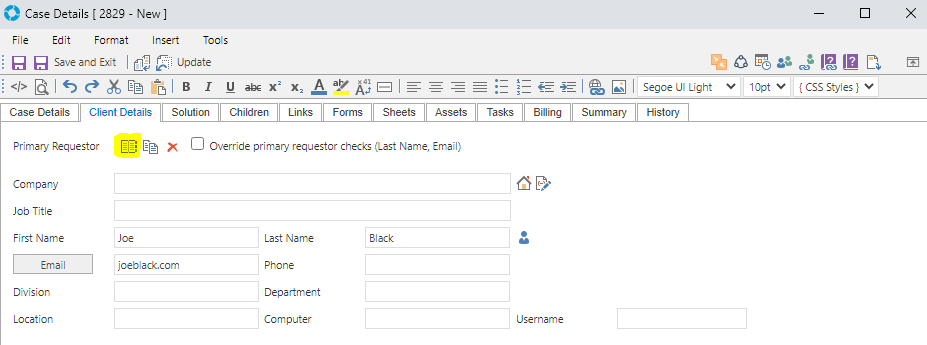
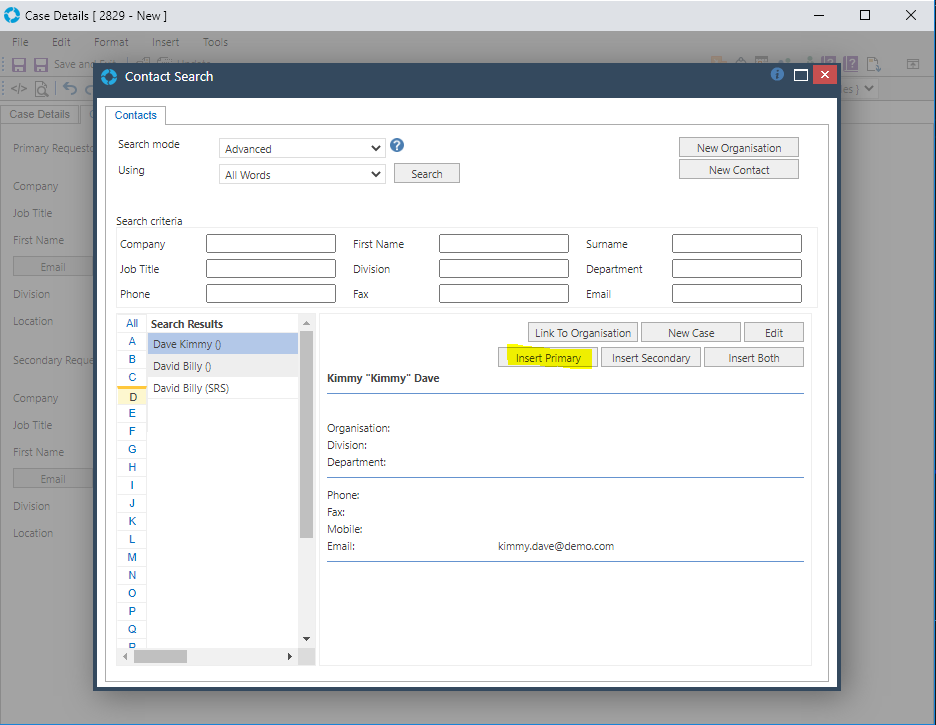
Step 3 Perform a search for your Contact Record that you created previously.
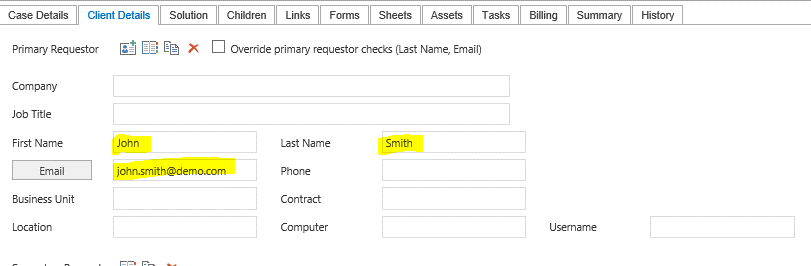
Step 4 Select the Contact Record and click the Insert Primary button to insert the Contact as the Primary Requestor of the Case.
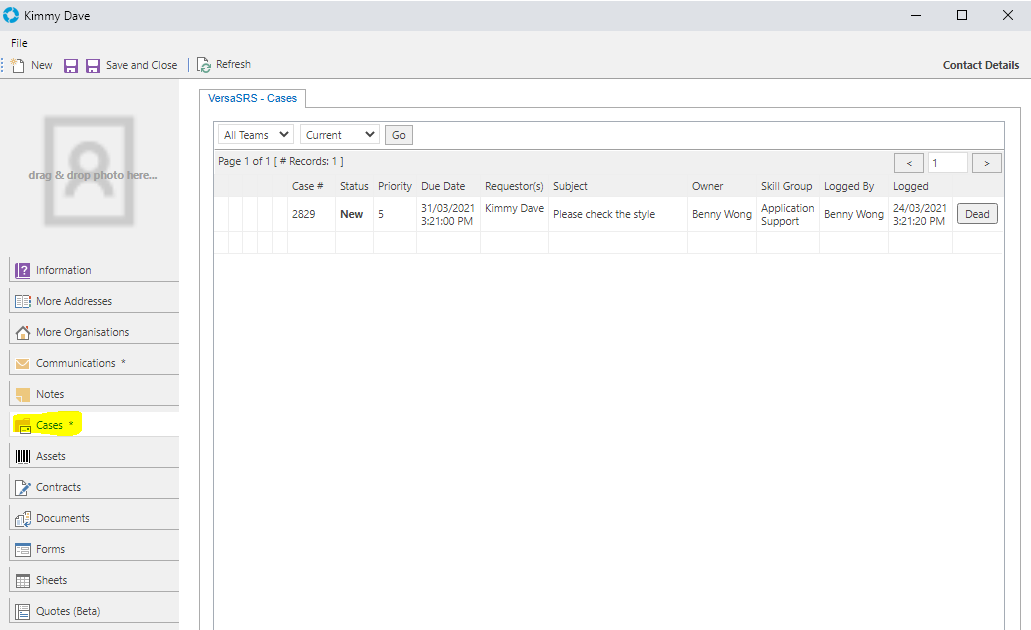
Step 5 Click Save on the Case and then click the Client Details tab again. Notice that this time there is the Go to Contact icon indicating that this Case is now linked with the matching CRM Contact.
![]()
Step 6 Click the Go to Contact icon, as shown in the above picture, on the Client Details tab in the Case to go to the Contact Record in the CRM.
Step 7 Click on the Cases tab on the left side of the Contact.
Step 8 You will see that this Case is now part of the Contact Records Cases.
Exercise 5 - Reassigning Cases
The aim of this exercise is to educate Users on how to Reassign Cases in versaSRS.
Scope
Reassigning Cases
Reassigning from a Case
Step 1 Open a Case that you have created in the previous exercises or create a new one.
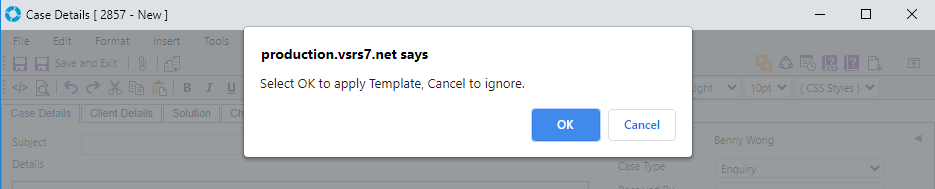
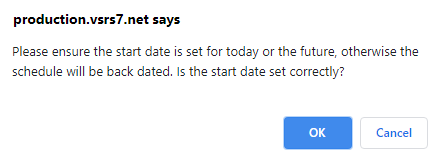
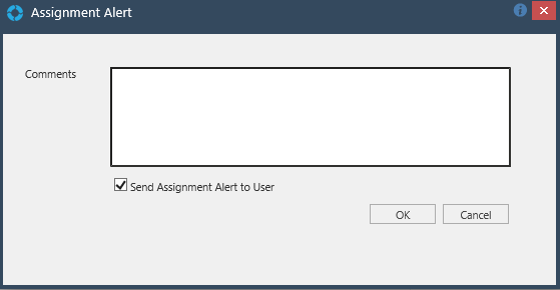
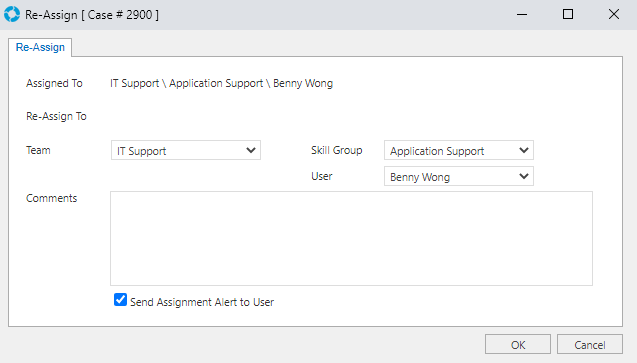
Step 2 Click the User drop-down and assign the Case to another member of the Team. You should be prompted with a message like the one shown below, click OK.
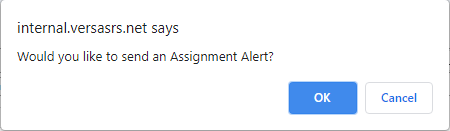
Step 3 Write a Comment and click OK, this will be included in the Assignment Alert that gets sent. The Assignment Alert is controlled by an Administrator created template in the Team settings under the Case Templates tab.
Step 4 Click Save on the Case to commit the reassignment.
Reassigning from Main Screen
Step 1 On the main screen ensure the view is set to the Team your Case is located in.
Step 2 Find the Case that you have created and right click on it.
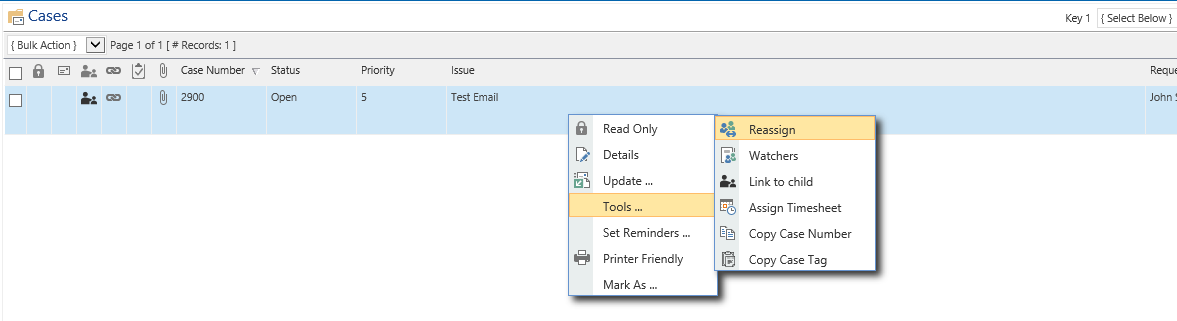
Step 3 From the Right-Click Menu Select Tools and then Reassign.
Step 4 Change the User and write a Comment then click OK.
Exercise 6 - Templates
The aim of this exercise is to educate Users on how to apply Case and Update Templates in versaSRS.
Scope
Case Templates
These can be applied when there is a known procedure or common issue solution, such as a Billable request or a solution for a Mail issue. This allows Users to apply a Case Template in these situations rather than manually categorising the Case by setting each field.
Step 1 Once logged in to versaSRS and on the main screen, select the Create New icon located on the navigation header at the top right of versaSRS and select Case to create a new Case, or select an existing Case.
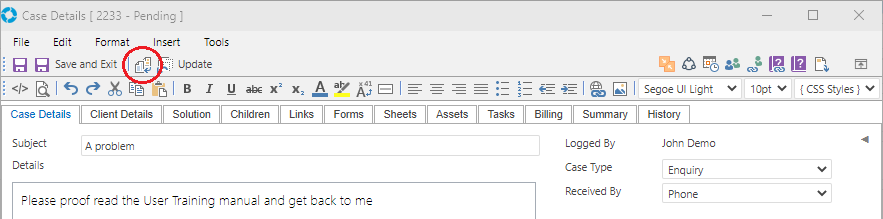
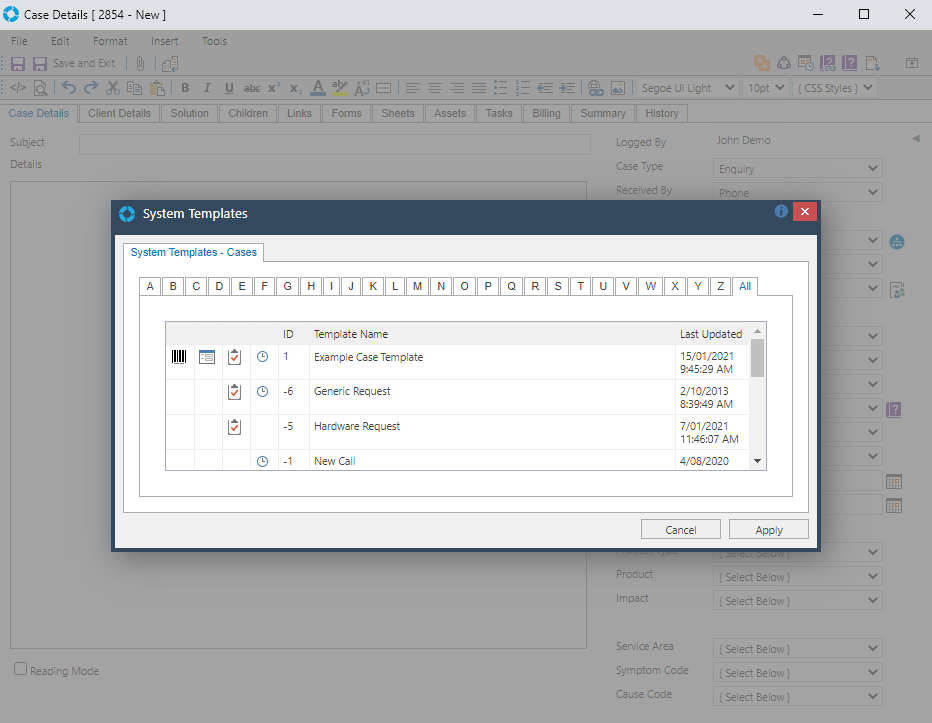
Step 2 On the Case screen click the Templates icon, this will populate a list of System (Case) Templates that you can apply to the Case.
![]()
Step 3 Select one of the Case Templates and click Apply.
Update Templates
Update Templates are great for defining standard responses or even to ensure branding headers and footers are included in outgoing emails from the Case.
Step 1 On an existing Case click the Update Button to launch the Update Screen.
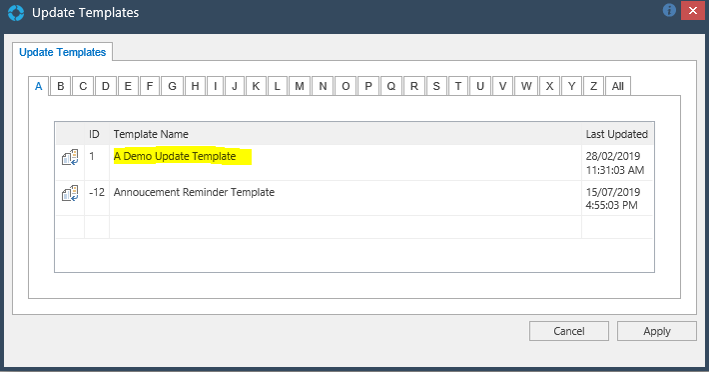
Step 2 On the Case Update screen select the Update Templates icon.
![]()
Step 3 Select any available Update Template and click Apply.
Step 4 If the Template's Update Type is set to 'Send Email' or 'Response to Requestors' the Update button will change to Send in the Update screen. Click the Send/Update button to Update the Case.
Exercise 7 - Reporting
The aim of this exercise is to educate Users on how to use the versaSRS Reporting Module.
Scope
Reporting Dashboard
Accessing Reports
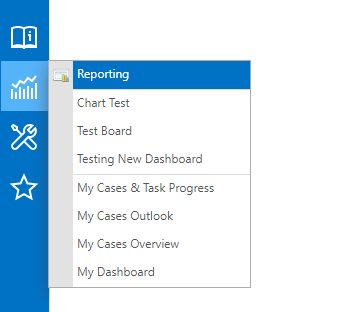
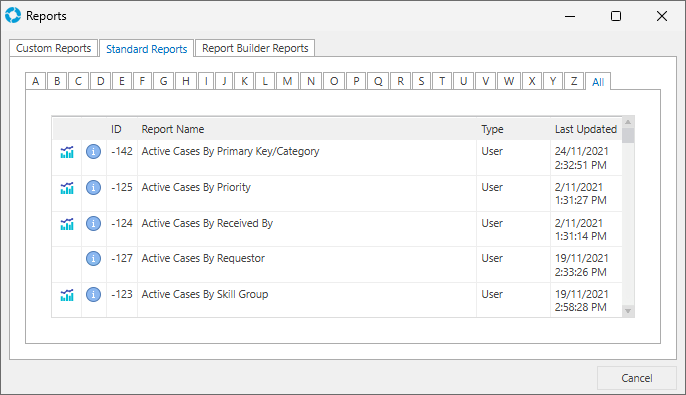
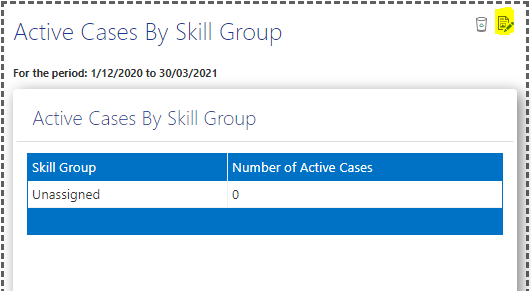
Step 1 Once logged in to versaSRS and on the main screen, select the Reports icon on the left navigation menu and click Reporting.
Step 2 On the Standard Reports tab double click the Report called Active Cases By Skill Group.
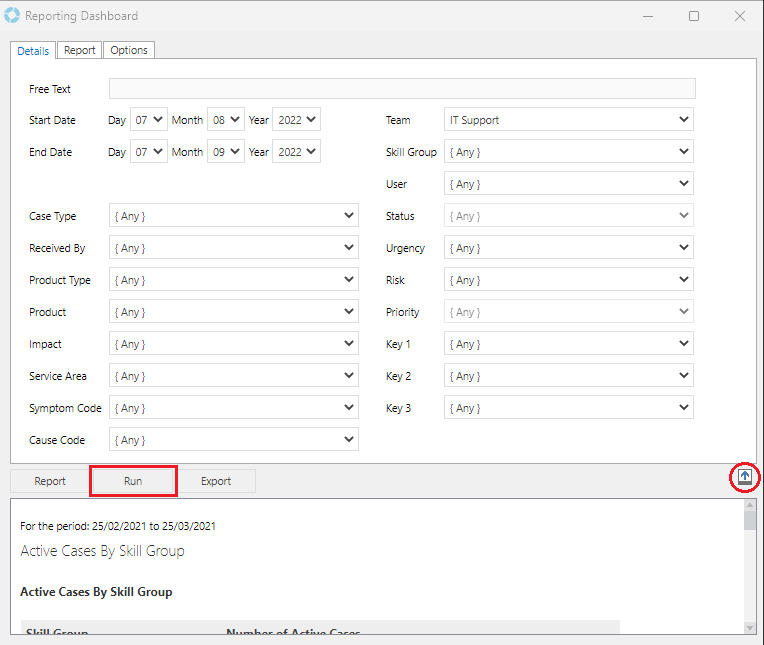
Running Reports
Step 1 Click Run to run the report with the currently selected, default parameters.
Exporting Reports
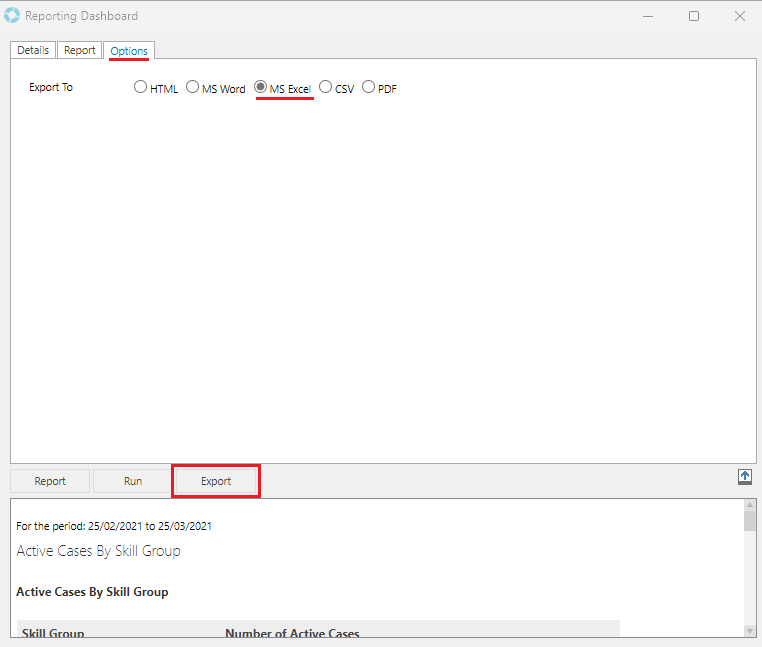
Step 1 Click the Options tab, underlined in the above picture.
Step 2 Check the MS Excel radio button option and then click Export.
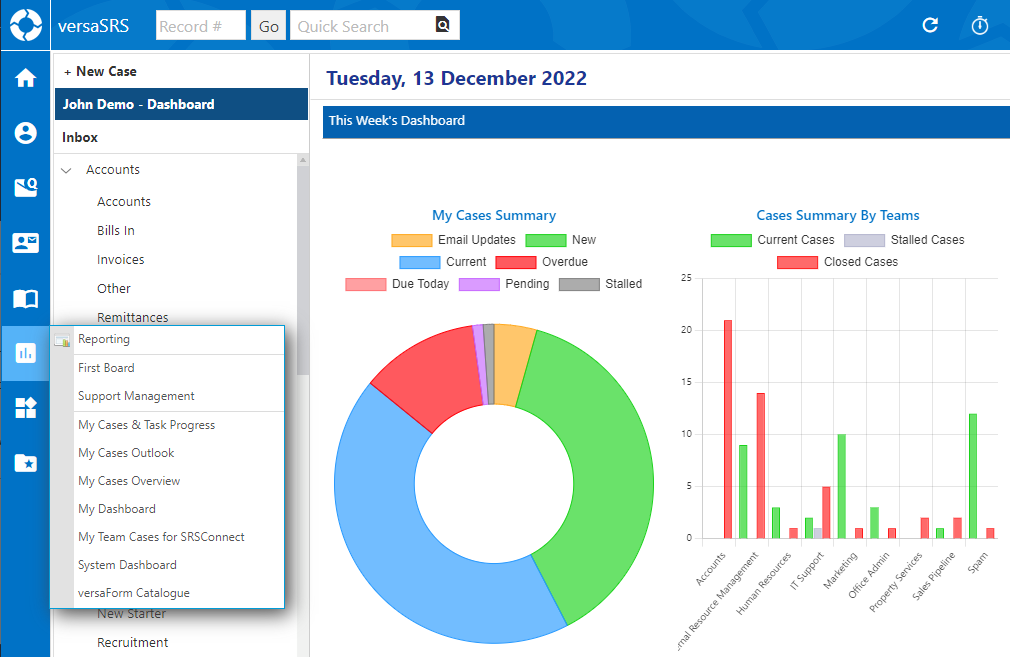
versaBoard Overview
versaBoard is a module in versaSRS that allows Reports from the Reporting Dashboard to be displayed graphically with charts and tables in a slide-show format. This can be used to present key reports on a screen in a rich graphic format that refreshes the displayed data at set time intervals, as well as being able to be triggered manually to ensure the data is up-to-date.
Please watch the short video below for an overview of versaBoard.
Launching versaBoard
Step 1 To launch versaBoard in versaSRS select one of the default versaBoards, example shown below, from the left navigation sidebar under the Reports icon. This will then display the versaBoard panel.
(e.g. https://yoursite/modules/versaboard/versaBoard.aspx)
Note: Not all of the controls shown will be available on every versaBoard. For example, System default boards cannot be edited, you'll notice there is no Toggle Designer control.
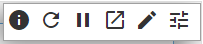
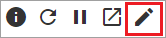
Information: The version of the versaBoard module.
Refresh: Refreshes the versaBoard.
Pause / Play: Pauses/Plays the slide show.
Pop-out: Pops the versaBoard out into it's own window.
Toggle Designer: Enter/Exit the design mode of the versaBoard. This is how to access the parameters for each Report and also the Toolbox where Reports can be added and new versaBoards created.
versaBoard Parameters: Access to the Global Parameters that apply to all reports on the versaBoard.
Creating versaBoard
Step 1 To launch versaBoard in versaSRS select the Create New icon on the navigation header then click the versaBoard option.
![]()
Step 2 This will then open a versaBoard Properties window.

The Public Access checkbox enables the versaBoard to be viewed in SRSConnect.
The Refresh Rate sets the Refresh time interval for the versaBoard.
The Publishing Queues drop-down enables the versaBoard to be viewed in the specified Team(s).
Step 3 Enter a name for the new versaBoard and select at least one of the Teams from the Publishing Queues drop-down list. Check the Active checkbox to activate the versaBoard then select Save to create the new versaBoard.
Step 4 The new versaBoard will be displayed on the main screen of versaSRS. From here the Header and Footer can be double clicked to edit them.

Editing / Deleting versaBoard
Step 1 Starting from the new versaBoard screen created in the previous exercise, click the Toolbox bar to the far left of the versaBoard. From here existing boards can be deleted, cloned, or edited by clicking on the icons next to the name of the versaBoard.
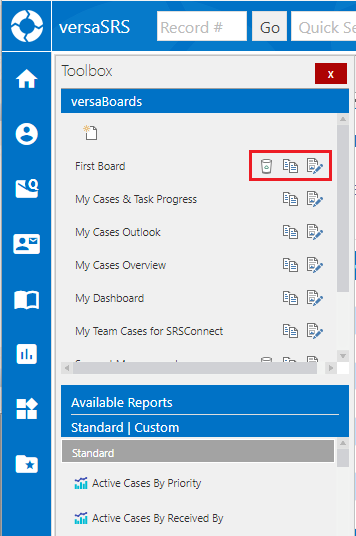
Step 2 Add at least one Standard Report to the versaBoard by dragging the desired report from the Toolbox onto the board.
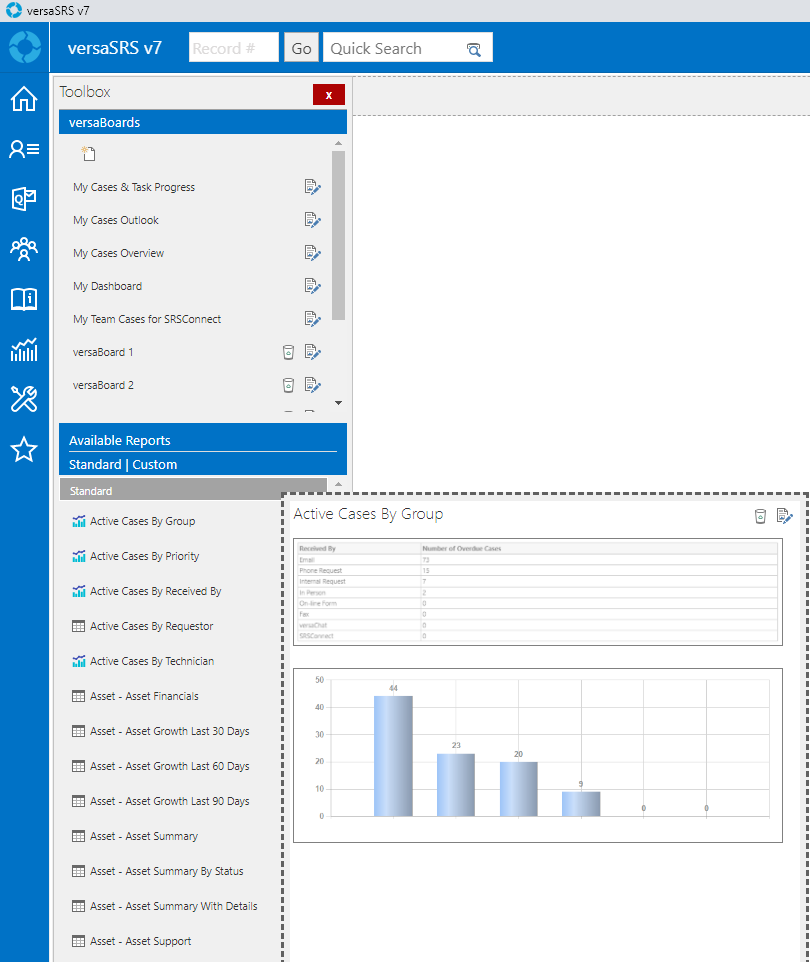
Step 3 Select the Edit button at the top right corner of the Report to customise the individual Report. Enter a Title in the Title field and change some of the drop-down options, then select Update to see how these settings affect the displayed report.
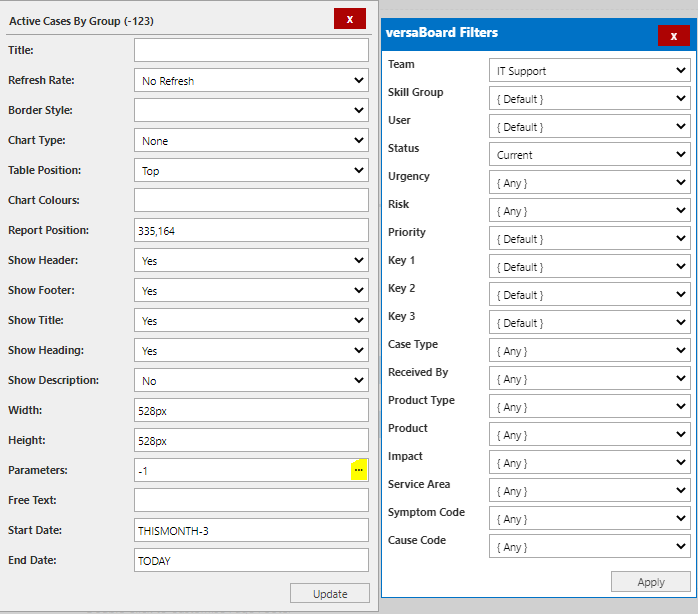
Step 4 Select Edit again then select the icon at the end of the Parameters field to display more report options. Change the Team selection, and click Apply then Update. The output for the report should have changed.
Step 5 Enable the Global Parameters that will apply to all Reports on the versaBoard. The Global Parameters option is displayed by selecting the Designer Mode icon from the versaBoard Controls. The Settings cog will then be shown as demonstrated in the image below.
Click the Settings cog then check the Display Parameters option, select OK to save.
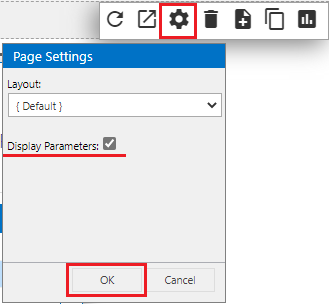
The versaBoard Parameters icon will then be added onto the control options menu.

Step 6 Exit the Designer mode by selecting the Toggle versaBoard icon from versaBoard Controls.

Step 7 Select the versaBoard Parameters icon, this will populate a versaBoard Filters screen where all report parameters can be configured at once. Change the current parameter selections and select Apply to save.
Setting versaBoard as Default View
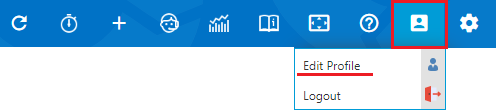
Step 1 Select Edit Profile under the User Profile icon on the top menu of versaSRS.
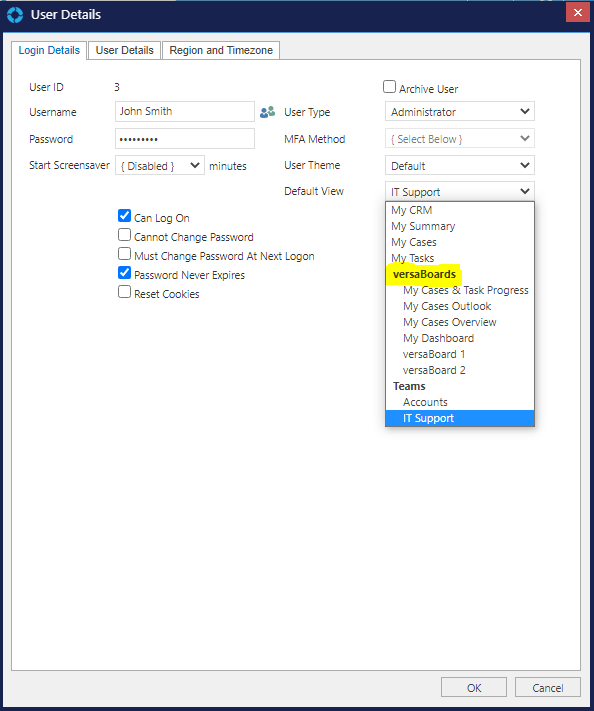
Step 2 This will display the User Details screen where versaBoard can be set to be a default page of versaSRS. Select the versaBoard you just created or any versaBoard of your choice as your Default View.
Step 3 Select OK to Save. The application will be refreshed and the selected versaBoard will be the Default View loaded on the main page.
Exercise 8 - versaForms (Enterprise License Only)
The aim of this exercise is to educate Users on how to create and apply versaForms in versaSRS.
Scope
- versaForms - Create and Edit
- Submitting Forms
- versaSRS Users - Forms only
- versaSRS Users - Forms with Case creations
- Non versaSRS Users - Forms with Case creations
- The areas where versaForms can be applied include:
- versaCRM
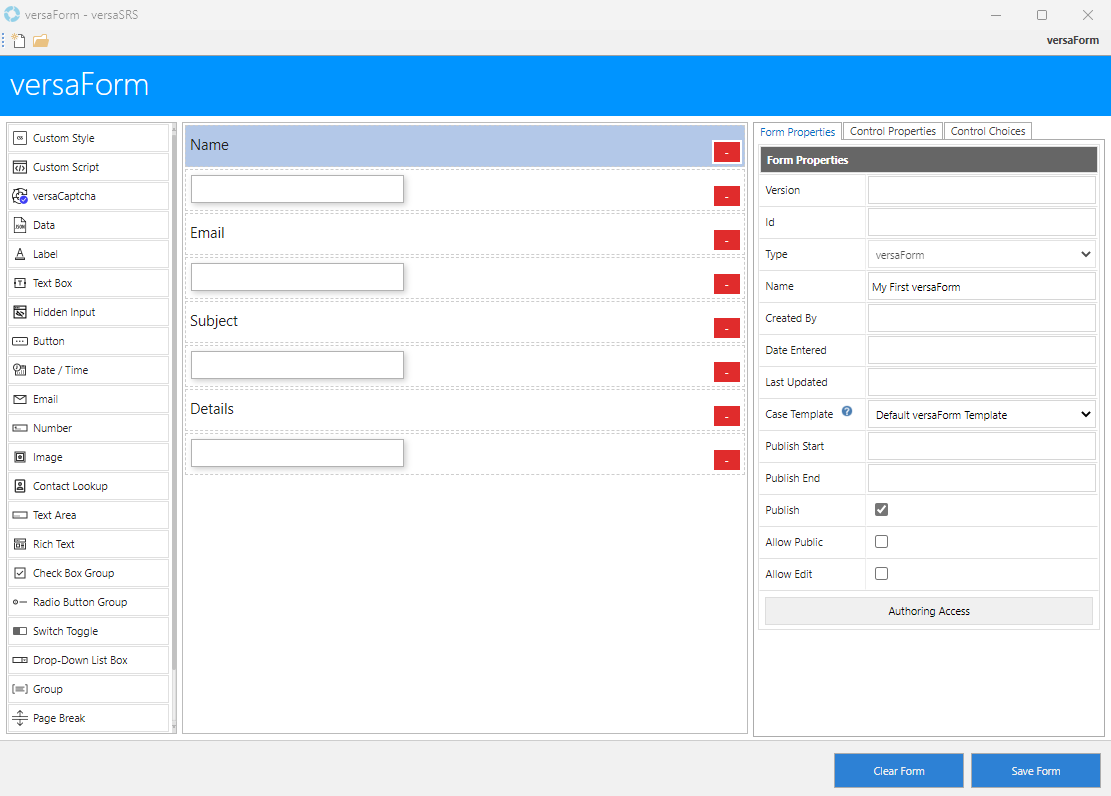
versaForms - Create and Edit
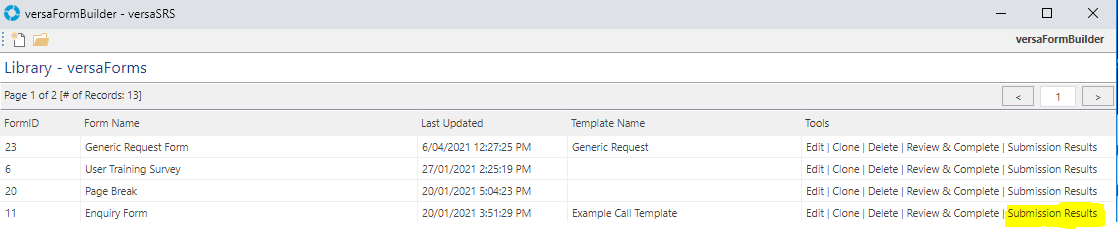
on the top left of the Global Settings as shown in the picture below.
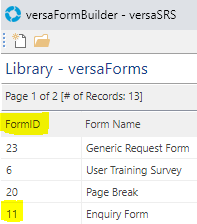
FormID: The ID of the Form, each one has its own unique FormID.
Form Name: The name of the Forms.
Last Updated: The last update for the Forms.
Template Name: The Case Templates used for the Forms.
Edit: It allows the Forms to be edited.
Clone: An exact copy of the Form will be created by selecting this.
Delete: Deletion of the Forms.
Review & Complete: Saved Forms can be reviewed and submitted by selecting this.
Submission Results: All submitted results of the Forms can be viewed, edited, and deleted.
 on the top left to create a new Form. This will open the versaForm editor where the Forms are designed and modified. Existing Forms can be double clicked to open.
Id: The ID of the Form. This is a non editable field, a New FormID is generated automatically after saving the Form.
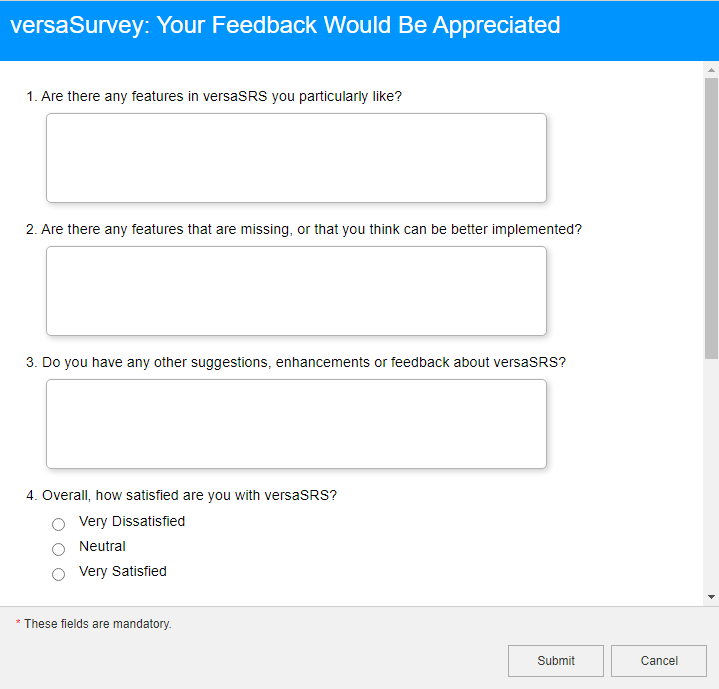
Type: The type of the Form. Options available: versaForm, versaSurvey
Name: The name of the Form.
Date Entered: This field is automatically populated by versaSRS with the date that the Form was created.
Last Updated: This field is automatically populated by versaSRS with the date that the Form was last updated.
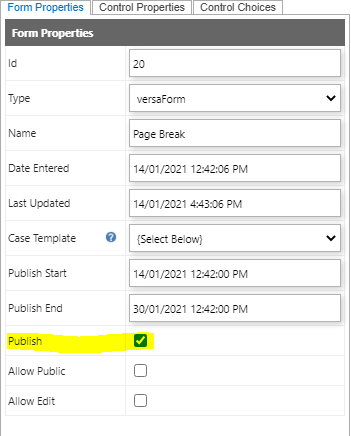
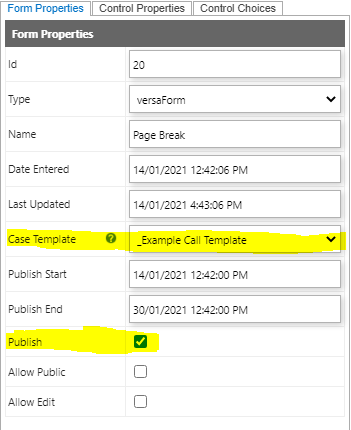
Case Template: Setting a Case Template in this field will log a Case in versaSRS when the Form is submitted. If a Case Template is not set then no Case will be logged when the Form is submitted.
Publish Start: The publication date of the Form.
Publish End: The end of the publication date for the Form.
Publish checkbox: Allows the Form to be published, meaning it can be viewed within versaSRS by other Users.
Allow Public: Makes the Form publicly accessible, allowing it to be viewed in SRSConnect and through external links.
Allow Edit: Allows other Users in versaSRS to edit the Form.
versaSRS Users - Forms only
versaSRS Users - Forms with Case creations
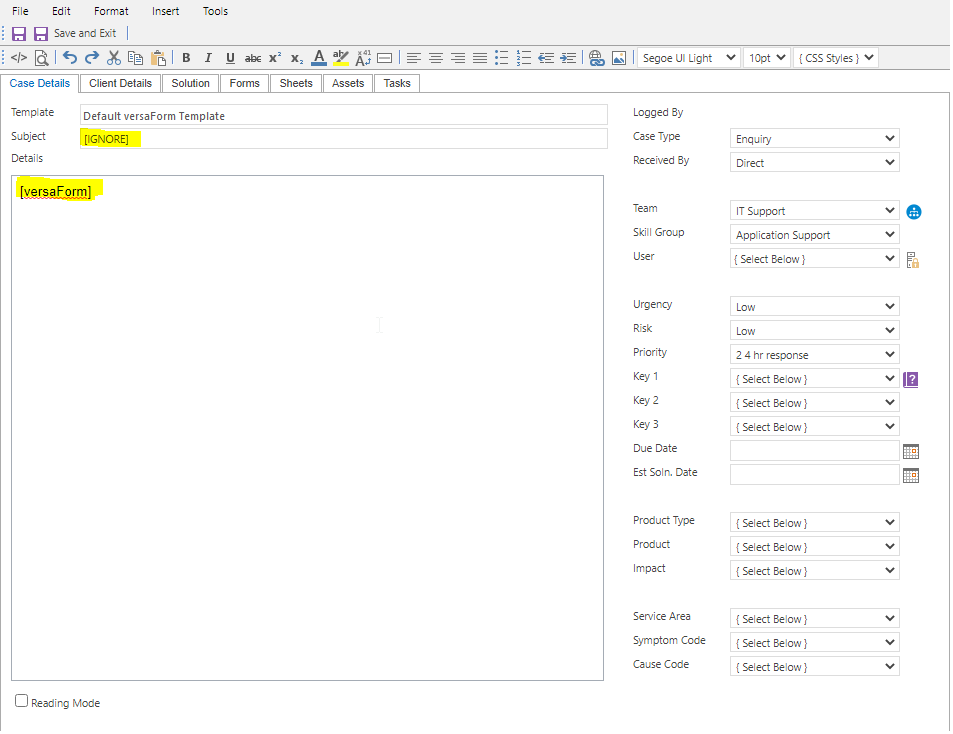
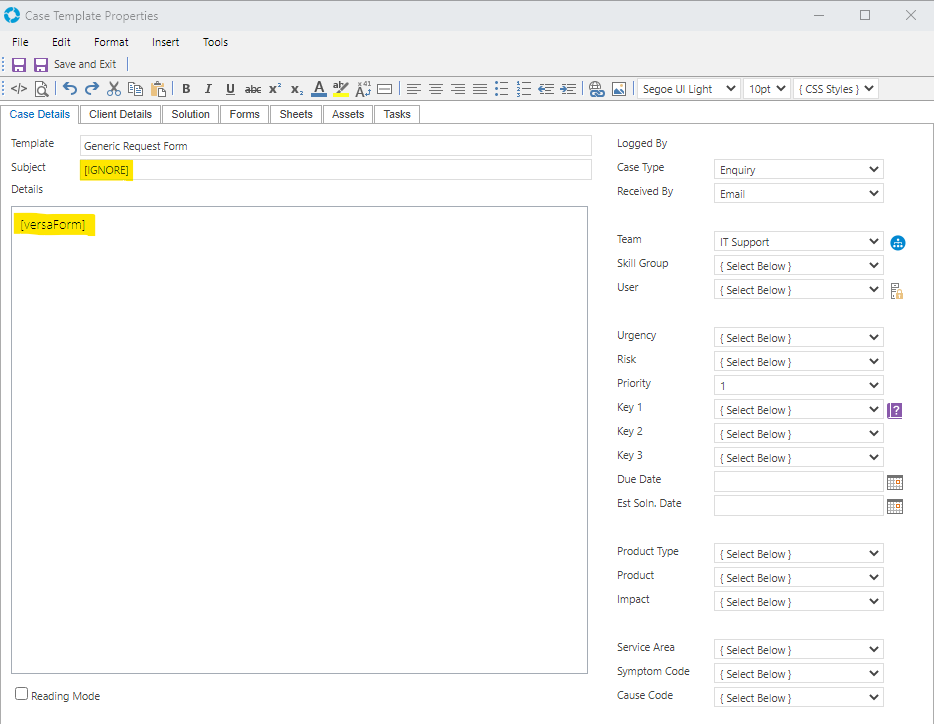
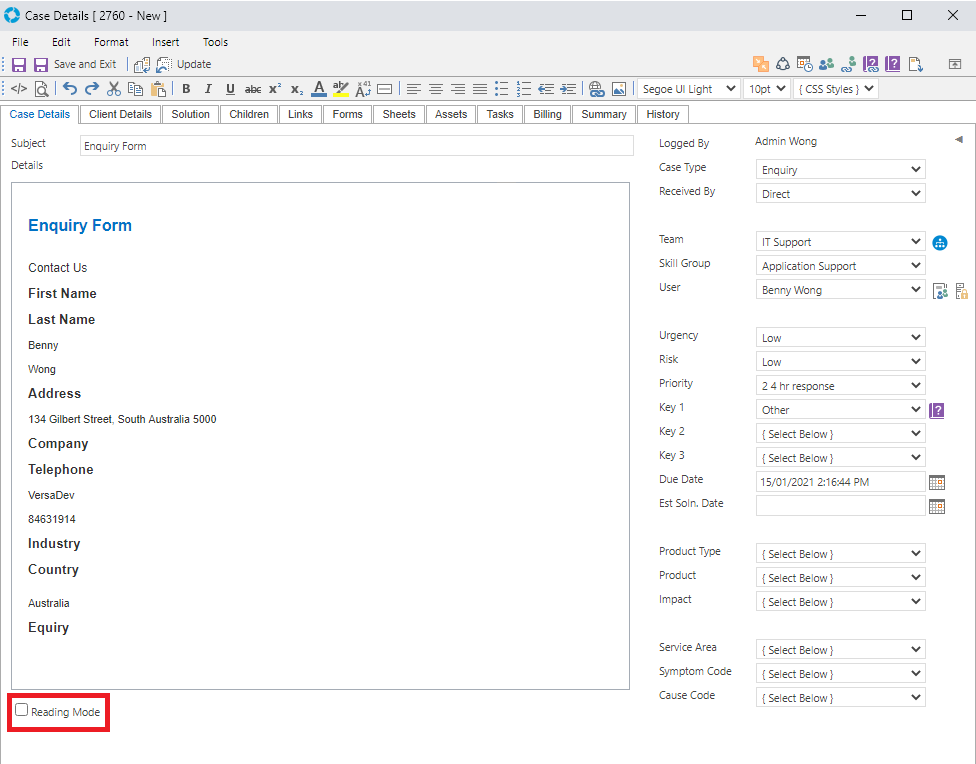
If Case Template has a [versaForm] tag in the Details, the created Case will show the details of the Form in the Details field.
If Case Template has a [IGNORE] tag in the Subject, the created Case will show the name of the Form as a Subject of the Case.
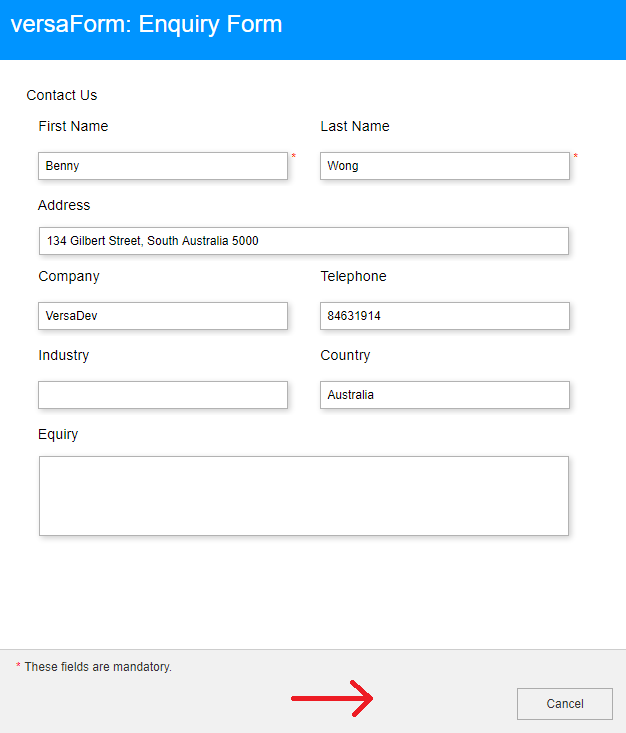
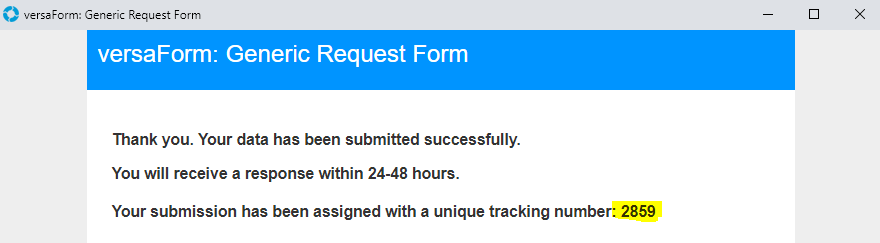
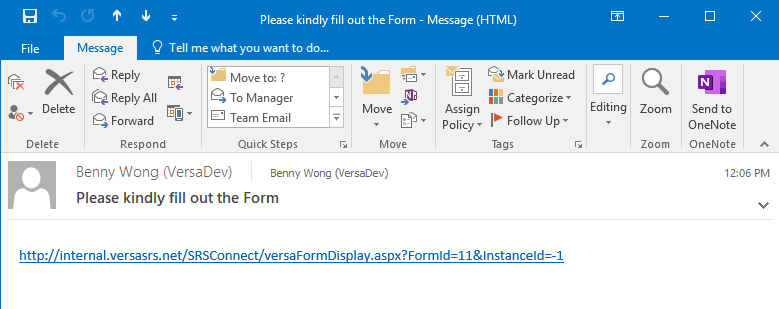
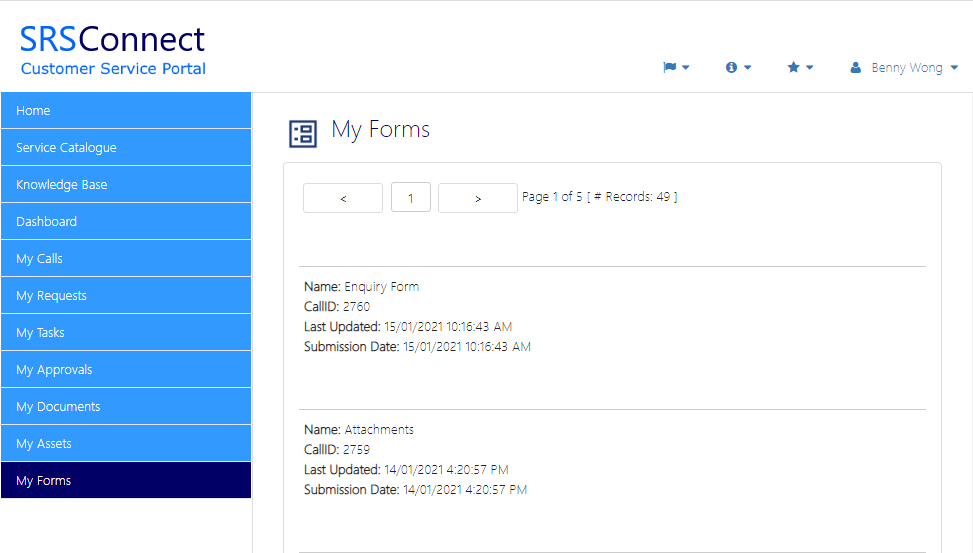
Non versaSRS Users - Forms with Case creations
For example: https://yoursite.net/srsconnect/versaFormDisplay.aspx?FormId=1&InstanceId=-1
The submitted Forms will then create a new Case which is visible to versaSRS Users if a Case Template is selected.


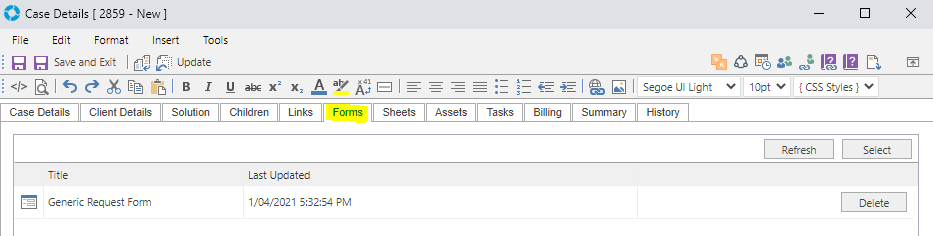
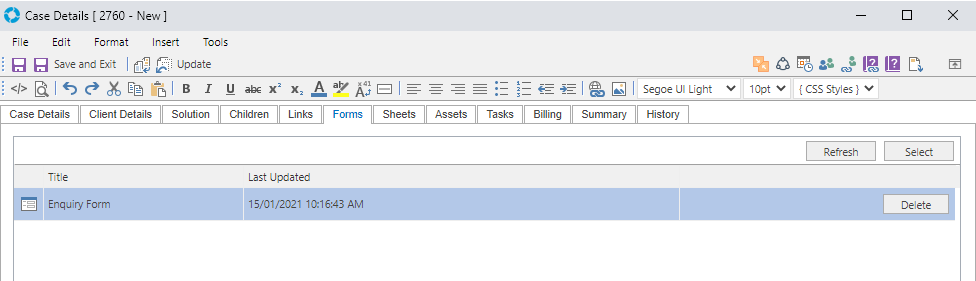
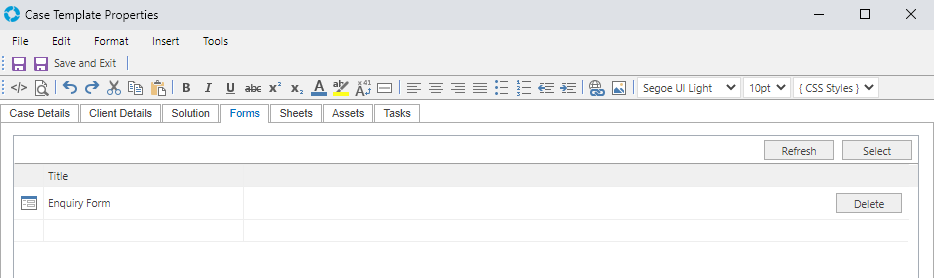
Cases - Forms tab
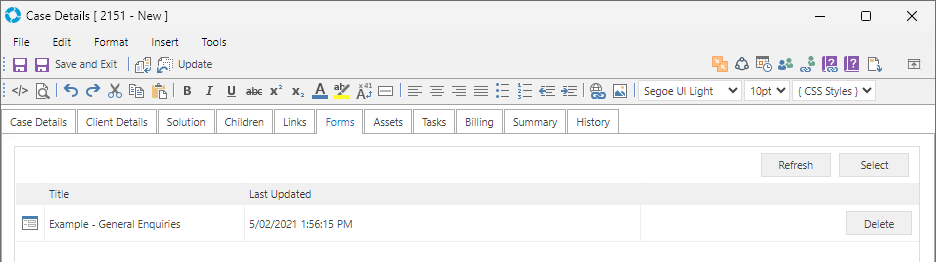
Case Updates - Forms tab
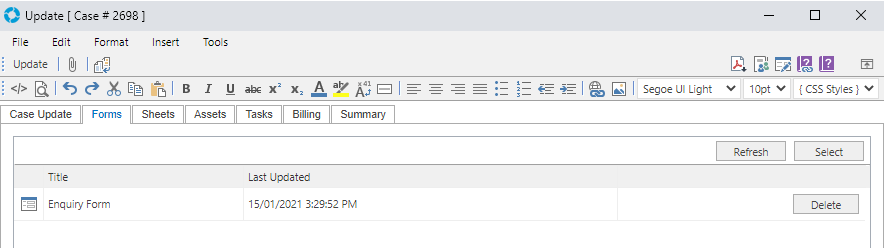
Case Template - Forms tab
Problems - Forms tab (Enterprise version Only)
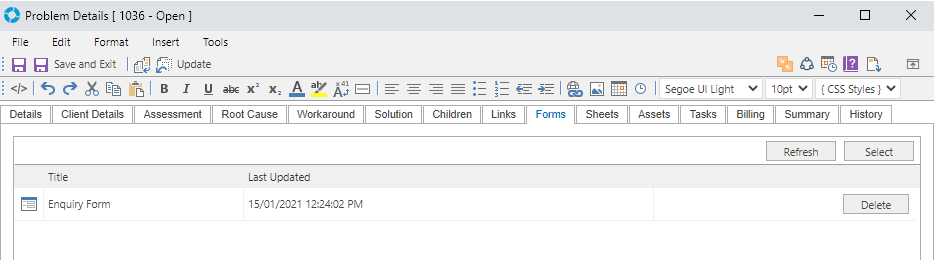
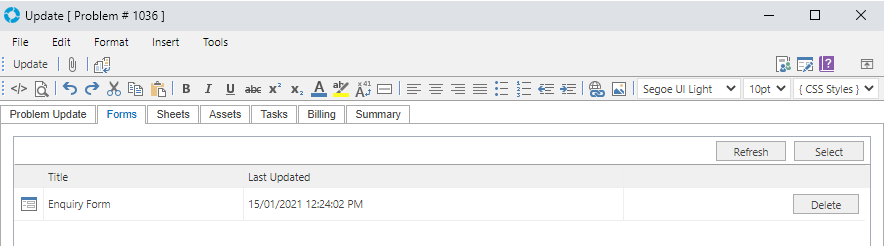
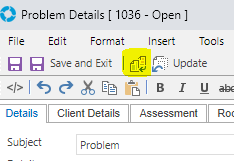
Problems Updates - Forms tab (Enterprise version Only)
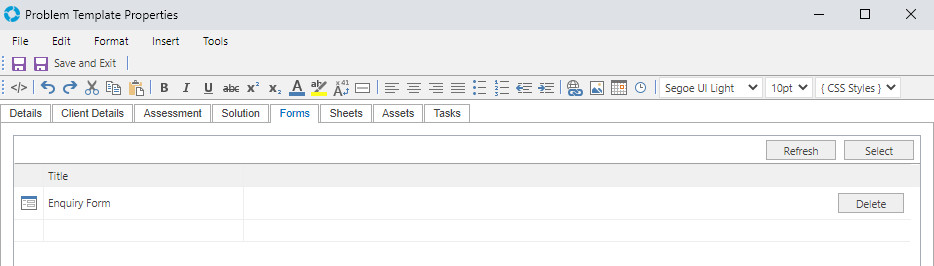
Problems Template - Forms tab (Enterprise version Only)
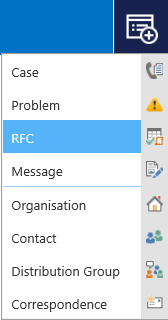
RFCs - Forms tab (Enterprise version Only)
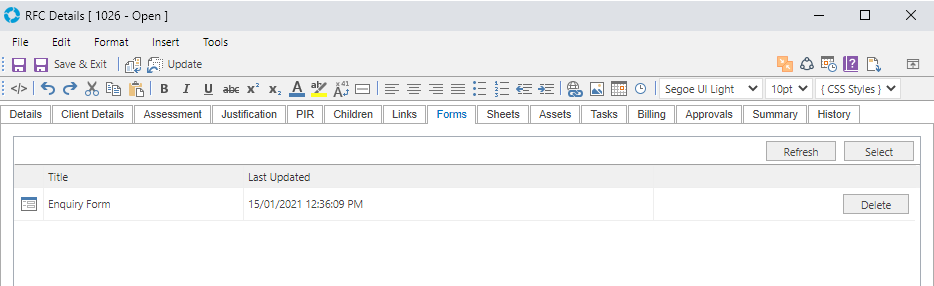
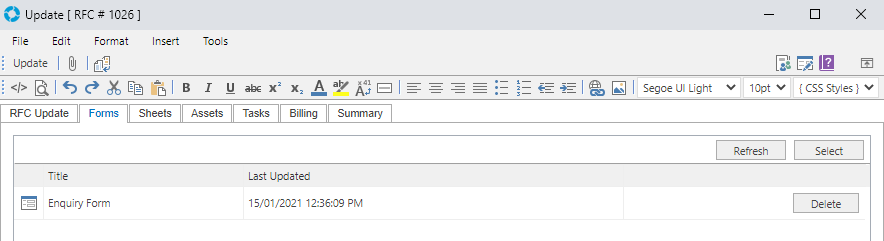
RFCs Updates- Forms tab (Enterprise version Only)

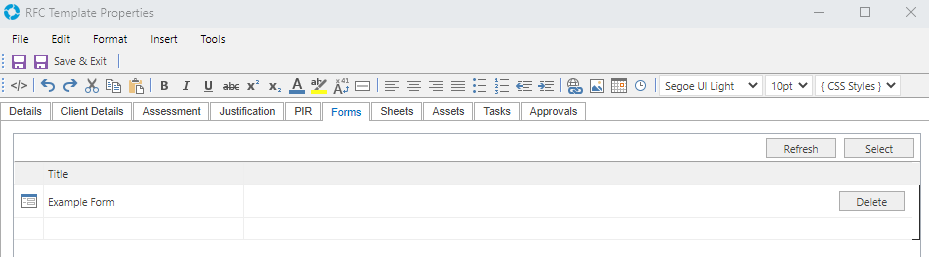
RFC Template - Forms tab (Enterprise version Only)
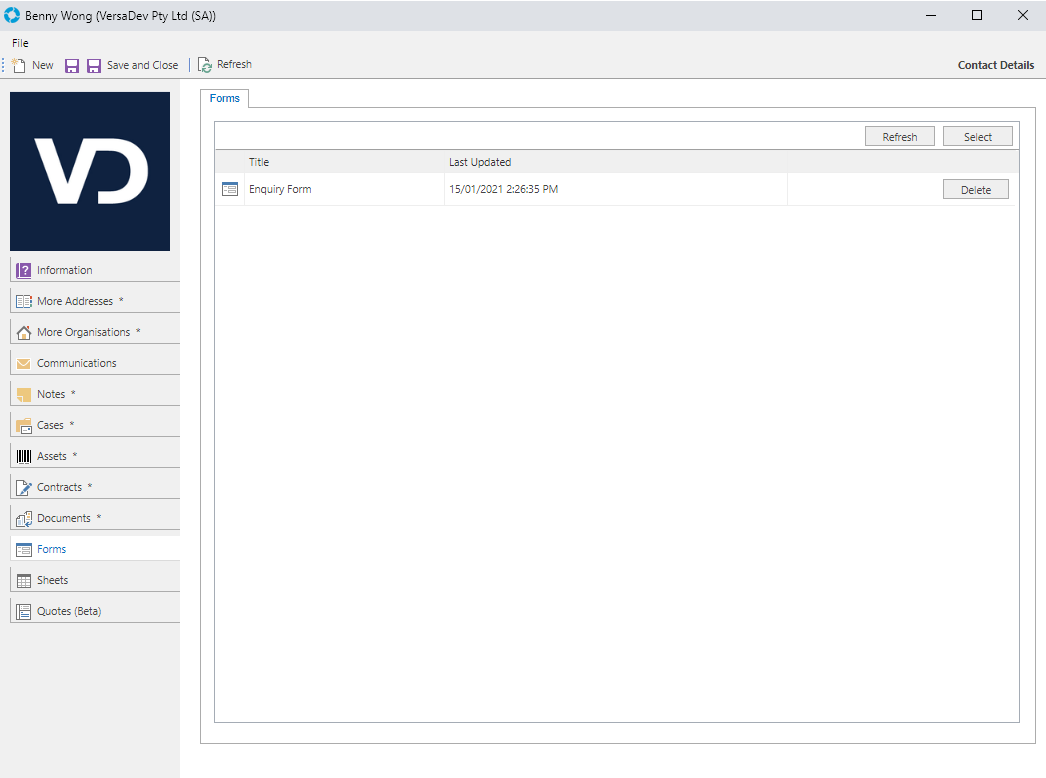
versa CRM Contacts - Forms tab

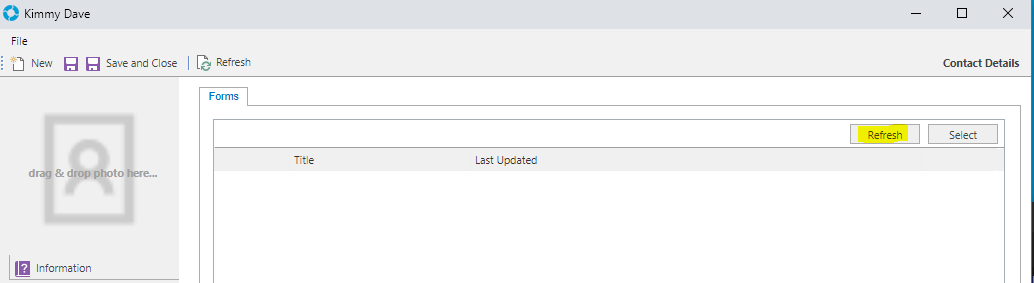
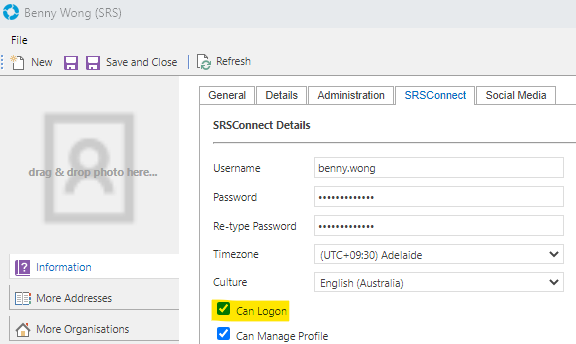
Note: The Can Logon checkbox must be checked as shown in the below picture.