Key Sets
Video Tutorial
Overview
versaSRS allows you to create unique Key Sets for each Team that enable a hierarchical structure within a Record (Case/Problem/RFC) to assist with categorisation, filtering, and Reporting.
Key Sets can drive Priority and Due Dates of a Record, as well as providing the ability to display a Custom Message to the User.
Pre-defined Case Templates can be configured to be applied to Cases based on the Key Set selection, making logging and completing a Case fast and efficient.
Update Templates can also be associated with Key Sets. If an update Template is specified for the Key Set assigned to a Record, when the Update button is clicked the Update screen will load with that Update Template.
Key Set combinations can also be used to display or link to particular Knowledge Base articles that relate to that Key Set.
It is possible to create Key Sets that only contain a Primary Key, or just a Primary and Secondary Key. If you find that when selecting Keys within a Record there is no Secondary and/or Tertiary Key available to select the Key Set likely does not have them specified. Check the Team Key Sets to confirm.
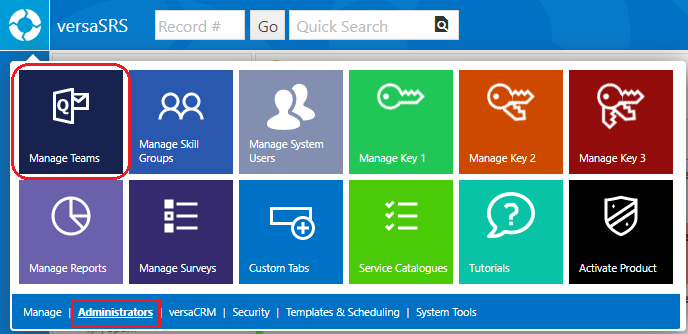
To create Key Sets select the Manage Teams icon from the versaSpinner - Administrators tab.
Within the System Teams menu select the Team you want to add Key Sets to and click Key Sets.
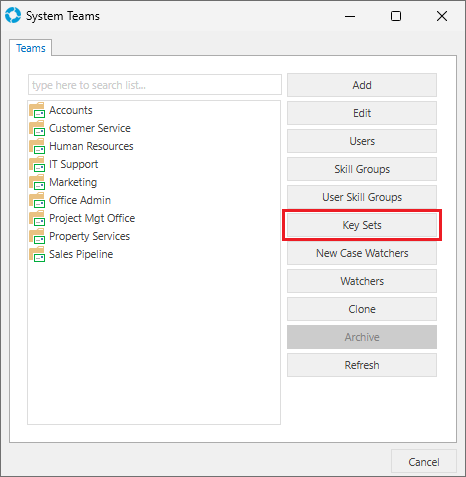
This will open the Key Sets window where key Sets can be added, edited, or removed. The Team you are managing Key Sets for is displayed towards the top left of the window.

- Select Keys 1, 2, and 3 as required. You may need to create Keys.
- Select the Priority setting. This allows you to set the default Priority for the given Key Set based on the Team's Priority Settings. This will assist with SLA compliance.
- Select the Case Template (Optional). Allows you to set a pre-defined Case Template that can be applied when the given Key Set combination is set for a Case.
- Select the Update Template (Optional). Allows you to set a pre-defined Update Template that will be applied within the Update window when the given Key Set combination is set for a Record.
- Enter information for the Message (Optional). The Message input here will be displayed to the User when that Key Set combination is set for a Record.
- Select the Add button to add the Key Set to the Team.
Key Set Import
There is also the option to Import previously created Key Sets. These can be imported either from other Teams or from a spreadsheet; download a blank Key Set import spreadsheet here.
Import from another Team:
- Open the Key Sets window for the Team you want to import the Key Sets to via the Manage Teams interface
- Select the Source Team from the drop-down list then click the Import button to add the Key Sets to the Team
Import from a spreadsheet:
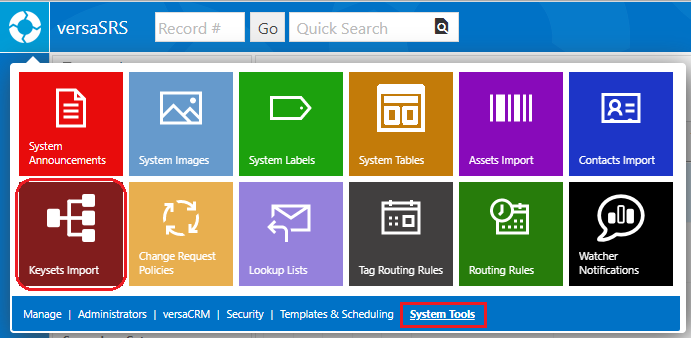
Open the Key Set Import interface by selecting the Keysets Import icon from the versaSpinner - System Tools tab.
Within the Keysets Import window perform the following steps:
- Select the Choose File button
- Find and select the Key Set import spreadsheet
- Click the Preview button to populate the Key Sets and allow the mapping to be selected; you may receive an error at this step:
- If it reads "Microsoft.ACE.OLEDB.12.0 provider is not registered on the local machine" you will need to consult this Knowledge Base article.
- If it contains text similar to "Message: 'Sheet1$' is not a valid name." the name of the Sheet in the spreadsheet file does not match the name in the Sheet Name field.
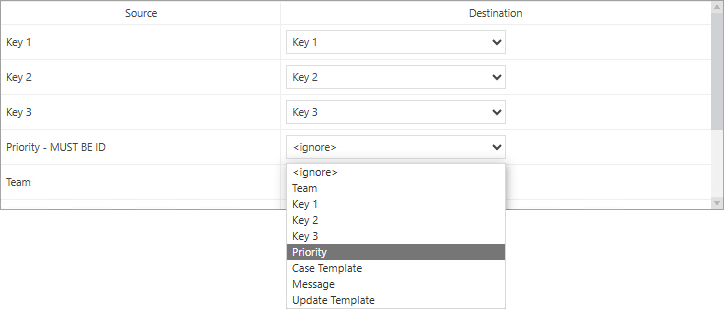
- Once the spreadsheet content has loaded the Mapping section will display the Source labels and Destination drop-downs.
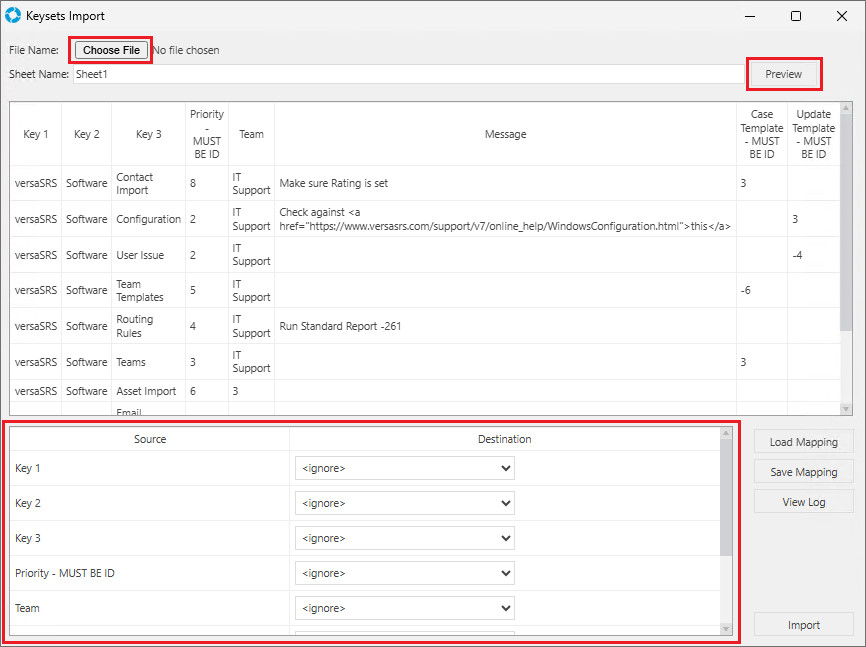
Select the relevant Destination field for each Source label, the Source labels correspond to the column headings in the spreadsheet.
If you have used the downloadable spreadsheet make sure the Source and Destination selections match (minus the label specifying the format the data needs to be in).
You can save this Mapping to be used for any future imports, to save the current selections press the Save Mapping button and name the file accordingly.
When you are satisfied the Mappings are all set correctly press the Import button.